Thursday, October 17, 2013

Chocolate Bats

I made some gingerbread bats that I thought were pretty cool, using a recipe from Good Cook, but then I thought, hey, wouldn't those bats be better if they were darker. Like, CHOCOLATE?

Um, did I just scream at you?

Sorry.

So, anyway, I knew I needed a recipe for chocolate cookies that wouldn't spread out much as they baked (like, for example, chocolate chip cookies) because that spreading would ruin the design.

Sugar cookies work well, but I wanted chocolate, and I wasn't in the mood to reinvent the wheel. Because as much as I like fiddling around with baking, sometimes it takes quite a few tries to get what I want.

Which is fine, if I've got the time. Right now, no time. But I still wanted chocolate bats. So, I went through my file of cookie recipes and found one that I'd copied from Epicurious that was credited to Dorie Greenspan. Unfortunately, it didn't note where the Dorie Greenspan recipe came from. She has a few books, so it could have been any one of them.

I've made a lot of Dorie Greenspan's recipes, and I've always had good luck with them. So I figured I'd give it a go.

I made a few changes to the recipe, because I wanted the bats as dark as possible. The Black Onyx cocoa I used is sold under a few different names - I think I've also seen it as Black Cocoa. It's usually used in combination with regular cocoa, so that's what I did here.

The espresso powder is not ground coffee beans, it's espresso that has been evaporated, leaving the powder. You can find it at King Arthur Flour (or other places, I'm sure) or you could use instant espresso or even instant coffee.

The flavor of these cookies is reminiscent of Oreo cookies, but these are sweeter than the cookie part of an Oreo. Which is fine, since these don't have that creamy sugary filling.

I did decorate some with an espresso sugar, though, and a bit of royal icing and some orange sugar decorations for the eyes.


Chocolate Bats

Adapted from a Dorie Greenspan recipe via Epicurious

2 1/2 cups (11 1/4 ounces) all purpose flour
1 teaspoon espresso powder
1/4 cup cocoa powder
1/4 cup Black Onyx cocoa powder
1/4 teaspoon baking powder
3/4 teaspoon salt
1/4 teaspoon baking soda
1 cup (2 sticks) butter, room temperature
1 1/3 cups sugar
1 egg
1 teaspoon vanilla extract

In a medium bowl, combine the flour, espresso powder, cocoa powders, baking powder, salt, and baking soda. Whisk to combine and set aside.

In the bowl of your stand mixer fitted with the paddle attachment, beat the butter until it's smooth, then add the sugar and beat until mixture is light and fluffy.

Add egg and vanilla, and beat until they are well incorporated. Add the flour mixture and beat on low speed until it is well incorporated. You don't want to see any powdery streaks, but you also don't need to beat the heck out of it.

Gather the dough into a ball, place it in a plastic bag, and flatten it. Refrigerate until well-chilled - figure about 4 hours, or you can do this the day before.

When you're ready to bake, pull the dough out of the fridge and preheat the oven to 350 degrees. Line a few baking sheets with parchment paper.

The dough needs to warm up a bit to make it easy to work with. Right out of the fridge, it's pretty solid. But you also don't want it super-soft. You might think the refrigeration step is silly, but it helps hydrate the flour and gives you a better cookie. I tend to refrigerate most of my cookie doughs, even if the instructions don't call for it.

Lightly flour your work surface. Working with 1/2 or 1/3 or 1/4 of the dough at a time - whatever is easiest for you, roll the dough to about 1/8 to 1/4-inch thick (depending on the cookie and your particular taste and measuring skills).

Use whatever cookie cutter you like, cut shapes from the dough and place them on your prepared baking sheets. These won't spread a lot, but they will expand a little bit, so leave a bit of space between them.


You can add decoration before baking if you like - the espresso sugar was added before baking. For the bat's eyes, I added the sugar decorations ahead of time, then after they were baked, I put another decoration on top of the first. The first ones helped form a hole in the dough for the fresh decorations added later. You can simply add the decorations after baking, but I find that it doesn't work as well. But do it any way you like.

If the dough gets too soft and mushy, refrigerate again until it firms up. It chills a lot faster if you flatten it.

Continue rolling and cutting until you've used all the dough. You can reroll the scraps as many times as you need, but keep in mind that you're adding more flour when you roll the dough - try to keep that flour to a minimum so your subsequent cookies won't suffer as much.

 Bake at 350 degrees until the cookies are just barely browning on the edges. It's kind of hard to tell with dark cookies like this, but you will see a slight color change. The cookies should also be firm on top, not soft and mushy. It took about 15 minutes for the bats, so figure 10-18 minutes, depending on the size and thickness of your cookies.

Remove the cookies from the baking sheets and let them cool completely on racks. They'll be soft when warm, but will become firm and crisp as they cool.

If you like, decorate with royal icing (recipe here), colored sugars, or whatever madness strikes you. After the haunted house I decorated, I was satisfied with just the colored eyes.

Wednesday, October 16, 2013

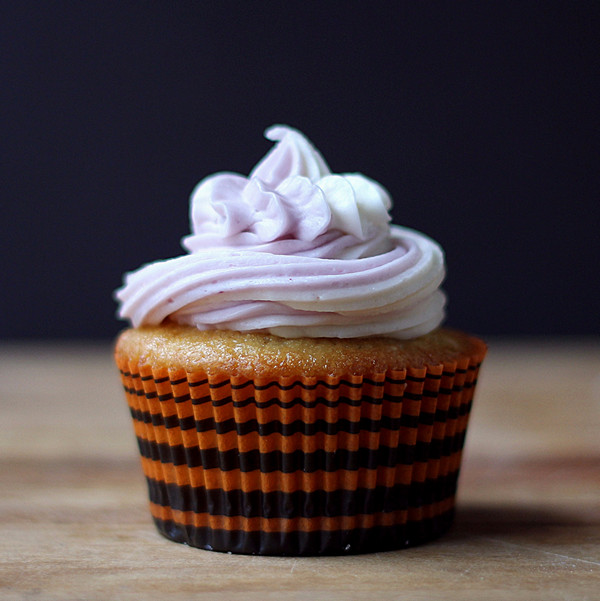
Yellow Cupcakes, 101 Classic Cookbooks, and Halloween Stuff

Sometimes I think I'm smarter than I am.

Case in point. I found a cake recipe in the cookbook 101 Classic Cookbooks, and I decided I could simultaneously cut the recipe in half, make cupcakes instead of cake, and tweak for high altitude. Without a calculator.

Yeah, that didn't work at all.

I think I've adjusted pretty well to high altitude cooking. I still think in sea level and I tend to make adjustments on the fly. For cakes and quick bread and muffin-like creatures, measure the sugar and leavening a little light and measure the liquid a little heavy.

It works most of the time and I don't have to break out the 1/8 teaspoons or measure 1 cup of sugar minus one tablespoon. And some recipes work just fine without any adjustment.

Muffins and cakes usually aren't a problem for me. Cupcakes on the other hand ... well, when they go wrong, the over-rise while they're still too soft, then they spread out on the pan and then they flatten. So they become a flat, mushroom-like thing.

 Cupcakes baked in the lower part of the oven (like when I'm trying to bake 2 dozen at a time) tend to fare worse than those baked in the middle or higher.

And I shouldn't ever try to fill the cupcakes more than 2/3 full. Half-full is sometimes perfect. 3/4 full sometimes works, but it depends on the recipe.

I know all of that. Sometimes I don't do what I know I should do. And I sometimes end up with very sad cupcakes.

The adjustments I made to the recipe in 101 Classic Cookbooks to cut the recipe in half might have worked at sea level. Here, not so much. The cupcakes rose way too much and then spread across the top of the pan, forming a giant flat surface.

Not so good.

So I took one more stab at it, this time making some more adjustments. The new recipe is pretty far from the original. Same ingredients, but I really messed with the quantities. And the method. Just because.

So, if you're curious about the book, it includes recipes from - you got it - 101 different cookbooks spanning a huge range of time, beginning in 1896. The front part of the book has photos from the original books and it goes in chronological order. The second part of the book has recipes listed in more common groupings, so you can browse appetizers, soups, or whatever strikes your fancy.

This would be a GREAT Christmas present for anyone you know who likes to cook. Or who wants to like to cook. Or who collects cookbooks. Or someone who only wants a few books on the shelf It's like a huge library in one tome. No need to buy 101 books ... or, it could help someone decide which of those 101 books to buy. Either way, it's a pretty cool book to have.

And now, onto the cupcakes.

What I liked about this particular recipe was that it included volume, weight, and metric measures. I also included the conversions to weight/metric as found in the book. Ounces are weight measures, unless it says fluid ounces)

The ingredients in the All-Occasion Downy Yellow Butter Cake from The Cake Bible by Rose Levy Beranbaum (and found in 101 Classic Cookbooks) were:

6 large egg yolks (3.5 fluid ounces, 4 ounces, 112 grams)
1 cup milk (8.5 ounces, 242 grams)
2 1/4 teaspoons vanilla (9 grams)
3 cups sifted cake flour (10.5 ounces, 300 grams)
1 1/2 cups sugar (10.5 ounces, 300 grams)
1 tablespoon plus 1 teaspoon baking powder (19.5 grams)
3/4 teaspoon salt (5 grams)
12 teaspoons butter (6 ounces, 170 grams)

The instructions are a little different than a typical cake recipe, starting with blending the dry ingredients with the butter and part of the milk, then adding the mixed egg, vanilla and the remaining milk in several additions. Not radically different from normal cake instructions, but a little different.

The recipe was intended for two 9-inch round cakes for a layer cake, baked for 25-30 minutes. But I wanted cupcake, and not a big batch.

So, after my first little disaster, this is where I ended up:

Yellow Cupcakes
Inspired by101 Classic Cookbooks
Makes 1 dozen cupcakes at high altitude

2 large eggs
1/2 cup milk
1 tablespoon vanilla extract
5 1/4 ounces all purpose flour (this is about 1 1/8 cups if you assume that all purpose flour weighs 4 1/2 ounces per cup)
1/2 teaspoon salt
1 1/2 teaspoons baking powder
3/4 cup sugar less about 1 tablespoon
3/4 stick (6 tablespoons) unsalted butter

Preheat the oven to 350 degrees and line a 12-cup cupcake pan with paper cupcake liners.

Combine the eggs, milk, and vanilla extract in a bowl - or do it the easy way - measure the milk in a measuring cup and add the eggs and vanilla extract. Beat with a fork just to break up the yolks. Set aside.

Combine the flour, salt, and baking powder in a medium bowl. Whisk to combine. Set aside.

In a large bowl (or in your stand mixer fitted with the paddle attachment) combine the butter and sugar. Beat until smooth. Add the flour mixture, 1/3 at a time, alternating with two additions of the milk mixture, beginning and ending with the flour mixture, beating well after each addition, so it's well combined. Scrape down the bowl as needed.

You get what that means, right? 1/3 of the flour, half of the milk mixture, another 1/3 of the flour, the last of the milk, and the last of the flour - beating well after each addition. You don't have to be accurate about the 1/3 or the 1/2 - just eyeball it.

Divide the batter into the 12 cupcake cups. Bake at 350 degrees until the cupcakes bounce back when lightly touched on the top and a toothpick inserted in the center of one comes out clean - about 25 minutes.

Remove the cupcakes from the pan and let them cool completely on a rack before frosting.

Here's the frosting I used.

Tuesday, October 15, 2013

GingerBOO Haunted House

I think this is my favorite detail on the house.
I've made plenty of gingerbread houses before. Big ones, small ones, simple ones, crazy ones ... all for Christmas.

But I never thought about building a Halloween-themed house until I got a haunted house cookie cutter kit from Sweet Creations by Good Cook. The kit I included the 3 required cutters (front/back, sides, and roof) and some decorating tools.

Perfect.

This is exactly the kind of crazy project I love - baking, getting messy, and being a little bit silly.

Is he climbing out of the house or trying not to fall in?
I was going to use one of my usual recipes when I realized that the recipe on the back of the box was a little different from what I normally do. Not the flavors or ingredients, but the technique. This one begins by boiling the molasses and brown sugar, just like you'd do if you were making some kind if candy.

So, I figured I'd give it a try.

I skipped the ginger - to me, gingerbread is a Christmas thing. But a nice molasses cookie is fine for Halloween.

Gingerbread Haunted House
Adapted from Good Cook

1/3 cup packed brown sugar
1/3 cup molasses
1 teaspoon baking powder
1 stick (8 tablespoons) unsalted butter at room temp
1 large egg yolk, beaten
1 teaspoon vanilla extract
1/4 teaspoon salt
2 cups flour, plus more as needed
1 teaspoon cinnamon
1 teaspoon ground ginger (I didn't use this)

Put the brown sugar, molasses, cinnamon, and ginger (if using) in a medium saucepan. Bring to a boil over medium heat, stirring. Remove from the heat and add the baking soda. It will foam up - that's what it's supposed to do - don't fret about it.

Add the butter a tablespoon at a time (you don't have to be accurate - just add lumps of butter) stirring well after each addition until the butter is incorporated.

Add the egg, vanilla, and salt and stir to combine.

Add the flour, 1/2 at a time, stirring well to incorporate the flour after each addition.

Flour your work surface and turn out the dough. Knead the dough, adding flour, if needed, until the dough is no longer sticky. It should still be soft - it will firm up a lot as it cools.

Wrap the dough in plastic wrap or put it in a plastic bag. It helps if you flatten it at the point - it will make rolling easier, later. Refrigerate until well-chilled - at least 2 hours or overnight.

In theory - if you're in a real hurry - you could skip the chilling step. But at this point you've got a warmish dough that - if you didn't go crazy adding flour - is still very soft. It needs a bit of chilling to be firm enough to roll the dough evenly, cut it, and move the pieces without them mangling themselves into odd shapes.

Refrigerating also helps hydrate the flour, which results in a better cookie. I tend to refrigerate all my cookie doughs, even if the instructions don't call for it.

When you're ready to bake, take the dough out of the fridge, preheat the oven to 350 degrees and line 2 baking sheets with parchment paper.

Flour your work surface lightly and divide the dough in half. Roll the first half to 1/8 inch thick and cut as many pieces from the dough as you can.

When the dough first comes out of the refrigerator, it will be quite hard, but it will soften as you begin to work with it. If you flattened the dough as I suggested, it will be a lot easier than if you left it as a ball. If the dough gets too soft and mushy as you work with it, put it back in the fridge for another little rest.

You should be able to cut the front and back house pieces as well as one of the sides or a roof piece from the first half of the dough, depending on the shape you rolled. If you can't get at least that many pieces, think about rolling the dough thinner - this makes crisp cookies rather than a cakey gingerbread, so the pieces can be very thin.

You should be able to cut the rest of the required pieces from the second half of the dough, or you might need to re-roll the scraps to get the last piece or two.

If you're using the same kit I used, you'll need a total of two pieces from the front/back, two sides, and four roof pieces. If you're using a different template, just make sure you can cut about half the pieces from the first half of the dough.

When you place the front/back pieces on the baking sheet, flip one upside down. The back and front pieces need to be mirror images of each other when you bake them, or the back of your house will have to be the bottom side of the cookie. Which isn't terrible, but it won't have the same look at the other sides.

Roll the second piece of dough to the same thickness and cut as many more of the required pieces as possible. Use the decorating functions of the kit to emboss it with the designs, or leave the pieces plain. Or add your own embellishments. Carefully transfer the pieces on the baking sheets.

Or - to make sure you don't mess up the shape of the cookies when you're transferring them, you can put the cookie dough on the parchment, cut the shapes, then remove the scraps from around the cookie pieces. This ensures that your cookies are exactly the right shape, but you might not be able to fit as many pieces on the baking sheets.

Since this is a spooky Halloween house, it doesn't really matter if the edges are a little wonky, but it will fit together better if all the shapes are correct.

Bake the cookie pieces at 350 degrees until the cookies are barely browning on the edges - 12 to 18 minutes. Move the pieces to a rack to cool completely before assembling.

If you have extra dough after you've cut all the required pieces, you can gather it together, re-roll it, and cut regular cookie shapes or decorative pieces for the house.

Assemble the house with royal icing and decorate as desired. I used some gel paste coloring added to the royal icing, and I also used some food-writer pens to color and add details.

I did some of the decorating before I assembled the house, which made a whole lot of sense. But some of the decorations - like the ones that wrapped around two sides of the house or that were directly on the seams - had to be done after the house was assembled.

For assembly, I found it easiest to join the front to a side piece first, and when it was stuck together just enough so I could let go of the two pieces, I attached another side. When that seemed stable, I attached the back. Since this was a crooked, spooky house, it didn't matter if everything aligned perfectly.

If you've got someone around who can hold the pieces for you while the icing sets, that can be helpful, but it doesn't take long until the icing firms up enough to hold the pieces together. The key is to use a small bead of icing rather than slathering it on - the thin icing will dry faster, then you can add more if you need to fill some gaps or do some decorating. And then just make sure the first pieces are at the corrent angle so the other two will fit. If the walls are a little off, though, I don't think anyone will notice.

And let's be honest here. Royal icing covers a lot of mistakes.

Along with the cookie cutter set, I got a nice box of other Halloween goodies as part of the Good Cook Kitchen Experts program. Looking for something? Check out the Halloween Cake Pops and the Haunted Cupcake Display