Friday, July 31, 2015

Cracking the Code on Eggs

What do YOU know about eggs?

Are you SURE you know everything you need to know?

It wasn't that long ago that we didn't have as many options. Maybe there were brown eggs. Maybe a different brand. But now we have free range, cage-free ... all sorts of of labels. All sorts of options.

Which ones actually make a difference?

Here are some of the most common terms you'll find on eggs at your local grocery store:

Produced without antibiotics: This term can be misleading, as eggs produced in the U.S. are generally antibiotic-free. Antibiotics are not used on a continuous basis in the egg industry, and though antibiotics may be used for hen health, antibiotic residue is not present in eggs.

Brown eggs: Eggs that are laid by chickens with red feathers and red ear lobes. The nutrient content, quality and flavor of brown eggs is the same as white eggs.

Cage-free: Eggs laid by hens at indoor floor operations. The hens may roam in a building, room or open area, usually in a barn or poultry house, that include nest space, perches and unlimited access to fresh food and water.

Cage-free systems vary and include barn-raised and free-range hens, both of which have shelter that helps protect against predators and bad weather. Both types are produced under common handling and care practices. Depending on the farm, these housing systems may or may not have an automated egg collection system.

Free-range eggs: Eggs produced by hens that have access to the outdoors in accordance with weather, environment or state laws. The birds have continuous access to fresh food and water and may forage for wild plants and insects. They are also provided floor space, nesting space and perches.

Natural: USDA identifies all shell eggs as natural.

Nutrient-enhanced eggs: Eggs that are produced by hens fed a special diet that may include things like flax seed, marine algae or fish oils.

Certified organic eggs: Eggs that are laid by cage-free, free-roaming hens raised on certified organic feed with access to the outdoors. The hens’ feed is grown without most synthetic pesticides, fungicides, herbicides or fertilizers, and 100 percent of the agricultural ingredients must be certified organic. Antibiotics and growth hormones are prohibited (although these will not be found in any shell eggs).

Pasteurized eggs: Eggs heated to temperatures just below the coagulation point to destroy pathogens. Pasteurized eggs have the same nutritional and protein content as conventional eggs. These eggs are recommended for recipes that call for raw eggs or for people susceptible to illness who prefer runny eggs. Pasteurized eggs must be kept refrigerated.

Pasture raised eggs: Pasture raised eggs originate from hens free to roam and forage on a maintained pasture area. The hens are moved to various pasture areas to maintain a constant supply of vegetation for the hens.

Vegetarian fed eggs: Produced by hens fed a vegetarian diet.

Here's a handy infographic with eggs-ceptional information about eggs. Double-click the image to see it full-size in a browser window or right-click and save, if you want to print it full size.


Infographic and information courtesy of The Egg Nutrition Center and Colorado Egg Producers. This is not a paid or sponsored post; I saw the graphic in a newsletter and asked for permission to use it.
Yum

Wednesday, July 29, 2015

Some of the BEST potato salads on the web!

I totally LOVE potato salad, but I have to say that I'm not stuck on one recipe - I love experimenting and I love trying new recipes. Writing recipe roundups for Parade Magazine's online Community Table has given me incentive to go find a whole lot of interesting recipes.

I was intrigued by them, and I thought I'd share just a few of them with you here. For the rest, go check out the full post, 17 Potato Salads that Walk on the Weird Side - in a Good Way.


New Potato and Sweet Pea Salad 
It's pretty easy being green when you add the fresh pop of sweet peas to potato salad.


Berry Delicious Potato Salad
Berries? In potato salad? Why, yes, that's exactly what you'll find here.


Beet Potato Salad
This potato salad won't be hard to find when you're filling your plate at the potluck barbecue. 
Beets add brilliant color to this salad.


Find it on Know Your Produce


Roasted Potato and Bacon Caesar Salad
Is it potato salad or Caesar salad? Does it matter? 
It sure isn't that white glop that your crazy aunt always brings in that beat-up Cool Whip container.


Find it on Hungry Couple 


Avocado and Egg Potato Salad 
Why didn't we think of adding avocado to potato salad before this? Why? Why?


Find it on Give Recipe


Apple Butter BBQ Potato Salad
Apple butter barbecue sauce on a potato salad with bacon and corn. What's not to love?


Find it on Chocolate Moosey


But wait! There's MORE!


I've just given you a taste - go check out the full post with all 17 potato salads!

If potato salad isn't your thing, maybe you'll like some of my other roundups:

Yum

Tuesday, July 28, 2015

Vegetarian (could be vegan) Caesar Salad Dressing

Yet another cookbook has crossed my path via the cookbook exchange group I belong to. This time, the book is The Pollan Family Table by Corky, Lori, Dana, and Tracy Pollan. If those names aren't familiar to you, the name Michael Pollan might ring a bell. The authors of this particular book are his mom and sisters.

Whenever I get a cookbook, I look for things I can make right away, without a trip to the store. If that's not possible, then I hope to find a recipe that uses ingredients that are normal around here. Because it's pretty rare for any recipe to use the whole quantity of anything, so I don't want to be done with making a single recipe and end up with a half-dozen jars with one teaspoon removed from each.

The first recipe that caught my eye was a caprese-style pasta, with tomatoes, fresh mozzarella and basil. I always have some kind of pasta - the recipe called for shells, but I used mini wagon wheels instead.

I had tomatoes from the farmers market, and I had some basil growing. I had olive oil and fresh garlic, too, so the only thing I needed to complete the recipe was the fresh mozzarella, and that's pretty easy to find at my local grocer.

The pasta was good, but not spectacular. It reminded me a lot of a recipe by Giada De Lauretiis that I've made a number of times (with variations, of course) called Pasta Sciue Sciue.

In Giada's recipe the tomatoes and garlic are lightly cooked, and the cheese is added to the hot pasta in the pan, along with the other ingredients. The cheese melts just a little, and gets stretchy.

With the Pollan recipe, the "sauce" is raw, and the hot pasta is added to the room temperature sauce. The pasta warms the tomatoes and cheese, but the ingredients stay pretty much raw.

I have to say I like the Giada version a little better. I like the melted cheese in the Giada version, and I liked the warmed tomatoes as well. Meanwhile, I thought the raw garlic was a little too strong in the Pollan version. Cooking the garlic, for sure, would have reduced its bite.

Still, the Pollan was a good recipe, and I might keep it as a cold pasta recipe, cutting the garlic way back or using roasted garlic instead. And if the plan was to serve the pasta cold, I'd add the tomatoes and the cheese after the pasta is totally cool. While the cheese never fully melted and got stretchy as in Giada's version, it did get soft enough to glue itself to the pasta once it was chilled.

The second recipe I tried from The Pollan Family Table was a vegetarian version of the classic Caesar salad. I think it's a brilliant idea. Not because I need a vegetarian version, but because I don't use a whole lot of anchovies, so opening a jar for just one or two is annoying.

I thought I had everything I needed for the recipe, but there was no Dijon mustard in the refrigerator, and the mustard bottle in the pantry wasn't Dijon. So, I used a brown mustard instead. If you have Dijon, feel free to use it; if not, use what you have.

My first try with this recipe was good, but I thought it needed some tweaking. Either my garlic was super-strong or the Pollans are concerned about vampires. A salad dressing should be flavorful when you taste it alone since a small amount of it is added to a pretty large amount of lettuce - which isn't exactly the most flavorful leaf on the planet. But I thought this was a bit over the top with both the garlic and the lemon.

So, I went at it again and made adjustments, and I made a larger quantity. While I don't have a problem with making a single-serve quantity of something like vinegar, oil, and herb mix, if I'm going to make a more complicated dressing, I tend to make enough to last for a while.

And then, since I was re-doing everything anyway, I decided that the capers needed to be chopped. Yes, they're small to begin with, but I thought smaller pieces that would show up on more bites of salad made more sense than finding just a few whole capers in a serving of salad.

I have several other recipes bookmarked in the cookbook, but if I find one that requires garlic, I'm going to cut the amount in half - at least - and add more after tasting if it needs it, particularly if the garlic is used raw.

No-Anchovy Caesar Salad Dressing
Vaguely adapted from The Pollan Family Table

1/4 cup mayonnaise*
1 tablespoon brown mustard
1 small clove garlic, minced (or to taste)
1/2 cup extra virgin olive oil
1 tablespoon (or to taste) fresh lemon juice (or to taste)
1 1/2 teaspoons Worcestershire Sauce**
2 teaspoons capers, chopped, plus
1/2 teaspoon of the caper liquid
Salt and pepper, to taste
For serving:
Torn romaine lettuce
Freshly grated parmesan cheese
Croutons

Whisk together the mayonnaise, mustard and garlic (if you're worried about how strong it will be, hold some back). Add the olive oil while continuing to whisk, or add in small quantities, whisking after each addition has emulsified.

Whisk in the lemon juice (start with about half - you can add the rest after tasting), Worcestershire sauce, capers, caper liquid, a pinch of salt, and several grinds of black pepper.

Taste for seasoning, and add more garlic, lemon, salt, or pepper, if desired. If the dressing is too tart (depending on the tartness of both the lemon and the mustard, it's possible!) add a pinch of sugar to counteract the tartness.

To serve, dress the salad, then grate on the parmesan. Caesar salad is traditionally served with croutons, but while I like croutons as a snack (yes, I'm odd) I don't really care for them on salad.

A traditional Caesar salad doesn't have a lot of extras, but you can use the dressing on your favorite tossed salad, too. Or drizzle it over fresh vegetables.

*If you want this to be vegan, look for a vegan alternative for the mayonnaise. I don't have recommendations, but there are a lot of options.

**Not all Worcestershire sauces are vegetarian! Make sure you read the label, or use a steak sauce (like A1) and read the label. I find that black vinegar, a condiment you can find in Asian markets, has a similar flavor and would work in this dressing. Read the label if you plan on using it.
Anchovy-free Caesar salad dressing can easily be made vegetarian or vegan
Yum

Monday, July 27, 2015

Sunset at the Beach Cocktail

I've fallen in love with the idea of color-changing cocktails and layered cocktails. This time I decided to up the ante by creating a layered cocktail that has a color-changing component.

My friends at Smirnoff challenged me to create a "Day at the Beach" themed cocktail featuring their Ruby Red Grapefruit Vodka. Well, okay then.

I decided that my drink should not only be drinkable on a sunny, beachy day, but that it should also look like a day at the beach. But it also had to taste really good.

I decided that butterfly pea flower tea would represent sea and sky, and pineapple juice would represent sand. But that wasn't enough. I wanted the drink to represent sunset - that time when the sun suddenly turns the water and sky colors, and the sun itself is a glowing red ball.

I have round ice cube molds, so I simply added syrup from dark red cherries to the water in one of my ice ball molds to create a red sun. Easy peasy.

This drink requires some planning, because you need to freeze the tea and the pineapple juice in ice cube trays, and make as many ice balls as you'll need. But then assembling the drink is simple.

I could imagine these being the special drink of the day at a beach bar.

Before the vodka is added, on the left. Finished drink on the right.
As far as what this tastes like, the main flavors are pineapple juice and citrus, while the tea adds a light floral flavor - not as ... perfumy ... as lavender, though. Round ice cubes melt very slowly, and the drink itself is very cold because it's made entirely from crushed ice, so the cherry flavor doesn't become noticeable unless you let the ice melt a lot before the drink is finished.

Sunset at the Beach

For the prep:
Brewed butterfly pea flower tea
Pineapple juice
Syrup from Amareno, Luxardo, or other dark cherries
For the cocktails:
1 ounce Smirnoff Ruby Red Grapefruit Vodka

Prepare ahead of time:
Freeze the butterfly pea flower tea in ice cube trays (as many as you need) and freeze the pineapple juice in separate trays.

You'll use about 1 part tea to 3 parts pineapple juice. To figure out how much ice you'll need per drink (since ice cube trays hold different amounts) crush a tray of plain ice and see how it fits in a glass along with a round ice cube.

If you freeze extra, I'm sure you'll find uses for the ice cubes or crushed ice later.

Combine cherry juice with water to create a red liquid and use it to fill round ice cube molds.

To make the drinks;
Blend the blue ice cubes in your food processor or blender until you have blue "snow." Transfer it to a container. Rinse the blue out of the food processor or blender. Blend the pineapple juice cubes in the same way.

Place the pineapple juice "snow" in your glass, filling it about 2/3 full. Place the ice ball on top of the pineapple slush. Ideally, you want the ice ball peeking above the top of the glass, so how full you need to fill the glass depends on how big your ice ball is.

Add blue "snow" around the outside of the glass, surrounding the ice ball, making sure to leave some of the ice ball uncovered. Now you've got sand, blue water and sky, and the sun starting to set.

Now comes the fun part. Pour the Ruby Red Grapefruit Vodka over the top of the ball and over the blue ice, and it will immediately change color.

Serve. A paper umbrella is optional, but highly recommended.

Thanks to Smirnoff for supplying me with tasty beverages.
Just like a sunset on the water, you can watch the sun and sky change color in this cocktail
Yum

Friday, July 24, 2015

Homemade Chip Dip Mix

I've been on a bit of a chip-dip binge lately. I've tried pretty much every brand of onion soup mix and dip mix that's out there.

Some of them were good, some were nostalgic. And unfortunately, some tasted way too raw-oniony for me. But buying little packets of soup mix to make chip dip seemed silly, considering I wasn't making soup, and I had a whole cabinet full of spices that I could use.

The idea was in the back of my head when I saw a recipe for onion soup mix on a blog called Save with Pennies. I was about to try that recipe to make chip dip when I thought, gee, lets skip the soup and go straight to the dip.

So I went into the kitchen, opened the world of spices, and started mixing. After several tasty tries - none of them were bad, really - I came up with something I liked.

This is a LOT of spices, but when they're mixed together and added to a creamy base, you don't really pick out the individual flavors of every single spice. It's just a very tasty dip.

Chip Dip Mix

1 tablespoon dried red and green bell peppers
1 tablespoon dried shallots
1 tablespoon dried romano cheese powder
2 tablespoons dried chives
2 teaspoons dried dill
2 teaspoons onion powder
2 teaspoons salt
1/2 teaspoon garlic powder
1/2 teaspoon sweet paprika
1/2 teaspoon dried horseradish powder
3 tablespoons dried toasted onion flakes

Combine all the ingredients in a spice grinder (I use a small coffee grinder) and blend for a few seconds. Add the toasted onion  and pulse a few times. I liked this best when there were small bits of onion rather than having it all powdered - but you can do what you like.

You could also simply mix the spices, but the shallots, onions, red & green bell peppers, and chives are all fairly large and you'd end up with a chunky dip, and that's not what I wanted.

If you don't have a spice grinder, you could go old-school and use a mortar and pestle to crush the spices, or you could try using a blender or food processor. I can't guarantee how well those methods would work since I haven't tried them - but from previous experience, the food processor doesn't seem to work as well with really small quantities.

To make the dip:
Add 1 tablespoon of dip mix to 1 cup of sour cream, yogurt, or a mix of sour cream and yogurt. Mix well.

While I love Greek yogurt, I think a little sour cream is needed for dip. A 50/50 mix of sour cream and yogurt is my preference, but when I'm short on sour cream and I have a lot of yogurt, a mix of 1/4 sour cream and 3/4 yogurt is pretty darned good.

But of course you can make it with all yogurt to cut the calories.

It's best if you make this an hour or so in advance and refrigerate it until you need it, so the dried herbs and spices have time to hydrate.

Sources:
For spices you can't find at the grocery store, check out Penzeys and Savory Spice Shop - that's where I got mine, but there are also other sources, I'm sure.
Make your own chip dip mix so you never have to buy a packet again.
Yum

Thursday, July 23, 2015

Chicken and Rice Casserole - a 30-minute meal

It's not fancy - it's COMFORT FOOD!
It all started out with a hankering.

Now, you have to know that if you have a hankering for something, it's not going to be something highbrow. No one hankers for escargot or seared scallops. No, you hanker for tater tot casserole or hot dish or 7-layer dip.

I was thinking that I wanted that chicken with cream-of-something soup. Maybe made in the slow cooker.

So I browsed for recipes and realized that I didn't have enough slow time for the slow cooker. But then I saw recipes that cooked in the oven. Well, okay then. A storm had just rolled through, so it was cool enough to turn on the oven.

I kept one eye on the clock while I worked on a few blog things. The average cooking time for the recipes I saw was about 45 minutes in the oven and maybe a 10 minute rest. I figured I'd give myself extra time, just in case it wasn't done in time. Or if I wanted photos.

I envisioned a thin layer of melted cheese, just for the fun of it. I figured I could cook the thing covered for 40 minutes, check the chicken temperature, add just a little tiny sprinkle of cheese, and then cook for another 5 minutes uncovered to let the cheese melt and maybe crisp the top a little.

It was all going swimmingly well. I dug out the 9x13 casserole I wanted to use and found ingredients and turned on the oven to preheat. I had just bought a couple bags of a frozen mirepoix mixture - one regular (carrots, onion and celery) and one Cajun (onion, celery, and green pepper), and I figured one of those would be nice in the rice. I grabbed the regular one.

The dice on the mirepoix wasn't as small as I'd have done if I was cutting, but it was fine for this purpose. I'm not sure if I'll buy it again, though. We'll see.

And then I looked at the oven to see how the preheating was doing and glanced at the oven clock and UH OH! Somebody stole a whole hour from me.

Grrrr. I had riced mixed with soup and water in the pan and I had the mirepoix bag cut open and chicken waiting for me ... and NOW WHAT?

I really didn't want to eat dinner an hour late, and although I could have scrambled some eggs, at this point I had mixed enough that I felt like I was committed to making this recipe. And then I did the thing that I thought I'd never do. I cooked the whole danged thing in the microwave.

And ... it was actually good. I needed to adjust flavorings at the end, but the recipe below has ths corrected amounts. As far as the cooking, it was fine. Not weird at all.

Of course, if you know how to read a clock, you could make this in the oven and figure about 45 minutes of cooking time, covered, at 375 degrees.

Chicken and Rice Casserole

1 cup jasmine rice (or other white rice like basmati)
1 10 1/2 ounce can cream of chicken soup (or cream of mushroom or celery)
1 soup can full of water
1/2 teaspoon salt*
1/2 teaspoon poultry seasoning
1/8 teaspoon garlic powder
1 12 ounce bag frozen mirepoix mix (or frozen mixed vegetables)
3 boneless, skinless chicken breasts

Mix the rice, soup, water, salt, poultry seasoning, garlic powder, and mirepoix mix in a microwavable casserole dish. Mine was a 9x13, but a 9-inch square or round should be fine, as long as it all fits.

Cover with microwavable plastic wrap (I had one brand that tended to melt, so make sure yours is okay in the microwave) or cover with some other microwaveable cover. Cook for 10 minutes on high.

PLEASE keep in mind that microwaves vary in power, so you might need to adjust your cooking time. But this should get you close.

While the rice is cooking, cut the chicken breasts into bite-sized cubes of somewhat even size.

When the 10 minutes are up, remove the pan from the microwave carefully. Peel back the plastic wrap (or remove the lid) very carefully. Steam burns are pretty awful, so vent it away from you and make sure your hands are enclosed in mitts or are well out the way.

If you want to taste for seasoning now, you can do so. The rice will be crunchy, but you'll get an idea of what the flavor will be.

Add the chicken, stir to combine, and cover again. Microwave for another 15 minutes, stopping about midway in the cooking process to stir again. Since we're cooking in a microwave, the center portion will be less cooked than the outer portion, so consider that when stirring.

When time is up, take a peek to make sure the chicken is cooked through and the rice is no longer crunchy. Most of the liquid should be absorbed. If you prefer it saucier, stir in a little hot water. If it needs more cooking, give it another stir and let it cook for another few minutes.

Taste for seasoning, and add more salt, if desired.

Serve hot, and don't admit that you cooked this in the microwave. A sprinkle of chopped parsley or chives adds some green freshness and makes the dish a bit more festive.

*Yes, I know that chicken soup has a lot of sodium ... for soup. But it's not quite salty enough for a cup of uncooked rice, 3/4 pound of vegetables, and three chicken breasts. If you fear that this will be oversalted, omit the salt at the beginning, and taste it at the end of cooking time and adjust, if need be.
30-Minute Chicken and Rice Casserole
Yum

Wednesday, July 22, 2015

Cheesy, Spicy, Sweet and Nutty Snack Mix

I've always liked Chex Mix, but I've never really found that ultimate recipe that I wanted to make over and over again.

Until now.

The inspiration for this creation was traditional Chex Mix, of course, but also a popcorn mix that's sold at my local farmer's market. That mix includes a spicy cheese popcorn mixed with caramel corn. I don't buy it often, because I devour it way too fast.

Chex Mix can be spicy, but I thought that the addition of cheese and sweetness would make it unbeatable. Turns out I was right.

The mix of sweet toffee-coated nuts, spicy buffalo flavored nuts, crunchy buttery toasty cereal, all coated in salty savory cheese powder makes perfect snack mix.

Cheese powder can be found online from spice shops, or from companies that sell popcorn supplies. There is also a cheese-flavored popcorn topping that you can find at grocery stores, but I don't recommend it - it can be way too salty, well before you taste enough cheese.

Even so, taste the cheese powder before you start. If it seems salty, you can skip the salt in the recipe and keep the saltiness in mind as you add the cheese powder.

The nuts I used were from Truly Good Foods supplied to me via 37 Cooks for a blogging challenge.


Cheesy, Spicy, Sweet and Nutty Snack Mix

3 tablespoons unsalted butter
2 teaspoons worcestershire sauce
1/2 teaspoon salt
1/4 teaspoon onion powder
Pinch of garlic salt
5 cups Chex cereal (mixed or all one type)
1 cup Cheerios cereal
1 cup Buffalo Nuts
1 cup Butter Toffee Peanuts
1/4 to 1/2 cup cheese powder

Put the butter on a large sheet pan and place it in the oven while you heat it to 250 degrees. When the butter is melted, add the worcestershire sauce. Sprinkle on the salt, onion powder, and garlic powder so it's fairly well evenly distributed.

Add the cereals and stir and toss to coat the cereal with the butter and seasonings.

Place the pan in the oven and cook for 45 minutes, stirring every 15 minutes.

After 45 minutes of baking, add 1/4 cup of cheese powder and stir. The cheese will stick to the cereal. Add more cheese powder, if desired. I added another 2 tablespoons and I was happy with that, but more would not be terrible, either.

Add the nuts and stir to combine.

Cook an additional 15 minutes, then remove the pan from the oven and let the mix cool before storing.

This makes about two quarts worth of snacks, which is fine for family use, and it's simple enough to make again and again and again and again whenever you want more.

Ahem.

But if you're making this for a party, I suggest doubling or quadrupling the recipe. It will disappear pretty quickly in a setting where people are nibbling.
Cheesy, Spicy, Sweet and Salty Snack Mix
Yum

Tuesday, July 21, 2015

Affogato alla Donna

Why yes, that is a purple coffeemaker.
Some recipes seem so simple, they shouldn't even be recipes. That's how I felt when I heard about affogato. It's a classic Italian dessert that's pretty much just ice cream with a shot of espresso poured over it.

I was skeptical, but I figured I'd give it a try. I went with strong brewed coffee rather than espresso, because I have a coffeemaker and not an espresso maker, and I used more than just a shot or two since coffee is weaker than espresso.

I have to say that although affogato sounds insanely simple, it's also insanely good. The hot coffee cools to a lovely warm temperature as the ice cream melts and forms a decadent creamy coffee-flavored moat around the still-cold but softened ice cream.

It's not just coffee and ice cream any more than pastry is just flour and butter. It's a whole other thing. It's decadent.

If you haven't tried it yet, I suggest you do.

But of course, I had to guild the lily a little and take it to a whole different level of yum. Because that's what I do.

Affogato alla Donna

2 medium scoops butterscotch ice cream*
4 ounces strong brewed coffee (I used Green Mountain Coffee Dark Magic)
Chocolate syrup, as needed

Put the ice cream in a bowl or other serving vessel. I used heat-proof mugs.

Pour coffee over the top. Add a drizzle of chocolate sauce.

Serve, quickly. You can't let this sit around too long after making it, or the ice cream will melt too much and you'll have a drink instead of a dessert.

If you're serving to more than one or two people, I suggest serving the ice cream (topped with chocolate sauce) separate from the coffee, then pour the coffee at the table for each guest.

Or, let your guests pour the coffee onto the ice cream themselves if you have small pitchers that would hold the individual servings of coffee.

Coffee, ice cream, and a little chocolate syrup sounds insanely simple, I know. But it's crazy good.

If you want to gild the lily even further, you could top this with a dollop of whipped cream and maybe a sprinkle of cocoa or chocolate shavings on the whipped cream.

But really, it doesn't need any extra flourishes. It's perfect without any garnish at all.

*Needless to say, you can use vanilla ice cream, or chocolate, or caramel, or pretty much any ice cream flavor you have that you think will pair well with the coffee.

Keurig has provided me with supplies for coffee making at no cost to me.
Affogato is a classic Italian dessert. This one has a few twists.
Yum

Monday, July 20, 2015

Inside Food Network Star with Jay Ducote

Jay Ducote, contestant on Season 11 of The Next Food Network Star.
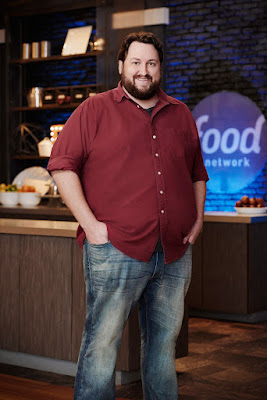
All photos courtesy of Food Network
If you're a fan of the TV show The Next Food Network Star, you may have wondered what it's like to be on the show. I mean, we get to see what the producers and editors want us to see, but you know it's got to be different to be on the other side of the camera.

I had a chance to interview Jay Ducote, one of this year's contestants. Full disclosure: I've "known" Jay for quite a while, online, and I'm rooting for him to win. We belong to a blog group called Virtual Potluck, but we've never met, and until this phone call, we've never had a conversation that didn't involve typing at each other.

The folks at Food Network were nice enough to set up and interview, and I was armed with a few questions. Just like the guy you see on television, Jay was easy to talk to and super-nice. And I'm sure the ears at the network were listening in to make sure I didn't ask any questions about future episodes. You do know it's not a live show, right? It's filmed ahead and we're watching things that happened a while ago.

Jay originally auditioned for the Season 10 show, which was last year. He said he got pretty far through the interview process, but didn't make the cut. This year, he got a call back from the network who said that they had liked him the year before, and they encouraged him to apply again. Even though he was invited to apply, he said it was still a long process and a lot of interviews and paperwork.

So, it's not like you interview once and wait for the results. You go step by step by step, and then when the call comes, you have a short time to "put your life in order" so you can run off to be on the show. Jay said that he got the call while he was at a restaurant and while he couldn't say too much, he toasted his two employees and said, "Have fun running the business without me." Besides blogging at Bite and Booze, Jay does pop-up events and hosts a radio show. He also has his own line of barbecue sauce, and it's pretty darned good!

Jay and his sister had watched The Next Food Network Star together many times, and his brother also knew what the show was about, but his parents were a little more in the dark. He said that his mom had never actually seen the show, and his dad might never have seen the Food Network at all. Once he told them the news, his mom watched the previous year's episodes to get an idea what her son would be facing. I'm pretty sure they're both watching it every week now.

Of course we had to talk about cooking challenges, and Jay said that the hardest one for him was the restaurant challenge, for two reasons. First, it was the only challenge where he had to collaborate with someone on a single dish. There were other team challenges, but in those, people worked on their own dishes. In the restaurant challenge, the two contestants had to collaborate and create a single cohesive dish.

The other reason it was hard, he said, was because it was done in a commercial restaurant kitchen, and that's not something he's used to. The equipment is much different from home cooking, and the space was small and cramped.

Jay Ducote works on a recipe during The Next Food Network Star.The Food Network Star kitchen certainly isn't like anyone's house, but he said it was nice because it was so roomy, and the equipment was more like something high-end home cook would have, so it was easier to work with.

What about that equipment? What cooking things did Jay wish he could have brought home with him?

"They had a really good selection of cast iron Dutch ovens and skillets," Jay said, and noted that if you watch closely, that's pretty much what he goes for every time. Once, Dom beat him to the punch and got the cast iron skillets in the pizza challenge, and Jay's pizzas ended up with underdone crusts. I have to agree with Jay that when you need cast iron, you NEED cast iron!

Speaking of Dom, Jay said that Dom is one of the funniest people to be around when the cameras aren't rolling. While he seems shy on-camera, he's very fun when the contestants aren't competing.

Jay mentioned that he's made good friendships during the show, and that they continue to stay in touch, even though filming is over.

He also said that the contestants all had the attitude that they wanted to get ahead and to win by being the best they could be, and no one wanted to win because someone else screwed up. They were all cheering for each other, while also being competitive.

One big question is whether they all get to nosh on each others' food, and for the most part, they don't. Sometimes they will sample some component someone's dish in progress, if the other person asks for an opinion. But there were times when they didn't even get a chance to sample their own finished dish, like with the pizza challenge. They each made three pizzas for judging, and although they could taste the components as they made them, or perhaps a bit of topping that fell off, no one got a chance to try a slice of their own, or anyone else's pie. The judges were the only ones who got a chance to taste.

For some challenges, though, if there's leftover food after an event, they might have a chance to do some sampling, like at the Fourth of July event where teams had food that wasn't served to guests. But it doesn't happen often.

Jay Ducote always impresses the judges with his presentations on The Next Food Network Star.When it comes to best and worst dishes, Jay said that his gumbo will probably live in infamy, but it truly wasn't as bad as it was made to seem. Bobby Flay said that the flavors was good, but the dish was "murky."

Jay explained that he was going for a slimy dish, since that was his challenge. He chose to do gumbo because okra can be slimy. He said that what he ended up with was more of a stew than a soup, but he said it wasn't as bad as it looked. Still, if he had a chance to do it over again, he would like a chance to re-do that dish and get it right - even if he only had 45 minutes.

As far as dishes he liked, the outdoor cooking and grilling events were the most comfortable for him, and he chose the Fourth of July event as his ultimate favorite. His steak was well-liked, he redeemed himself with the okra, and he did a great job with his presentation. For a non-grilled recipe, he was very happy with his crazy calamari dish that had to incorporate pink lemonade and the color black as part of the improv challenge.

A really tough challenge for almost everyone was the grocery swap challenge. Jay said that he was happy with what he got (Dom's beautiful steaks) but other contestants "were dumbfounded" when they had to cook with things that other people had shopped for. It was particularly hard for Rue, who had chosen South African spices to match her point of view - and when she lost all those spices to work with, she had to shift gears. And Dom is probably still looking for those steaks.

Jay said that watching the show on TV doesn't "do justice for how challenging and how crazy it is." The contestants don't have a clue what they will be doing ahead of time. "It's not like you have two days to think about making pizza," he said. The challenges are described, and the countdown starts, just like you see it on TV.

Jay Ducote gives the finishing touch to a dish on The Next Food Network Star.
For those who want to consider applying for the show, Jay said that most people know they need cooking skills, but many lack the necessary presentation skills. Very crucial is the internal clock that allows you to know how long 30 seconds or 1 minute or 4 minutes is, so you can pace yourself and "wrap it up and get out on time."

Considering how many of the contestants leave dead air after they're done talking, or who are mid-sentence when the camera stops rolling, that's very good advice.

Another important thing is to know your cooking point of view. Jay said he was surprised that some people had no specific point of view and just said, "I like to cook everything." The network isn't looking for that - they're looking for people with a very specific point of view - not necessarily a gimmick or recipes based on geography - but a theme that works for the person, their stories, and their recipes.

Based on what I've seen so far (just on TV, I don't get any special viewings), this year's cast definitely has cooking chops. Jay said that the judges often commented on how good this year's cast is and how good the food has been from everyone. As far as Jay's recipes, I wandered through his blog to see if he might have a gumbo hiding there. I didn't find one, but I think I'd be even more happy with the crawfish rolls he recently posted.

Jay didn't even hint at what might happen in upcoming episodes, but I know that I'm glued to the TV every Sunday until it's over. How about you?
Yum

Friday, July 17, 2015

Roasted Red Pepper Spread for Can-It-Forward Day

Roasted Red Pepper Spread - great on sandwiches, pasta, and in recipes. Try it on pizza instead of tomato sauce!I'm by no means an expert canner, but I'm pretty adept with pickles and jams and things involving tomatoes.

But I don't fly solo - canning is a science, and you need the right level of acid and salt so the canned products don't go bad.

My go-to book for most recipes is the Ball Blue Book. And this year, there's a new version (the 37th edition!), with a whole new section called Meal Creations as well as individual new and updated recipes.

It's worth looking into if you plan on doing any canning. And, I have a copy of the newest book for one lucky reader, plus an extra bonus!

Giveaway is over.

Here are the covers from all 37 issues - the large one at the bottom is the new edition.

Covers from 37 editions of the Ball Blue Book

I actually have a few different editions, and I still use them. How many do you have?

So the point of this post - besides sharing a delicious recipe, is to let you know that for the fifth year in a row, Jarden Home Brands will host Can-It-Forward Day, this year on August 1, broadcast live at FreshPreserving.com from 11am to 4pm EST.

AND - If all goes well, technically, I'll be hosting the webcast here, as well. So you don't need to wander too far!

This is what Ball says about Can-It-Forward Day:

Can-It-Forward Day encourages gardeners & food enthusiasts across the country to celebrate what “Made From Here” means to them by fresh preserving their favorite local ingredients in peak season. The webcast will have an integrated chat function where consumers can submit their home canning questions to be answered in real time. New this year, there will also be an exciting celebrity mason jar auction unveiled during the webcast!

But enough about that. Let's get to the recipe!

As I was paging through the book, I spotted a recipe for a roasted red pepper spread that sounded perfect. I love roasted red peppers on sandwiches and in recipes, so I figured the spread would be just as good.

But of course, I can't leave things be. I decided that I didn't want to make a full recipe, and I decided not to can it at all. The original recipe made 5 half-pints of spread, or about a quart-and-a-half. I figured that if I made half of a batch, I'd have no trouble using it in a short time.

So far, I've used it as a sauce on chicken ... in the place of tomato sauce for a chicken parmigiana dish. You can find the recipe for the chicken here.

Roasted red pepper spread on breaded chicken, topped with melted cheese.

And on a sandwich. This was Italian sausage, mushrooms, and onions on a soft bun.

Roasted red pepper spread on Italian sausage sandwiches.

I'm planning on using it as a sauce on pizza, and I'm thinking about making red pepper soup. And about that time, I'll need to make more.

Besides cutting the recipe in half, I made a few other adjustments. I accidentally used 1/4 cup of onions, but it really should have been just 2 tablespoons for half of the recipe. And the original recipe called for basil, which I didn't use. I knew that I could easily add basil later, and wanted the peppers to be star of the show.

If you make this from the book, I suggest weighing the peppers and tomatoes to make sure you have the right amounts, since product sizes can vary a lot. The book estimated 12 red peppers for 6 pounds, but I only needed 5 for 3 pounds. It estimated 10 roma tomatoes for one pound, but mine were pretty huge, so I only needed 2 for half of the recipe.

Roasted Red Pepper Spread
Adapted from the Ball Blue Book Guide to Preserving

Roasted Red Pepper Spread - so simple and so delicious!3 pounds red bell peppers
1/2 pound Roma tomatoes
1 large clove garlic, not peeled
1/4 tablespoons onion (after roasting)
1 1/2 teaspoons sugar
1/2 teaspoon salt (plus more, to taste, if needed)
1/4 cup red wine vinegar

Wash the bell peppers and tomatoes. put the peppers on a baking sheet. Place them under your broiler, and cook, turning as needed until the skins are blackened in spots on all sides. When the peppers are done, place them in a paper bag and close it or put them in a large bowl and cover the bowl. The steam from the peppers will make the skins easy to remove. Let them rest until they're cool enough to handle, then peel them, remove the cores and seeds, and put them in your food processor.

Meanwhile, place the tomatoes, garlic, and onion (you'll need about 1/2 of a medium onion) on another baking sheet and broil, turning as needed, until the tomato skins split and the garlic and onion have brown or black spots on the skin.

Place the tomatoes in a bag or bowl as you did with the peppers and let them cool until you can handle them.

Roasted red pepper spread from the latest edition of the Ball Blue Book.
Peel the garlic and chop it roughly and place the pieces in the food processor. Peel the onion, chop, and measure 1/4 to add to the food processor.

When the tomatoes are cool enough to handle, peel them, remove the core chop them roughly and add to the food processor.

Puree the ingredients in the food processor, then transfer the mixture to a heavy-bottomed saucepan. Add the sugar, salt, and vinegar.

Heat on medium until the mixture comes to a simmer and continue cooking until the mixture thickens. It needs to reduce a lot to become a spread. Taste for seasoning and add more salt. I thought it needed just a tiny bit more.

I stopped when I had 1 1/2 pints of product, and it was a thick sauce rather than a spread, but it was really tasty. Based on the original recipe amounts, I should have continued reducing until I had 1 1/4 pints. But then again, it was really good as a sauce, so I'm fine with it as it is. Next time I might continue reducing further.

Transfer to jars, cover, let them cool to room temperature, then refrigerate.

Thanks to Jarden for sponsoring this post! I will be mailing the cookbook to the winner; Ball will mail a coupon for the canning jars.
Ball Blue Book Roasted Red Pepper Spread
Yum