Showing posts with label Techniques and Tips. Show all posts

Wednesday, August 24, 2016

Technique: The anti-trussed poultry

I grew up with a mom who tended to overcook poultry. Or she overcooked the breast. The dark meat was usually fine. But here's the thing. Dark meat can handle being cooked longer and to a higher temperature. It doesn't mind at all. That's why you'll find thighs in recipes that require braising, and you'll find breasts in recipes that cook quickly.

The problem is that the breast is right there, up-top, where it gets the most oven heat. Meanwhile, the joint between the thigh and body is tucked away, protected from all the heat.

And then recipes tell you to truss the bird. Tie its legs together. This is somehow supposed to protect the breast from overcooking. I don't know about you, but I've never seen a chicken that had legs that covered the breast that well. Meanwhile, that thigh joint is still tucked away, right?

A while back, I was working on a chicken recipe where I was stuffing things under the chicken skin, and with all that fussing, the skin tore and the thighs spread away from the breasts and I decided to just go ahead and cook it that way. It wasn't a pretty, round, neat chicken. It looked messy. Lazy. Sort of ... ugly, if I'm being honest.

But here's the thing. That thigh joint was exposed to oven heat, and the chicken cooked much more evenly.

I had forgotten about that chicken until recently. I don't roast a lot of whole chickens. I cook a lot of chicken pieces. But I was cooking a recipe from Sheet Pan Suppers and I saw the words "truss the chicken" and I said "Oh no. I want to anti-truss it." Instead of trying to protect the breast so it would cook slower, I wanted to expose the thighs so they'd cook faster.

And ... it worked! The only downside was that the skin on the thighs didn't get crisp. If the chicken had been cooking on a rack, the thighs would have gotten some air, but the chicken was sitting on a bed of vegetables, so the skin was kind of flabby.

In the photo, the chicken isn't quite done yet, but it's almost there. You can see how the meat in that body-thigh joint is still a little pink. It would have been a LOT more pink if that joint had been protected.

The good news is that breast wasn't overcooked by the time the dark meat was completely done. It was a sloppy looking chicken, but if you serve your chicken cut up, it doesn't really matter, does it? I'm calling it a win. I'm also calling it dinner, and sandwiches, and soup.

Next time, I might remove the leg-and-thigh sections completely so I can roast them skin-up. I mean, seriously. What would you rather have, a chicken that looks pretty, or one that's cooked correctly?

Wednesday, April 13, 2016

Instant Pot Baby Back Ribs

Mmmm. Ribs, potato salad, and asparagus!
Way back in the stone age, when I was a mere youngster, my mom always boiled pork ribs before slathering them with sauce and finishing them in the oven. I know, the horror of it all.

But ... it's the best we could do. There was no back yard or barbecue grill or smoker. There were pots and ribs and an oven, though.

If I have to admit it, those ribs were pretty good. Obviously, they weren't smoked. But they were tender and juicy and saucy and just fine. And since I'm being honest here, I've had smoked ribs that weren't great.

After a few people told me how great the Instant Pot was for cooking ribs, I decided to give it a go. I mean, why not? I looked online and found tons of recipes. A few proclaimed that the ribs were fall-off-the-bone tender. Which is fine if you want them that way. Me, I prefer a little more toothsomeness. Yes, I want them tender. But I don't want them totally falling apart if you give them a strong glance. I want them to have a little fight left.

I'm happy with the result I got. I would have been happier if I had a working broiler or a normal oven to finish the ribs. But for ribs that never saw a grill or smoker - I sure as heck can't complain.

And, yes, of course you could use a different brand of pressure cooker. There are plenty to choose from.

Pressure-Cooked, Oven-Finished Babyback Ribs

1 or two slabs of baby back ribs
Water, as needed
Apple cider vinegar, optional
Salt, optional

Put your ribs in your pressure cooker. I sort of coiled mine up so they were sitting on the protruding bone ends. I'm sure they'd be fine cut and stacked as well. Add about an inch of water to the pot along with a splash of apple cider vinegar (optional) and a pinch of salt (also optional).

Put the cover on the pressure cooker, set it to the seal rather than vent, and set the cooking time for 15 minutes at high pressure.

When the time is up, turn the pressure cooker off and let the ribs rest for 15 minutes before venting any remaining steam.

Stick a fork in a rib to test the tenderness. If you need to cook a little longer for your preferred tenderness, do so, and make note of how long you like your ribs cooked for the next time you make them. At 15 minutes plus the resting time, my ribs were fork tender, but not soft.

Remove the ribs from the cooker, place them meat-side up on a baking sheet (line it with foil for easy cleanup) and slather with your favorite sauce.

Heat your oven to 250 degrees and put the ribs in. Cook for another 30 minutes or until the sauce has thickened and grabbed onto the ribs. Cook longer or less, if you like. Or slather with sauce and just put them under your broiler for a few minutes.

Serve hot with more sauce on the side. Because more sauce is never a bad thing.

I received my Instant Pot at no cost to create a blog post for 37 Cooks, but my obligation to them is loooong over. I'm just having fun now.

Friday, July 31, 2015

Cracking the Code on Eggs

What do YOU know about eggs?

Are you SURE you know everything you need to know?

It wasn't that long ago that we didn't have as many options. Maybe there were brown eggs. Maybe a different brand. But now we have free range, cage-free ... all sorts of of labels. All sorts of options.

Which ones actually make a difference?

Here are some of the most common terms you'll find on eggs at your local grocery store:

Produced without antibiotics: This term can be misleading, as eggs produced in the U.S. are generally antibiotic-free. Antibiotics are not used on a continuous basis in the egg industry, and though antibiotics may be used for hen health, antibiotic residue is not present in eggs.

Brown eggs: Eggs that are laid by chickens with red feathers and red ear lobes. The nutrient content, quality and flavor of brown eggs is the same as white eggs.

Cage-free: Eggs laid by hens at indoor floor operations. The hens may roam in a building, room or open area, usually in a barn or poultry house, that include nest space, perches and unlimited access to fresh food and water.

Cage-free systems vary and include barn-raised and free-range hens, both of which have shelter that helps protect against predators and bad weather. Both types are produced under common handling and care practices. Depending on the farm, these housing systems may or may not have an automated egg collection system.

Free-range eggs: Eggs produced by hens that have access to the outdoors in accordance with weather, environment or state laws. The birds have continuous access to fresh food and water and may forage for wild plants and insects. They are also provided floor space, nesting space and perches.

Natural: USDA identifies all shell eggs as natural.

Nutrient-enhanced eggs: Eggs that are produced by hens fed a special diet that may include things like flax seed, marine algae or fish oils.

Certified organic eggs: Eggs that are laid by cage-free, free-roaming hens raised on certified organic feed with access to the outdoors. The hens’ feed is grown without most synthetic pesticides, fungicides, herbicides or fertilizers, and 100 percent of the agricultural ingredients must be certified organic. Antibiotics and growth hormones are prohibited (although these will not be found in any shell eggs).

Pasteurized eggs: Eggs heated to temperatures just below the coagulation point to destroy pathogens. Pasteurized eggs have the same nutritional and protein content as conventional eggs. These eggs are recommended for recipes that call for raw eggs or for people susceptible to illness who prefer runny eggs. Pasteurized eggs must be kept refrigerated.

Pasture raised eggs: Pasture raised eggs originate from hens free to roam and forage on a maintained pasture area. The hens are moved to various pasture areas to maintain a constant supply of vegetation for the hens.

Vegetarian fed eggs: Produced by hens fed a vegetarian diet.

Here's a handy infographic with eggs-ceptional information about eggs. Double-click the image to see it full-size in a browser window or right-click and save, if you want to print it full size.


Infographic and information courtesy of The Egg Nutrition Center and Colorado Egg Producers. This is not a paid or sponsored post; I saw the graphic in a newsletter and asked for permission to use it.

Tuesday, June 16, 2015

Should you start cooking pasta in cold water or boiling water? A side-by-side comparison.

Keep reading; this photo will make sense.
One thing that you might not know about me is that I tend to be a skeptic. In a good way.

If someone tells me something that runs counter to what I believe, I love it. Because I might learn something new. But I don't simply believe what I hear. Mostly I disbelieve until I can find out more.

If it's something that I can investigate on my own - like a new method of cooking - then I often perform my own experiments. That's how I fell in love with sous vide cooking. A number of people scoffed and said that it was nothing more than the old "boil-a-bag" method and completely useless.

But that wasn't enough for me. I tried it, and I like it. I don't use it all the time, but there are results I can get from sous vide cooking that simply aren't possible any other way. Like 72-hour short ribs. And the rib roasts I've made using sous vide have been amazingly tender.

When I can't do the experiments myself - like when we're talking about real science rather than kitchen science - I go online and hunt up reputable sites and dig as far back to original scientific papers as I can. I've read some pretty obscure research papers over the years.

I love it when I learn something new, or when some bit of information changes my opinions.

I also enjoy listening to, watching, or reading about things that I know are untrue. In those cases, I'm not looking for information to change my mind, but I'm honing my skills at seeing the flaws in logic or the fact-manipulation that's sometimes used to convince the less-skeptical.

While I don't expect everyone to go to ground zero to get their facts, I do find it amusing when someone bases their decisions on "people say" or "everyone knows." I once asked one of these folks which "people" say these things.

Just people.

Do you know these people well? Have they studied nutrition? Do they have degrees in the subject? Where did you meet them? How many people have told you this?

All I got was a tilted head and a puzzled look. I don't know if it sunk in or not, but I did suggest that other people would tell you the opposite, if you researched further than the backyard fence.

Non-mushy cooked pasta.
This all came to mind because recently I mentioned that lately when I cook pasta, I start it in cold water. Someone responded that I must like mushy overcooked pasta and that I should ask "any good Italian" how pasta should be cooked.

It was an odd comment, to say the least.

First, I'm not sure what they meant by "good Italian." Is that someone who's nice to their mother? Someone who doesn't kick puppies? I suspect they meant that I should talk to someone's grandma who has been making pasta the same way for decades. A traditional Italian, perhaps.

And as far as how I like pasta, it was interesting that someone would assume that the pasta was mushy or overcooked, or that I liked it that way. I was going to ask if they had ever tried the cold-water-start method themselves, but I'm pretty sure they would have said that they didn't because they don't have to. Everyone knows you start it in boiling water. Everyone.

But here's the thing. When I first read about the cold-water-start method, I was skeptical. It challenged my long-held belief that you had to start pasta cooking in in a large amount of boiling water. I always started pasta in boiling water. Always.

So of course, I ran into the kitchen and gave it a try. And now I always cook my pasta starting in cold water. Because it actually turns out better. The fact that it's done faster is a bonus.

But, if I was you, I wouldn't believe me without a little more proof, so I went into the kitchen and did a side-by-side comparison of pasta cooked both ways.


So, here's how it went. First, the cold-water start.

I put 1/2 cup of elbow macaroni in a pot and added water about a inch over the level of the pasta. I added a little bit of salt, covered the pot, and put it on high heat to get it to boiling.

The water came to a boil in 4 minutes - since there wasn't much water, it was pretty quick. I checked a piece of pasta every minute starting at 5 minutes. After 7 minutes, The pasta was firm, but you can still see a bit of white, dry, uncooked pasta. If I was going to add the pasta to a hot soup, or it was going into sauce and cooked for a few minutes, this would be a good time to get it out of the water.


At 8 minutes, the pasta is cooked almost all the way through, but a really close inspection shows that it's still got a tiny bit that's not quite cooked. This would be a good time to take it out of the water if it was going into sauce for a short time.

At 9 minutes, it was cooked all the way through. The pasta was plump, but still with a bit of chew. If I was going to toss it quickly with ingredients, but not cook it in a sauce, this would be perfect.

At 10 minutes, it was a little softer, but in no way mushy. This would be the perfect cook for a cold pasta salad.


So, this is 10 minutes total, since there was no time required to get the water to a boiling point. Keep in mind that I live at high altitude, so if you live at sea level, your cooking time is likely to be less.

But what about starting the pasta in boiling water? How does that compare?

I filled a pot about halfway full, added salt, and put the lid on to encourage it to come to a boil. That took about 8 1/2 minutes. I measured 1/2 cup of pasta and added it to the water, and started timing the cooking from that point - 9 minutes.

I started checking the pasta starting after 5 minutes of cooking. The first thing I noticed was that the surface of the pasta was sort of ... slick. Or maybe the right word is pasty. The outer layer was cooking much faster than when I started it in cold water.


The pasta was cooked through and plump at 7 minutes - about the same stage as the cold-water version at 9 minutes, but the outside of the pasta was definitely softer and a little mushy. Keep in mind that this is 7 minutes of cooking time, plus 9 minutes to get the water boiling, so it's 16 minutes total.

I let it cook one more minute, and it was overcooked and had almost no "bounce" left. When I tried to cut it to see the interior, it broke.

So there we go. The cold-water version cooked faster and more evenly. I thought for a moment that the outer softness of traditionally-cooked pasta might help sauces to stick, but I've been using the cold water method for a while and I've never had a problem getting sauces to hang onto the pasta.

I suspect - but can't confirm - that the difference between the two methods might be a little more dramatic up here at high altitude. But I'm not the only one who says this works - even Alton Brown has written about it.

But there's one point where I disagree with Alton. He says the cold-water method isn't useful for long pasta, like spaghetti. But I've cooked long pasta starting in cold water. The trick is to use a pot that's wide enough so the pasta can lay flat in the pot. 

I use this one:


It's a 5 1/2 quart braiser that's 12 inches in diameter, so pretty much any long pasta fits. Any pot that's wide enough should work, It doesn't need to be super-deep, because you only need the water a little bit above the pasta.

If you're happy with the way you cook your pasta, I'm not saying you absolutely need to change what you do. I cooked mine using the traditional method for many, many years and never thought I needed to try anything else.

But if you want to challenge one of your food assumptions, give it a try. Pasta is cheap, so you're not losing much if you don't like the result.

And you'll save a few minutes of cooking time.

Monday, May 4, 2015

Start Your Pasta Cooking in Cold Water - Does it Work?

Pasta started in cold water (with butter and cheese for serving)
I've seen a number of posts on Facebook about cooking pasta by starting it in cold water. Which is exactly the opposite of what we were all taught to do, right?

We're told to start with briskly boiling water, then add the pasta, stir to keep it from sticking, and quickly bring it back to a boil.

But the cold-water method has the pasta added to cold water (or cold water added to pasta, I suppose) and then it's brought to a boil and cooked until it's done.

Oh, and you don't need a vast amount of water. Just enough so the pasta is covered enough so it stays under water during cooking, which means it comes to a boil faster.

One advantage to cooking this way is that the pasta doesn't stick to each other. There's a scientific reason for that. I was a little skeptical. But it worked. No sticking.

The second advantage is that you don't have to wait for the water to start boiling before you start cooking. It starts softening right away. So cooking time is significantly less.

I thought that second advantage would be the one that would win me over. But it turns out there's one more advantage, and for me, it's the killer reason for doing this.

Here's the thing. When you cook potatoes, you always start in cold water so that the potatoes cook evenly from the outside to the center. If you started them in hot water, the outside of the potatoes would be mushy while the center is still raw.

Well, because pasta is so thin, that's usually not an issue. BUT!!! I live at high altitude where water boils at about 202 degrees instead of the usual 212 degrees. I've noticed that unless I'm cooking something super-small, like angel hair, the pasta can be a little too soft on the outside, while there's still an uncooked "bone" in the center of the pasta.

As much as I love it, pasta is not always my friend.

But when I cooked the pasta starting in cold water, it was evenly cooked from the outside to the center. I was thrilled. I'm never going to cook pasta any other way, ever again.

But what about long noodles, you say? Since you don't need a deep pot, you can cook spaghetti, linguine, fettuccine, or any other long pasta in a skillet where it can lay flat. Yeah, it's pretty magical.

Tuesday, November 11, 2014

Pasteurizing eggs with sous vide

Have you ever heard of pasteurized eggs? There are a few companies that sell them, but around here, I don't see them very often.

Then again, I don't need them often. I've made eggnog with pasteurized eggs, and there are some cocktails that use them. And there might be a few ice cream recipes, as well.

Since they're not sold here often, I decided to pasteurize my own using a sous vide immersion circulator.

After reading a lot of websites with a lot of information, I decided that 75 minutes at 135 degrees seemed to be enough time at a high enough temperature to make the eggs safe without cooking them. So I gave it a try.

To keep the eggs from bashing around and cracking in the sous vide water, I put the eggs into a silicone mesh bag. I waited until the water reached 135 degrees, then I lowered the bag into the water and set the timer for a hour, 15 minutes. When the time was up, I removed the eggs and let them cool in cold water, then refrigerated them.

When I cracked the eggs, the whites were cloudy and the yolks were a little firmer than a normal raw egg, but they weren't too dense to use them like a normal raw egg. I've read that pasteurized whites take longer to whip if you need them whipped for things like a meringue, but I didn't need that, so I can't tell you how well that would have worked.

I don't see any reason why these eggs couldn't be used just like raw eggs. Whether they were completely safe for eating raw or not, I can't say. Other reputable sites say they're safe. While nothing is 100%, I'm going to go out on a limb and say they're safer than if they weren't heated at all.

So there ya go. Sous vide pasteurized eggs.

Thursday, October 2, 2014

Pie Crust

That's it. Just crust.

In a food processor.

Ideally, everything should be as cold as possible. You can use mostly-frozen butter, if you like. Then, move fast. You want the butter to remain in itty-bitty pieces rather than mixing into the flour.

The larger the butter pieces, the larger and more layered the crust will be - like a puff pastry crust. But if the butter chunks are large, they also need to be very very flat.

I've made pie crust doughs where the butter was visible as dime-sized, super thin layers, and I've made crusts where the butter seemed to be nothing more than tiny flecks. And I've made pie crusts with liquid oil instead of a solid fat. It's all a matter of taste.

Pie Crust 1

6 ounces (a shy 1 1/2 cups) all purpose flour
1 tablespoon sugar
1/4 teaspoon salt
1 stick cold unsalted butter
1 tablespoon vodka
3 tablespoons very cold water

Put the flour, sugar and salt in the processor and pulse a few times to mix it up.

Cut the butter into a a bunch of chunks and add it to the food processor. Pulse a few times to break up and distribute the pieces.

Combine the vodka and water. With the processor running add this. When the dough starts clumping together, you're done. You can pulse a few times if you've got flour that's not quite incorporated, but this should should happen very quickly. You don't want to combine the butter with the dough - you want it to remain in itty-bitty pieces.

Transfer the dough to a plastic zip-top bag, flatten the dough (it chills faster) and refrigerate for at least an hour, but up to a few days.

Continue with whatever recipe you're making.

Pie Crust 2
Slightly larger crust, a little sweeter

2 cups (9 ounces) all purpose flour
2 tablespoons sugar
1/2 teaspoon salt
2 tablespoons vegetable shortening
1 stick (8 tablespoons) unsalted butter
1 tablespoon vanilla extract
1/4 cup very cold water

Put the flour, sugar and salt in the processor and pulse a few times to mix it up.

Add the shortening and process until it disappears into the flour.

Cut the butter into a a bunch of chunks and add it to the food processor. Pulse a few times to break up and distribute the pieces. There shouldn't be any large chunks, but you've got a lot more processing about to happen, so it's fine if there are visible pieces.

Combine the vanilla and water. With the processor running add this. When the dough starts clumping together, you're done. You can pulse a few times if you've got flour that's not quite incorporated, but this should should happen very quickly. You don't want to combine the butter with the dough - you want it to remain in itty-bitty pieces.

Transfer the dough to a plastic zip-top bag, flatten the dough (it chills faster) and refrigerate for at least an hour, but up to a few days.

Continue with whatever recipe you're making.

Wednesday, October 1, 2014

Bread Shaping Technique - AMAZING video!

Someone I know shared this video on Facebook, and I scoured the web looking for a source for it other than Facebook that I could link to - like a blog or YouTube ... but I couldn't find it anywhere else. So, hopefully you can see this even if you don't have an account there.

I thought this was pretty fascinating to watch. Check it out!


If you happen to find another source for this video, let me know!

Tuesday, September 9, 2014

Buttercream Frosting (with variations)

It seems like I've been using a lot of buttercream frosting lately.

 ... on cupcakes ...


in ice cream... 


on cakes ... 


and on cookies.


But I've never published my basic buttercream recipe here. So, here we go. This recipe makes more than enough to frost a layer cake, but it's always best to have more than you need, right?

You can refrigerate the leftovers, and use them on something else. I'm not sure how long it lasts before it goes wonky - I'm always able to find a use for leftovers ... including putting it into ice cream.

This recipe will dry to form a somewhat hard surface, so it was great when I wanted to airbrush the cupcakes in that top photo. When I used it for the cookies and applied a very thin layer, it hardened most of the way through. Not hard like royal icing, but hard enough so the cookies could be handled.

Buttercream Frosting

1 cup butter (2 sticks), or 1/2 cup vegetable shortening, or any combination to equal 1 cup*
1 2-pound bag of powdered sugar
1/2 teaspoon salt
1 tablespoon vanilla extract**
Milk or cream, as needed, starting with about 1/4 cup, possibly up to 3/4 cup

Beat the butter/shortening (your stand mixer fitted with the paddle attachment is easiest, or use an electric hand mixer) to make sure it's soft, then beat in the sugar (a little at a time, so it doesn't fly all over the place!) and the salt until all the sugar is incorporated and you have a smooth mixture. Add the vanilla and beat well.

Add the milk, a little at a time, until you reach the consistency you're looking for, depending on your intended use. If you're planning on piping, it needs to be soft enough to run smoothly though the piping tip, For frosting cookies, it just need to be thin enough to spread easily.

Continue beating until the frosting is fluffy rather than dense.

If you mess up and it gets too thin, you can add more powdered sugar.

*Butter tastes better, but shortening holds up better in the heat and tends to give you better crusting/hardening, if that's important. For flavor and holding power, half butter and half shortening works well. If you need a bright white frosting, shortening will give you that. If you want the lightest-colored frosting possible using butter, use an unsalted butter - they tend to be lighter in color than salted. For no good reason. Or check out different brands. Some of them are lighter than others.

** I prefer pure vanilla extract, but if you need a bright white frosting, you can use the clear artificial flavoring instead. Also, you can add other flavors. For an almond-flavored frosting, use 1 teaspoon almond extract and 2 teaspoons vanilla extract. If you use other flavors, start with less and add more until it's right. Some flavors can be pretty strong, so you don't want to add too much.

Want Cream Cheese Frosting?
If you prefer the flavor of cream cheese frosting, it's pretty simple. This frosting is less sweet, because there's more of the cream cheese/butter component in relation to the sugar, when compared to the buttercream frosting.

2 8-ounce packages cream cheese*
1/2 cup butter (1 stick)
1 tablespoon vanilla extract
2 pounds powdered sugar

Beat the cream cheese and butter until it's smooth, then add the vanilla extract and beat until it's incorporated. Add the powdered sugar in increments until the mixture is the consistency is what you're looking for. If you need less sugar, that's fine. If you somehow manage to get it too thick, add a little milk or cream.

*The cream cheese you choose does make a difference. I've tried making frosting with fat-free cream cheese, and I thought it tasted terrible. If you like it, go for it. BUT! The brand and type of cream cheese will affect the consistency of the frosting. You might need more or less sugar to get to a nice frosting-like consistency.

Make it Your OWN!

Frosting isn't something that needs to follow an exact formula. It's all about flavor and consistency. If you look online, you'll find lots and lots and lots of variations when it comes the proportion of fatty substance to sugar.

You can't go too far off the beaten path or you'll end up with something that will drip instead of spread. But within a pretty wide range, you can adjust the frosting to your taste, adding more or less sugar, more or less butter, or more or less additional liquid. So, if you want to start with 3/4 cup of butter and just a little cream cheese, that's perfectly fine.

As far as flavor goes, you can use less vanilla (I tend to use more than most folks) or find some other interesting extracts. Add maple syrup or a splash of bourbon. Just taste and adjust until you have a flavorful frosting with the right consistency for piping or spreading.

Thursday, September 4, 2014

Pizza dough - for 2 personal-sized pizzas

I hadn't planned posting this as a recipe, but I needed to make a little pizza for a photo for a post I was writing about unique ways to use a cast iron frying pan.

One of my interesting options was to use the frying pan upside-down in the oven to bake the pizza. Like using a cast iron pizza stone.

So I threw together this dough, and it turned out pretty darned good, so I wanted to save the recipe - for myself. Of course, the best place to save it is on this blog.

This makes just enough for two small pizzas, each about 8 inches in diameter.

Pizza Dough

1/2 cup water, plus 2 tablespoons
1 teaspoon yeast
1 teaspoon sugar
1 cup (4 1/2 ounces) bread flour
1/2 cup (3 ounces) semolina flour
1/2 teaspoon salt
1 tablespoon olive oil

Combine all the ingredients in the bowl of your stand mixer fitted with the dough hook. Knead until the dough is smooth and elastic.

Cover the bowl and set aside until the dough has doubled in size, about an hour.

Put a large cast iron frying pan in the oven, upside-down (you'll be cooking on the bottom of the pan). Note: You might want to measure the bottom of that pan to see how large it is, so you know how large you can roll your pizza dough. My pan was 9 inches in diameter, so I figured that an 8-inch pizza would be the maximum.

Flour your work surface and turn out the dough. Knead briefly, the divide into two pieces. Roll the first piece to the size you need it. Sprinkle a pizza peel with cornmeal and place the pizza on the peel Top it as desired - I used some basil pesto and some cheese - nothing fancy.

Use the peel to transfer the pizza to the frying pan bottom. Cook until the crust is brown and the cheese is bubbly and browned in a few spots.

Remove the pizza from the pan - the easiest thing to do was grab it with tongs and slide it onto the peel.

Slice and serve.

Make the second pizza the same way.

Monday, August 25, 2014

How to knead bread

A while back, I wrote a some columns for Serious Eats called Knead the Book where I reviewed bread-baking books and made some of the recipes. 

Scroll down to the bottom for a chance to WIN The Art of Baking Bread and four others that I think you'll like! (Giveaway is now over.)

Here's part of what I wrote, way back in 2012:

The Art of Baking Bread is the bread book I wish I had when I first started baking bread. Back then, most of the bread books were filled with recipes, which makes sense. But they assumed the reader would know how to knead or fold or shape.

And that makes sense, too. You wouldn’t expect a cookbook to explain how to stir soup or give detailed instructions on how to peel a carrot.

Handling bread dough isn’t difficult, but it takes some practice and you need to know some basics before you begin.

This book teaches those basics. Oh, sure, it has some recipes. But not a lot of them. Most of the book is about technique, and it goes into detail, dividing the process into eight steps.

That makes the few recipes a little difficult to follow because each step refers to instructions in another section of the book. But that’s only the first time you make a loaf. Once you’ve mastered the techniques, you won’t need to refer back to the details.

But it’s not just about basics. It’s also about options. Many techniques offer different methods. You can knead your bread using the standard method or the French method. There are several methods for folding dough. And the list goes on.

Along with the instructions, there are tips in each section, as well as comprehensive information about equipment and ingredients. It’s all written in plain language so it’s appropriate for a beginner. But at the same time, there’s plenty for the more experienced baker to think about as well.

How to Knead Bread
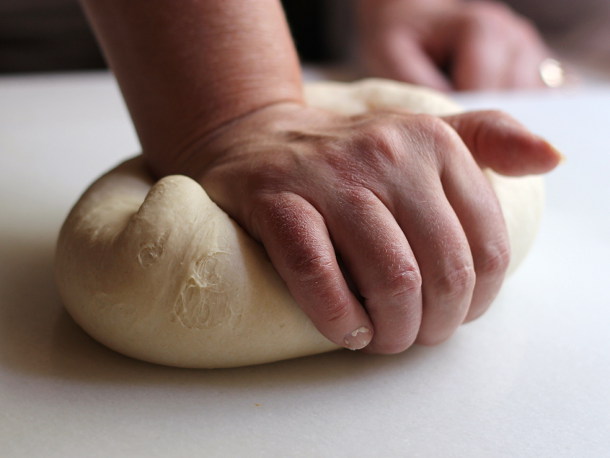
There are two methods of bread kneading described in The Art of Baking Bread. This is the conventional method. From The Art of Baking Bread by Matt Pellegrini. All rights reserved.

1. On an unfloured work surface, place the ball of dough directly in front of you with the heel of your hand on top of the dough.

2. With the heel of your hand, push the dough downward (toward the work surface) and forward with a smooth stroke. Make sure that your are pushing hare enough that the dough moves underneath your hand, but not so hard that the dough beings to tear. When you have pushed the dough so that the heal of your hand is at the front edge of the dough, remove your hand from the dough.

3. With your other hand, fold the dough in half and move the dough back to where it started before the first knead.

4. Repeat steps 1 through 4 until the dough becomes smooth and the gluten has been developed to the desired degree.

Conventional Kneading Tips
  • Work the dough as close to your body as possible to alleviate unnecessary pressure on your back.
  • Focus on pushing the dough, not rolling it or compressing it.
  • Resist the urge to add flour to the dough. The more you knead, the more air will be incorporated into the dough and the more the flour will absorb the water. Both will help to combat what appears to be excessive moisture.
  • If the dough sticks to your work surface, use the stiff bowl scraper (or bench knife if it won’t scratch your surface by doing so) to scrape the bits of dough from the surface and return them to the rest of the dough.
  • If you find that you are getting tired during the process, switch hands. It might take a little getting used to as far as coordination goes, but once you get the hang if it, you’ll be able to work through the kneading process that much easier.
  • As you knead the dough, you will notice that it transforms into something much smoother and more elastic. This means that the dough is developing precisely the way you want it to. So keep doing what you’re doing.
  • If you use the conventional method to knead dough with a greater hydration level, it is helpful to use the bowl scraper instead of your hand to gather the dough and fold it upon itself during the kneading process. If you use your hands, the dough sometimes sticks to them so much that it’s hard to keep the dough together.
  • If you decide to make larger batches of dough, be aware that the heavier weight of the dough takes more effort on your part. Keep that in mind so you don’t wear yourself out before the dough makes it to the oven!

Want to win an AUTOGRAPHED copy of this amazing book?

Sorry! Tbe giveaway is now OVER.
PLUS four other cooking-related books?

You want them, right?

Go to my new review/gadget/giveaway blog, Cookistry ... Reviews and enter to win ALL FIVE BOOKS:

The Art of Baking Bread
Betty Crocker Cookbook
Emeril's Potluck
Big Book of Pies and Tarts
A Short History of the American Stomach

Monday, July 28, 2014

Basic Pasta Dough - great for cavatelli!

I had to test a cavatelli maker, so I needed pasta dough. This is the one I made. This would be just fine for other types of pasta, as well.

Pasta Dough

Fresh, home-made cavatelli.
3 cups (13 1/2 ounces) of all purpose flour
1 egg
1 teaspoon of salt
About 1/2 cup of water

Combine the flour and salt, then add the egg. Then add the water until the dough no longer has dry bits and it can come together in a ball - the actual amount of water you'll need, depending on the flour you use. You're looking for a firm but kneadable dough.

Knead the dough until smooth, then wrap the dough (or place it in a plastic bag and seal it) and let it rest for at least 30 minutes. You can let it rest at room temperature for an hour ... maybe longer. But if you need to let it sit around for a long time, refrigerate it.

Roll the dough as needed, and cut to the desired shape.

Want to know about Fante's Cousin Elisa's Cavatelli Maker maker I was testing? Go check out my new review blog.

AND ... I'm gearing up for a really great giveaway. Keep your eyes peeled!

Saturday, July 26, 2014

Best High-Altitude Hard Boiled Eggs EVER!

Hard boiled eggs shouldn't be difficult. But sometimes they are.

Before I moved to Colorado, I could boil hard-boiled eggs with no trouble. Heck, I didn't even need to time them. It was an instinctual thing. I'd think, gee, I'll bet they're done. And they'd be done.

Then I moved to high altitude. And, well, I could still hard boil an egg. I just couldn't boil them right. I tried every possible version of boiling, simmering, leaving them in hot water with the lid on. I changed the timing, the pot, and the amount of water.

I tried salting the water, and I tried adding baking soda to the water. I tried old eggs, very old eggs, and fresh eggs.

And no matter what I tried, and even if the center of the eggs were slightly undercooked, I always ended up with a green ring around the yolks. Always.

And let's not talk about the perils of peeling. Sometimes I'd get the eggs to peel cleanly, but often the peels stuck and the eggs were ugly. And that was totally inconsistent. I always boiled extra eggs, because it was a good bet that at least some shells would stick. But there were always some that were perfectly fine.

Then, I tried steaming the eggs. I read an article that suggested that 12 minutes was perfect, but that was written by someone at sea level, and I live at just about a mile high. I knew the timing was probably going to be a bit off, so I pulled out one egg at 12 minutes to test it. The inside was set, but not as done as I liked. So I continued cooking. At 16 minutes, I tested another one, and it was cooked evenly to the center, and absolutely no green ring around the yolk.

Even better, every single egg peeled very, very easily.

Just what I wanted.

Have you tried steaming eggs? You should!

Psssst! Hey! Wanna know a secret?


Look up. No, not at your ceiling. Look up at the tabs at the top of this page. See the very last one, labeled Cookistry Reviews? If you click that, it will lead you to my brand new review blog!

Go! Check it out! I'll still be here, cooking.

Sunday, June 29, 2014

Packing for a Picnic?

Recently, I conducted a completely unscientific poll and found that there were three distinct picnic food groups. First came the comfort food version with cold fried chicken and potato salad. Second was the wine and cheese picnic, and third came sandwiches.


My personal preference is probably based on my early infatuation with Aunt Bea’s fried chicken packed in a wicker basket for Sheriff Andy. But I would never turn down wine, cheese and nibbles.

First, You Need a Basket


A picnic basket doesn’t need to be wicker. Or basket-shaped. Red Envelope sells a backpack designed especially for picnicking. It comes complete with dishes, wine glasses, metal utensils, napkins, cutting board, serrated knife, corkscrew, and tiny salt and pepper shakers. Insulated storage for food is in a separate compartment, and detachable wine storage and a picnic blanket complete the set - and you can get the backpack monogrammed, as well.

The backpack basket is great if you’re doing a little hiking to your picnic space, whether that hiking is urban or back-country trails. Or, perhaps for a short bike ride. But since space (and weight) is limited to what makes sense to carry on your back, they’re probably best for wine, cheese, and nibbles, or for a few sandwiches and a few sides, rather than a huge spread.

Wicker baskets evoke that old-timey picnic vibe. From Bambeco, the picnic basket for two includes bamboo plates and utensils, embroidered napkins, wine glasses, and a cutting board. Since the interior is roomy, this sort of basket is well suited for a larger and more varied array of picnic goods.

No matter what type of basket you choose (or an insulated cooler, or canvas bags, or whatever you prefer to carry), you need to do some planning when it comes to packing – because once you get to the picnic area, you can’t run back to the kitchen for an extra spoon.

Keep Your Cool


When it comes to food storage, we probably all know the mantra that heat rises and cold sinks, so for best preservation of chilled foods, it makes some sense to have the ice packs on top (if you’re using them – but more on that in a bit). But there’s another logic involved. Put the foods you’ll want first on top, and leave dessert on the bottom. You’ll conserve more chill by having the basket open for less time.

While ice bags are useful, I found that using a freezable sports bottle filled with water worked just as well. I didn’t fill the bottle completely, since I didn’t want it to burst in the freezer, and it was the last thing to go into the basket when it was packed.

Of course, if you’re going on a long drive, you might need more chilling power, but for a quick trip to a nearby park for lunch, things will stay cold long enough. And, once you’re at the picnic, you have cold water to drink.

Another option for chilling that serves double duty is the Rapid Ice Cooler from Vacu Vin. Actually, there are a variety of these sleeves, designed to fit cans and bottles to chill them and keep them cool. You can wrap them around your containers before putting them in the basket (which has the added benefit of cushioning them, if you happen to be bringing glass) or you can lay the coolers on top of the basket for travel and let people insulate their beverages as they’re drinking. You can also use them to keep foods chilled, if you have them packed in containers of the right size.

How will you serve?


One thing to keep in mind is that your chosen picnic spot might not be close to running water, so if you drop your serving spoon in the grass, maybe you’d rather grab a clean spoon instead of trying clean the dirty one.

In fact, I suggest bringing along plenty of extra utensils. They don’t take much space. For serving spoons and random cutlery, you don’t need to go all-out with high-end equipment. A visit to a local thrift store will probably supply you with a big handful of unmatched and interesting flatware and serving spoons for very little cost. When the picnic is over, wash them, put them in a plastic bag, and store them in the basket so you’re ready to go next time.

Speaking of cutlery, bring along a few extra knives, as well. You don’t need your best equipment, but I’d suggest something better than a butter knife. A knife that comes with its own sheath is a good idea, like the Oni knife from Dreamfarm that’s designed for cutting with one edge and easy spreading with the other. A divot in the handle has a tiny sharp edge for cutting – like when you’re wrestling with one of those chip bags that just doesn’t want to open.

A few small cutting boards can come in handy, too. Remember, you might not have a good way to rinse your used boards, so it might be handier to bring a few extras. While I love small flexible cutting mats, you might be working on a bumpy surface at the picnic area, so solid board might be a better choice. The “small plates” boards from J.K. Adams are small enough to fit into your basket and the designs are pretty enough to use them as serving boards for your cheese – you did think about serving that cheese, right?

For the wine and cheese basket, don’t forget the toothpicks! I packed cheese, olives, and some pickled items, none of which really required plates or utensils to nibble – but toothpicks are certainly more civilized than poking in the olive container with your fingers. Buy a little toothpick dispenser and keep it in the picnic basket.

How about extra glasses? Sure, you can refill your wine glass with lemonade or iced tea, but why not pack a couple extra glasses? Duralex glasses are durable enough to travel, and you can use them for serving that fruit salad you brought, just in case it’s too messy to put on flat plates.

While the picnic baskets I mentioned came with their own napkins, some extras in a dispenser that will keep them from blowing away is a good idea. After the picnic, leave it in the basket or use it for back yard dining. The Simply Pull napkin holder from OXO is a good choice.

Many of the baskets on the market come in 2-person and 4-person versions. Even if you think your picnics will only involve two people, the 4-person version might be a good choice, since you'll get extra plates and utensils that can be used for serving, and you won't need to pack up as many extras.

Food, Glorious Food


I have a tendency to put way too much food on the table for dinner, but that’s fine because leftovers are easy to pack and store. At a picnic, that’s not necessarily the case. No matter how well chilled your food was when it arrived, it’s probably going to be edging towards warm if it’s been out of the basket for serving.

Are you really going to pack that food up and put it in the refrigerator to serve another day? Some things, yes. The potato salad, probably not.

OXO’s LockTop containers come in a variety of sizes, and the 4-ounce container was perfect for a single serving of cole slaw – no need to dish it out – just pop the top and eat. If you think someone will want a second serving, just bring extras in those small containers and keep them chilly in the basket.

A larger LockTop container was great for the chicken and a divided container kept vegetables and olives from getting to know each other too well.


While it’s perfectly fine to pick up olives, hummus, and pickled vegetables from the olive bar at the grocery store, don’t be tempted to use those containers for your picnic. I’ve had those flimsy plastic containers open and spill into my grocery bag, and that’s not something you want to deal with at a picnic.

Besides, if you’re packing munchies for your wine and cheese basket, you’ll probably want a small amount of many things, rather than a vat of hummus and a quart of cornichons. And think about how fun it will be to unpack and nibble on a whole array of small portions, while you slice your cheese and sip your wine.

I used an assortment of containers, including colorful Veggie Savers from Mastrad for the fruit I brought for dessert. To go with the wine-and-cheese basket, star fruit in a bright purple container looked great.

Remember that ice water in a sports bottle? I suggest bringing extra water or other beverages besides the wine. On a hot, sunny day, you might find yourself wanting to chug a whole lot of cold drinks. The Pure Fizz soda maker lets you bring your own carbonated water – flavored or not – and the Bormioli Rocco bottles are a beautiful way to carry your homemade lemonade or iced tea.

Sandwiches, Anyone?


For sandwich packing, there are two options – the pressed sandwich would be fine wrapped in foil and stashed in a plastic bag to thwart leakage, but the Compleat FoodSkin offers another option. It stretches and molds around the food inside, keeping it snug.

For the make-your-own sandwich, sturdy plastic sandwich containers would house bread nicely – one sandwich at a time – and meats, cheeses, and condiments could be stored separately, to avoid the dreaded soggy sandwich issue.

Then we have condiments. Depending on what you’re serving, you might want mustard, ketchup, mayonnaise, hot sauce, ranch dressing, oil and vinegar dressing – but you’re only going to use small amounts. Rather than bringing a whole bottle, consider repacking, and then consider easy serving.

The travel bottle from Swissmar is designed to hold 3 ounces of liquid – which you could take on an airplane – but it’s also nice for ketchup, mustard, or mayonnaise on a picnic. For dressings and sauces that are more pourable, the small salad dressing shaker from OXO holds 8 ounces and has a pour spout.

If you want hot coffee with your meal, forget about carrying it in your picnic basket. Use a insulated bottle or travel mug and carry it separately. You can even find insulated containers in bowl shapes for that hot German potato salad or the baked beans that you want to serve with your sandwiches.

Some Extras You Shouldn’t Forget


Don’t forget a blanket, if you’ll be sitting on the ground. The blue checked blanket (from Target; not online) folds and zips to form a pillow with a carrying handle, and if you forgot one last thing, you can shove it into the zipped blanket for easy carrying.

Any blanket will do, really, but keep in mind that the ground might be damp. Bring a thick blanket, one with a waterproof underside (like the blanket that came with the backpack) or a combination of a waterproof ground cover (a plastic tablecloth or drop cloth are fine) along with your own festive blanket.

Don’t forget to bring chips or crackers to go with the cheese, salsa and dips. They’re lightweight, but bulky. It would be ideal if you could fit absolutely everything into the basket … but really, why stress? It’s not like luggage. You won’t get charged extra for bringing another bag. Any sturdy tote bag will do, since we’re not worried about insulation.

While chips come in their own handy storage container to bring to the picnic, think about how you’ll take them home without spillage. Bring bag clips. Not only do they seal your bags, but you can clip one to the corner of your napkin to keep it from floating away on a breeze.

Speaking of snacking, if you’re bringing a little friend along who won’t be partaking in the main event, whether a toddler or four-footed pal, bring something a special. Snickers was amused by this shark container, designed for kids’s snacks.


Now that you’ve committed to bringing a tote bag for the chips, a roll of paper towels might come in handy if things get really messy. And it’s not like they’re heavy to carry. Toss a pack of Wet Naps in the bag, too, if you tend to get messy.

Bring along a trash bag or two, for easy cleanup when the picnic is done. Remember that running water that might not be nearby? Well, after the picnic you’ve got a collection of dirty plates, utensils, and probably some now-empty storage containers. Do you really want them dripping into your basket? Collect them and put them in a trash bag (or other reasonably large bag) to keep your basket clean, and not make a mess of the storage containers that will be heading back to your refrigerator after the picnic.

Remember those chunks of cheese that came wrapped from the store? It made sense to slice and serve at the picnic, but now that the wrapper is ripped, how are you going to bring them home? Bring a few plastic zip-top bags. They take no space to carry and you might find other uses for them as well, like carting off the chicken bones when you realize there’s no trash bin nearby.

If you drove to the picnic, there’s one last thing you might bring, but leave it in the car: a plastic gallon jug of water. Sure, many picnic areas have running water, but what if it’s not available? That jug will come in handy to wash sticky hands or rinse muddy feet, if need be.

And now you can pack up the car and go home.

This previously appeared on Serious Eats. Some products were provided be the manufacturers specifically for this post; other products came from my personal stash.