Showing posts with label comfort food. Show all posts

Friday, February 16, 2018

Blasphemous Chili - cooked in an electric pressure cooker!

When I was growing up, the only chili was chili mac. There was no Texas chili or Cincinnati chili.

Chili was ground beef, beans, and elbow mac in a tomato-y sauce. That's what my mom made, and that's what was served in the school cafeteria.

It was the only chili that existed in my universe.

It was the first "meal" that I cooked for the family, when I was trying to earn a Girl Scout badge. I waffled between chili and spaghetti, but chili seemed more complicated, so that's what I chose. Oyster crackers might have been involved, and I might have made a salad. Dinner was served.

My mother cried. Because it was the first meal she made for my dad when they were newlyweds. Which is completely ridiculous, because they were Polish and living in the midwest, where chili was not a big deal.

Polish cuisine is not known for spicy foods, although they do love their black pepper. But spicy peppers? Nah, those didn't exist. And midwest food wasn't particularly spicy at that time, either. We had plenty of bell peppers, but jalapenos were unknown in my neighborhood.

But she made chili mac for my dad, and I made chili mac for a badge.

I was a little disappointed that it was so simple. It took some time to make because she simmered the beans and meat for quite a while. But it was very very simple to assemble. You know, with canned kidney beans in the starring role.

Imagine my surprise when I found out that most chili didn't include the mac. And then my head nearly exploded when I found out about chili without beans! Whoa, nellie! And then (drumroll please), green chili was a whole new world of wonder.

Although my taste buds have grown up and I like spicy foods now, I still like the comfort foods of my childhood, and that includes (gasp!) Chili Mac.

Sorry about the weird kitchen lighting!
So, when I bought a pressure cooker cookbook put out by the folks at America's Test Kitchen, I decided to give the chili mac a try.

Although I've been using a pressure cooker for a long time, pasta is not something that I tend to cook in there. Pasta cooks fast enough. Why do I need to pressure cook it?

But still, I figured it would be a good test of the book, and the pressure cooker (I'm testing a new one.) So I plunged right in.

Unlike my mom's recipe, this didn't have beans. But it did have corn. And it's spicier than what mom made. I'd have to say that although it had the same comfort factor, it felt a little ... more modern. The corn, you know. Not what mom used.

Overall, I really liked this, and I certainly can't argue with the one-pot ease. The pasta was a little more cooked than I would have preferred, but it wasn't totally dead, and it was still fine when I reheated. So it wasn't overcooked. And ... since pressure cookers are not identical, some adjustments in cooking time are to be expected.

The flavor was good. Just enough spice so I wasn't tempted to add hot peppers, but not overly spicy. Of course, that can be controlled by adjusting the chili powder and the spice level of the canned peppers, so you can make it more or less hot to suit your own taste.

Other things can be easily adjusted, too. Add more onions, or different meats, or even add (gasp! puff! gasp!) some beans.

In any case, I'm keeping this as part of my lazy cooking repertoire, when I want something comforting and easy, and I don't want spaghetti.

Tex Mex Chili Mac
Recipe from America's Test Kitchen Pressure Cooker Perfection
I made this in an electric pressure cooker, so that's the instructions I'm including.

1 tablespoon vegetable oil
1 onion, chopped fine (I left mine a little larger than fine)
1 green pepper, stemmed, seeded, and cut into 1/2 inch pieces (I cut mine a little smaller)
3 garlic cloves, minced
2 tablespoons chili powder
1/8 teaspoon cayenne pepper
1 pound 85 percent lean ground beef
2 cups water
1 15-ounce can tomato sauce (I had 2 8-ounce cans, so mine had just a little more)
8 ounces (2 cups by volume) elbow macaroni
1 cup frozen corn
1 4.5 ounce can chopped green chiles (these are available in mild, medium, and hot, so you can control the heat)
2 tablespoons minced fresh cilantro
Salt and pepper
4 ounces shredded cheese, for serving

Heat the oil in your pressure cooker until it's shimmering. Add the onion and bell pepper and cook until softened, stirring as needed.

Add the garlic, chili powder, and cayenne and cook for another 30 seconds.

Stir in the ground beef. Cook, stirring to break up the meat, until you no longer see any pink.

Add the water, tomato sauce, and macaroni.

Put the lid on the pressure cooker and make sure the vent is closed.

Pressure cook on high pressure for 5 minutes, then quick-release the pressure. (I'm going to try 4 minutes next time, to see if I like the texture of the pasta better. If it's not quite done, I can always cook a little longer after the pressure is released.) Remove the lid.

Stir in the corn and chiles and simmer until the corn is tender and the pasta is cooked to your liking. Taste for seasoning and add salt and/or pepper as desired.

Serve with a sprinkle of grated cheese. I've also been known to stir in a little sour cream or yogurt, as well.

Check out the book here:


Tuesday, September 13, 2016

Retro Recipe Redo - Impossible Turkey Taco Pie

Way back when, there were a whole bunch of recipes for what were called Impossible Pies. They were magical recipes that made their own "crust" as they baked. And they all used Bisquick to make that magical crust.

I was browsing through some old newspaper and magazine clippings I had saved and scanned, and I found a recipe for Impossible Taco Pie. I had made that recipe many times back in the day, and I really liked it. I decided to make it again, to see if I still liked it.

But of course I made some changes.

I used turkey instead of beef, and I have to say that I doubt anyone could tell the difference in this recipe. Which is a good thing.

I didn't have any Bisquick in the house the first time I made this, but there are a lot of "make your own Bisquick" recipes online, so I figured I could do that rather than run to the store.

Nope. It didn't work. Not at all. I made it with Bisquick, and it was perfect. So, although that "make your own" recipe is probably a fine substitution for some recipes, it didn't work for this one. Maybe if I fiddled around with it some more, I could work it out, but that doesn't seem like a good use of my time.

Or my ingredients.

So now I have Bisquick. So it's a pretty sure bet I'll be making this again. Or maybe some other version of it. Because, seriously, this is comfort food, in the best possible way.

Panela cheese is interesting. It's a fresh cheese with a mild flavor. It softens when warm, but it doesn't really melt. So you'll end up with soft pockets of cheese in the pie, but they won't melt and get disappear into the pie.

Impossible Turkey Taco Pie

1 tablespoon olive oil
1/2 large onion, diced
1 pound ground turkey
2 tablespoons chili powder (or to taste)
1/2 teaspoon cumin
1/4 teaspoon garlic powder
1 teaspoon salt (or to taste)
1 fire-roasted red pepper, diced
4 ounces panela cheese, cut in small cubes
3/4 cup Bisquick
1 1/4 cup milk
3 eggs
1 4-ounce can diced Hatch chiles
4 ounces shredded provolone cheese
Diced tomatoes (as needed for garnish)
Diced avocado (as needed for garnish)
Green salsa (for garnish)

Green Salsa

8 medium tomatillos
1 small green pepper, cored and seeded
1 serrano pepper, cored and seeded
1 small bunch cilantro
1/2 teaspoon salt (or to taste)
2 teaspoons lime juice (or to taste)

Heat your oven to 400 degrees and have a 9-inch pie plate standing by.

To make the taco pie:
Heat the olive oil in a saute pan. Add the onion, turkey, chili powder, cumin, garlic powder, and salt. Cook, stirring as needed, until the turkey and onion is cooked through. Take it off the heat and add the roasted red pepper and the panela cheese.

Add the meat mixture to the pie plate and level it.

Mix the Bisquick, milk, and eggs in a medium bowl. Pour over the meat in the pan. Sprinkle the chiles on top.

Bake at 400 degrees for 25 minutes. Sprinkle the provolone cheese on top and return the pie to the oven. Bake for an additional 10 minutes, or until a knife inserted into the center of the pie comes out clean.

Let the pie rest for 5-10 minutes for easier slicing.

Garnish with chopped tomatoes, avocados, green salsa

To make the salsa:
Put all the ingredients in a blender, and blend until smooth.


Friday, September 2, 2016

Sous Vide Oxtails

It's been a while since I've posted a sous vide recipe, mostly because I've been making a lot of the same things.

This time, though ... I decided to make something totally different. Well, the meat isn't different for me, since I grew up eating oxtails. But the method is different. I've pressure-cooked oxtails and I've braised them and I've slow cooked them.

But then I thought ... why not sous vide? I loved the sous vide short ribs I've made, and oxtails are that same sort of tough meat. So I figured I'd use the same sort of cooking method. I upped the temperature just a little bit, but kept the looooooong cooking time.

I didn't add a lot of seasoning - just a little bit of commercial barbecue sauce. Then I sealed up the bag, chucked it in a big pot, and let the oxtails enjoy the hot tub experience.

I used my Anova Wifi Precision Cooker, which is actually pretty cool. I can set it all from my phone and monitor it from my phone and watch it from my phone. There are recipes included as well as suggested cooking times and temperatures.

Let me mention that one thing I like about this model is that the timing doesn't start until the temperature has been reached. If you're cooking for a long time, the extra time it takes water to come to a recipe probably doesn't matter much. But if you're cooking for a short time, it's nice that the timer doesn't start before temperature has been reached.

But of course I didn't use the included recipes because I was winging it. Or tailing it, maybe?

The great thing about this recipe is that you can pretty much cook more or less meat, and you can flavor it any way you like. I added that tiny squirt of barbecue sauce, but you could certainly add hot sauce, teriyaki, ginger, beer, wine ... pretty much anything you can think of. Or add nothing and serve the oxtails with a sauce.

There's one prefect word for these oxtails ... unctuous. They were tender and juicy and mmmm. Just mmmmm. Not soft and mushy, not dry or chewy. Perfectly cooked, but still pink inside. Not rare pink, but not brown or gray. They couldn't be better.

I'm definitely going to make these again. I'm not saying I'll never use my pressure cooker for oxtails when I want food fast. But I'm definitely going to try to plan ahead next time I want oxtails so I can cook them sous vide. It's well worth it.

Sous Vide Oxtails

3 pounds oxtails (or as many as will fit neatly in a bag in one layer)
Squirt of barbecue sauce or other flavoring (optional)

Put the oxtails and flavoring in a vacuum seal bag and seal it.

Place in a large pot with your sous vide attached. Cover the pot as best you can with foil or another type of cover. I use a silicone cover from GIR that has a V cut out. They don't come with that cut-out, but scissors or a sharp knife will do the trick.

Set the sous vide for 150 degrees for 72 hours.

When the time is up, you can serve the oxtails right away, or let them cool to room temperature, then refrigerate and reheat later.

The juice left in the bag is a pretty amazing stock. There's not much of it, but there's plenty to make a little bit of a sauce or gravy, or add it to the cooking water for rice, or add it to some soup to add a boost of flavor.

Friday, April 8, 2016

Creamy Goat Cheese and Chive Grits

I totally love grits. It's become sort of a joke in the cookbook-swap group that I belong to - if there's a grits recipe in one of the books, I'm probably going to make it.

When I got The Up South Cookbook by Nicole A. Taylor, I was happy to see that there were several grits recipes to choose from.

Or, actually, I made two of them. The first one had cheddar cheese and blue cheese mixed in. That was really good with the hint of blue cheese. But the interesting thing about that recipe was that it used corn stock - basically corn cobs simmered to make a corn-only vegetable stock.

At this time of year, I don't have fresh corn hanging around, so I used a basic vegetable stock. But when fresh corn is in abundance, I'm going to make corn stock for sure.

So anyway, the next grits recipe that struck my fancy was one that called for goat cheese and chives. The flavors sounded good, so I decided to make it. The first time ... the goat cheese I had on hand seemed a bit off. I ended up making grits with feta cheese instead. It was good, but not particularly pretty.

So I bought goat cheese. I had chives growing, so I harvested a nice handful.

And then I decided to make the grits in my Instant Pot. Why, yes, I might be getting addicted to that thing. I'm having a blast creating and adapting recipes for it. And it's nice to be able to have food done quickly.

These grits are super creamy. Probably the creamiest I've made since a slow cooker grits recipe or maybe the Tyler Florence grits recipe that included actual cream. But this one was faster and easier than either one, and required no stirring.

Right out of the pot, these were super-creamy and loose. Just like any other grits, they got a bit solid when refrigerated. This is great if you want to fry the grits, but I like them soft. That softness and looseness can be adjusted by adding more liquid (water or milk are my usual choices) as you reheat.

Creamy Grits with Goat Cheese and Chives
Adapted from The Up South Cookbook (Baked Grits and Fresh Chives) by Nicole A. Taylor

4 cups water
1 teaspoon Better Than Bullion vegetable or chicken stock concentrate
1 teaspoon salt
1 cup coarse grits
4 tablespoons unsalted butter
1/4 teaspoon freshly ground white pepper
4 ounces goat cheese
1/4 cup chopped fresh chives

Put the water, stock concentrate, salt, grits, butter, and pepper in the Instant Pot. Give it a stir. Place the lid on, make sure the knob is set for sealing, and push the porridge button. Make sure it's set for 20 minutes.

When the time is up, let the cooker stay on the "keep warm" setting for 15 minutes before turning the machine off and releasing any remaining steam.

Remove the cover and stir or whisk the grits. They will look a little watery, but they'll be nice and creamy after you stir. Add the goat cheese and stir until the cheese is melted into the grits. Add the chives and stir. Taste and adjust seasoning as desired.

Serve.

The recipe in the book calls for baking the grits in ramekins with an egg on top, until the egg is cooked. You could also serve the grits with a fried or poached egg on top. Or just serve them plain.

Monday, April 4, 2016

Vegetable Soup - Easy to make vegetarian or vegan!

It seems like every time I get a new gadget, I make a million recipes in it. When I got my Vitamix, I had smoothies every morning for breakfast. And maybe for lunch. And blended cocktails. And  ... well, all sorts of blended things.

I didn't post a lot of recipes because, well, it was smoothies. Lots of bananas disappeared, but I wasn't being particularly creative.

Now that I have an Instant Pot, I'm having fun pressing buttons and seeing what it can do. One night, I was thinking about soup. I had chicken stock, canned tomatoes, fresh vegetables. It was 10:34 and I seriously wanted to make the soup that late at night. But then I decided it would be just as easy to make the soup the next day for lunch.

So that's what I did.

To make this soup vegetarian, simply swap in a vegetable stock for the chicken stock. To make it vegan, omit the butter or use olive oil instead. It might sound a little odd to add butter or oil to a soup, but this soup has no meat that would normally provide fat. It's not necessary, but it adds a little bit of richness.

The mild Hatch chilis don't add heat to the soup - if you prefer a spicy soup, use hot chilis. Or you can pass hot sauce or sriracha at the table for those who like it hot.

Vegetable Soup

1 quart chicken stock (I use Kitchen Basics if I don't have homemade)
2 14.5-ounce cans petite diced tomatoes
1 14.75-ounce can creamed corn (or corn kernels, your choice)
1 4-ounce can mild diced Hatch chilis
1 cup sliced carrots (about 3)
1 cup sliced celery stalks (about 3)
1 medium onion, diced
1/4 cup jasmine rice
2 tablespoons butter
2 teaspoon lemon juice
1 teaspoon salt

Place all the ingredients in the Instant Pot and give it a little stir. Set on "soup" setting and turn time to 12 minutes. When the time is up, release the pressure. Serve hot.

I received the Instant Pot though 37 Cooks in order to create a post on that site. I'm not obligated to continue posting about it.

Wednesday, March 30, 2016

Short rib, carrot, and tomato stew

I love short ribs. Lately, I've been obsessed with cooking them sous vide. The texture is totally different than what you get when you cook them any other way. But sous vide short ribs cook for a looong time. The recipe I use cooks for 72 hours.

Although I love that style of short ribs, change is good. So is speed. Thus, the decision to wrangle the ribs in my Instant Pot, using the pressure cooker function. Or, more accurately, I used one of the pre-sets to make it even easier.

The result was ... well, comfort food. The meat was tender, the carrots were perfect, the sauce was tasty, and it was just what I wanted.

Speaking of sauce, serve this with something to take advantage of that sauce. Crusty bread for sopping it up would be nice. Or simple boiled or mashed potatoes. Just don't waste it.

Short Rib, Carrot, and Tomato Stew

2 pounds beef short ribs
1 14.5-ounce can petite diced tomatoes
1/2 can (just eyeball it) water. Or measure about 3/4 cup, if you tossed the can.
1 onion, diced
1 teaspoon oregano
1/2 teaspoon salt (or your favorite seasoned salt) or to taste
1/2 teaspoon ground white pepper, or to taste
2 tablespoons red wine vinegar (optional)
1 pound carrots, peeled and cut into chunks (I like carrots a lot. Use as many as you like)

Put the short ribs, tomatoes, water, onion, oregano, salt, and pepper into the Instant Pot. Put the cover on, make sure the knob is set to sealing and not venting, and press the "meat/stew" button. Make sure it's set for 50 minutes.

When the time is up, turn the pot off and let the pressure reduce for 15 minutes. When the time is up, turn the knob to vent any remaining pressure. Taste the sauce for seasoning and add salt and/or pepper as desired. If the sauce needs a little brightness, add the red wine vinegar. 

Add the carrots and put the lid on the pot again, with the knob set for sealing. Set the cooker for manual, high pressure, and 6 minutes to cook the carrots. When the time is up, turn the cooker off and wait 10 minutes before releasing pressure.

You can serve this immediately, but I prefer cooling meats like this and reheating before serving. If you refrigerate it, it's easy to peel off the fat from the stew. If you serve immediately, you might want to skim off some of the excess fat before serving.

I received the Instant Pot through 37 Cooks for a post on our group blog. I am not obligated to keep posting about it. I'm just having fun.

Wednesday, March 23, 2016

Not Your Mom's Tuna Noodle Casserole

A while back, a company called Safe Catch sent me some lovely cans of tuna.

Have I ever mentioned that when I was a kid, I didn't know that tuna could come in any form except cans? I mean, I knew what fish was. We went fishing and ate what we caught. But the little mom-and-pop grocery store where my mom shopped didn't have fresh tuna.

Or, if I'm being honest, they didn't have any fresh fish at all. There might have been some breaded fish filets in the freezer case, but nothing as exotic as tuna. Or salmon. Or pretty much anything except cod.

These days, I can appreciate a nice tuna tartare or a seared raw tuna., but I still like canned tuna for tuna salad or for a tuna casserole. Because, seriously, tuna casserole is pure comfort food.

Not Your Mom's Tuna Casserole

4 tablespoons butter
1 onion, diced
1 rib celery, diced
1 pound fresh mushrooms, sliced
2 tablespoons flour
1 cup milk
1/4 cup mayonnaise
1 can Safe Catch Tuna
6 ounces egg noodles or your preferred noodle, cooked barely al dente
4 slices muenster cheese

Heat the oven to 350 degrees and have an 8-inch baking dish standing by.

Melt the butter in a skillet and add the onion, celery and mushrooms. Cook until the vegetables are cooked through and all of the liquid exuded from the vegetables has disappeared.

Add the flour and stir. Cook, stirring for a minute or two, then add the milk. Stir to combine, then let it come to a boil, stirring. It will thicken.

Add the tuna and stir to combine. Break up the tuna enough so that it is well distributed, but don't let it break up so much that you no longer have pieces. Fold in the noodles, then mix in the mayonnaise.

Transfer the mixture to an 8-inch square baking dish and top with the cheese.

Place the baking dish in the oven and bake at 350 degrees until the mixture is boiling and the cheese is melted. It's perfectly fine if the cheese browns a little in spots.

Serve warm.

I received product at no cost to me, but I wasn't obligated to write about it. I just happened to be hungry.

Tuesday, November 17, 2015

It was all spaghetti - even when it wasn't

Let me make one thing abundantly clear. My mother wasn't Italian. She wasn't even the littlest bit close to Italian. She was so far from Italian that I knew what ravioli was before she did. I came home from grade school all excited about this magical new food served in the cafeteria - ravioli. And no matter how I tried to describe it, she just couldn't get it.

So, when it came to cooking anything resembling Italian food, it was all spaghetti. Even when it was mostaccioli or rotini. If it was served with a tomato-based sauce, it was spaghetti. And all tomato-based sauces were simply called spaghetti sauce. There was no such thing as Bolognese or marinara in our house.

Nope. We got spaghetti with spaghetti sauce, even if it was fettuccini with marinara.

Now I know better, but even so ... there are times when I think about making spaghetti, but end up making rigatoni instead. Because when I go see what noodles I have on hand, there are no long thin noodles. And I'm fine with that. I pretty much love noodles of all shapes and sizes.

I was feeling a little bit out-of-sorts the other day and the best cure for that is nostalgic comfort food, so I decided that recreating one of mom's non-spaghetti spaghetti recipes would make me happy. In other parts of the country, this might be called hot dish or goulash. In my house, this was just one of the things that might have been served when mom said we were having "spaghetti."

I used mini wagon wheels. They were one of my favorite past shapes when I was a kid.

Wheels and Sauce

1 pound ground beef
1 medium onion, peeled and diced
1 large bell pepper (any color you like), cored, seeded, and diced
1 tablespoon dry oregano
Salt, to taste
1 jar ready-made pasta sauce (Your own or store bought. I used Ragu.)
1/2 pound pasta, any shape (I used mini wagon wheels! wheeee!)
Grated cheese, for serving

Heat a large saute pan on medium heat and add the ground beef, onion, pepper, and oregano. Add 1/2 teaspoon salt. Cook, stirring as needed until the meat and vegetables are cooked through.

Add the sauce and stir to combine. Taste for seasoning, and add more salt, if desired. Lower the heat to a simmer and continue cooking, stirring occasionally, while you cook the pasta.

Cook your pasta as desired, then add it to the meaty sauce in the pan. Cook for another minute and give it one last taste. Serve with grated cheese, if desired.

Last week, I wrote a sponsored post for Ragu with a different recipe and I used a similar Ragu sauce here, because I bought more than one jar to work with. However, this post is not sponsored. It's just a recipe. Using a jar of sauce that I bought. 

Monday, September 28, 2015

Slow Cooker Chunky Potato Leek Soup #SimplyPotatoes

This post brought to you by Simply Potatoes. The content and opinions expressed below are that of Cookistry.

Potato soup is one of my ultimate comfort foods, and what's better than comfort food that's easy to prepare? This one is made in a slow cooker, so you don't need to watch it, stir it, or worry about burning. Slow cooking is one of my favorite methods for busy days.

This was my first time using Simply Potatoes, and I have to say that I enjoyed the convenience. Just rip the bag open and go. In case you haven't seen them yet, Simply Potatoes are fresh potatoes, not frozen or dried, so you'll find them in the refrigerated dairy section. Since they're peeled and prepared, they're easy to use. And they're made from real ingredients. You know - potatoes.

I found a number of different varieties at the store, including hash browns - and how convenient it that? No grating in the morning when you're sleep-cooking!

In the end, I decided to use two different types of Simply Potatoes - the traditional mashed and the chunks. I used the mashed because I wanted a thick, creamy soup, and I used the chunks to provide texture in the soup to match the other vegetables. It was the perfect choice.

The rest of the vegetables in this soup can be prepped ahead of time if you like. Unlike potatoes that brown when cut, the carrots, celery and leek can be cut ahead of time and refrigerated until needed, so when you're ready to cook, you don't need to do much work at all.

This is a thick, stick-to-your-ribs soup. If you prefer something thinner, add more stock or water to achieve your desired consistency.

Slow Cooker Chunky Potato Leek Soup

2 carrots
1 stalk celery
1 leek
2 tablespoons butter
1 teaspoon salt
1 quart chicken stock (more as needed)
1 24-ounce package Simply Potatoes Traditional Mashed
1 20-ounce package Simply Potatoes Diced Potatoes with Onion
Freshly ground black pepper, to taste
Crumbled potato chips for garnish (optional)

Peel the carrots and slice them into thin rounds. Cut the celery in half, lengthwise, then slice into pieces about the same size as the carrots.

Trim the tough green parts off of the leek, and cut off the roots, if they're still attached.

Cut the leek in quarters, lengthwise, then slice into thin pieces. Put the leek pieces into a colander or strainer and rinse well. Leeks usually have dirt or sand trapped between some of the layers, and you want to make sure you remove all of that.

Heat the butter in a saute pan (or in your slow cooker, if it has a bottom-cooking function) and add the carrots, celery, and leek.

Add the salt, and cook, stirring, until the vegetables have soften a bit. You don't need them cooked through, but you do want to give them a head start.

Add the vegetable to the slow cooker along with the chicken stock and mashed potatoes.

Turn the heat to high and stir until the mashed potatoes are mostly mixed into the stock. It's fine if there are a few bits.

Add the potato chunks and stir again. Cook on high until the vegetables are cooked through - about 2 hours depending on your cooker and how thinly you sliced your vegetables. Taste and add more salt or pepper, if desired.

Serve hot.

Garnish with crumbled potato chips, if desired.

Thanks to Simply Potatoes  I gave away one slow cooker to a lucky winner (giveaway is now over).

If you're looking for more Simply Potatoes Recipes check out their website or follow Simply Potatoes on Pinterest.


Visit Sponsors Site
Slow cooker chunky potato leek soup.

Friday, September 4, 2015

Quick and Easy Chicken with Hatch Chiles

Don't get me wrong. This isn't fancy food. This isn't something you'd serve the Queen when she showed up. What this is, very frankly, it the meal you make when you want an hour before dinner to just sit and chill.

Or maybe an hour to help problem child with homework.

This uses (gasp) a can of soup. Yes, there I said it. I was inspired (and possibly frightened) by a recent cookbook that passed this way. It was written by Coolio.

Yes, that Coolio.

He's not a cook, but he wrote a cookbook called Cooking with Coolio, and it's a little weird. He has an odd love for balsamic vinegar, and canned soup made its way into a whole lot of recipes.

So I tried one of the canned-soup concoctions. And you know what? I liked it. It was comfort food. He was also pretty heavy-handed on the salt. Just so you know.

Anyway, this is not one of his recipes; not even adapted. The book is now long gone, so I couldn't peek if I wanted to.

I made this in my slow cooker, which is my usual set-it-and-forget-it cooking tool, but you could also make this in a heavy-bottomed pot, like a Dutch oven, either on the stove or in the oven.

Chicken with Hatch Chile

1 tablespoon olive oil
3-4 bone-in, skin-on chicken thighs*
1 red bell pepper
2 fire-roasted and cleaned Hatch** chiles (hot or mild, your choice)
2 tablespoons balsamic vinegar
1/4 cup water
1 can cream-of-something** soup
1/2 teaspoon salt
Chives or the green part of a scallion, for garnish (optional)

Heat the oil in your slow cooker (if it's got a stovetop/browning function) or in a pan on the stove. Or in your Dutch oven, if that's what you're using. Add the chicken, skin-side down, and cook until nicely browned. Flip the chicken over and cook the same way on the other side.

You can prep the vegetables while the chicken is browning.

Core the bell pepper and cut into a large dice. It doesn't need to be pretty. This is rustic food. Add to the pot when the chicken is browning on that second side.

Combine the peppers, balsamic vinegar, and water in a blender. Or you can use a stick blender or food processor. No tools like that? Just chop the peppers as finely as you can. Otherwise, blend the pepper mixture until it's as smooth as it can get.

Add the soup, pepper mixture, and salt to the chicken in the slow cooker and give it a stir. Cook on high for 60-90 minutes, depending on how much down time you need before dinner.

I served this with rice - made in my rice cooker. The rice was great for sopping up the extra sauce. Easy peasy.

Garnish the chicken with a few snips of chives or scallion, if desired.

* Of course, you can use other parts. Whatever you like. Cooking time might be different, though. I like thighs for the slow cooker because they're so forgiving as far as overcooking is concerned.

** If you don't happen to have freshly fire-roasted Hatch chiles waiting to be used, you can substitute with whatever you happen to have, or that you like.

*** I used cream of chicken, but you could use cream of mushroom, cream of celery, or even cheddar cheese soup.
Quick and Easy Chicken with Hatch Chiles

Monday, August 3, 2015

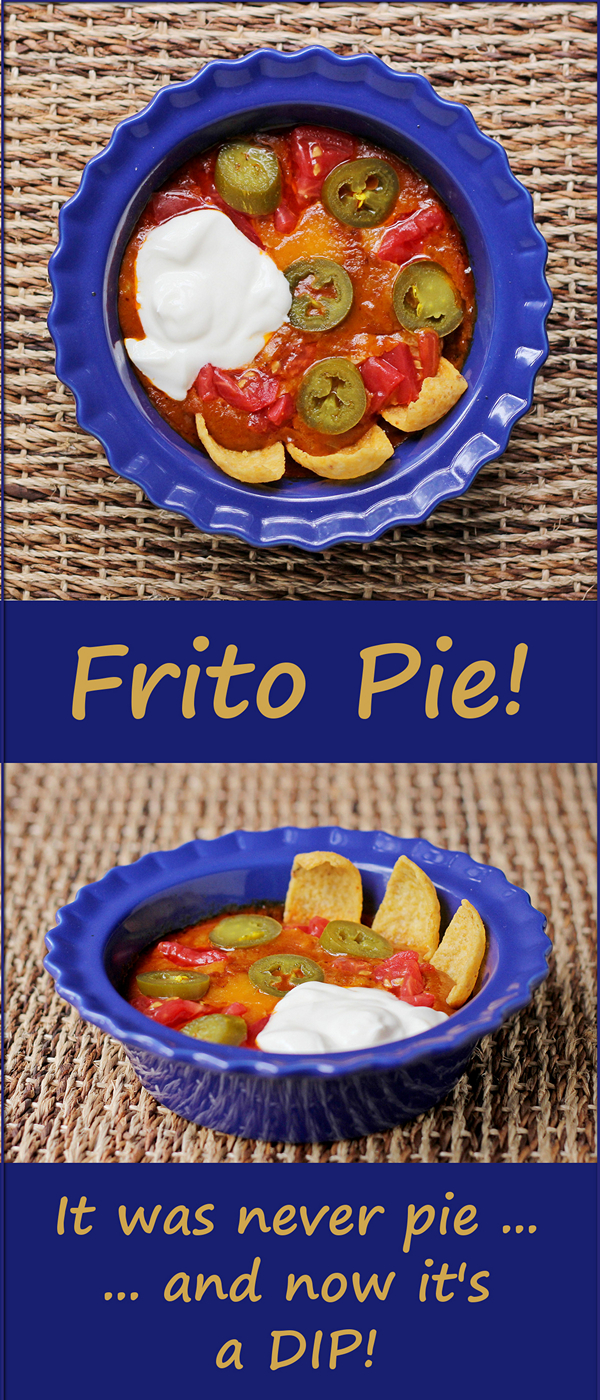
Frito Pie - It was never pie, and now it's a dip!

Last night I was watching a re-run of Hawaii 5-0 and the plot revolved around a surfer who was murdered. At the end of the show, a bunch of surfers paddled out into the ocean and formed a circle and spread the ashes of their deceased friend.

For me, it was a completely foreign ritual, and also very moving.

Particularly because a friend of mine had died suddenly, and I've been a bit weepy.

I started thinking about the rituals we have in our different cultures. Our religions and our ethnic groups and even our geographical locations dictate what sort of things we do when a friend or loved one dies, ranging from the mournful playing of a bagpipe, to a 21-gun salute at a military funeral, to the joyous celebration of life as it's done in New Orleans.

In those instances, mourners gather together to comfort each other in a way that is familiar to them. Different cultures have developed different rituals, but the purpose is the same. They help people move beyond the grieving to the point where they can think of their loved one with a smile and a fond memory.

Besides the usual geographic and familial cultural groups I'm a part of, I also belong to relatively new and unique culture. It spans many religions and nationalities and pays no attention to geography. We're a loosely connected and firmly knotted group of people who go online and bond over food and fun. We talk every day. We laugh, celebrate, kvetch, and sometimes cry. We are close friends, even though many of us have never met in person.

But when one of us dies, the rest of us can't hug or hold hands or perform rituals together. We can't eat funeral potatoes or hot dish or go to that one restaurant where everyone goes after a funeral. We're a new sort of tribe, we don't have those generations-old traditions, and we're not geographically close enough to get together for happy or sad events.

The funny thing is that new rituals have emerged, all by themselves. I guess people need a way to bond and celebrate the lives of those who have touched us. With our group, we talk about our friend's favorite food or their signature recipe. We choose a time to raise a glass in a tearful toast. We make their recipes. We post photos. And we are comforted because we know that despite the distance between us, we have a bond.

Don't those Fritos look happy in their chili and cheese spa?
My friend Chris Hughes, who recently died, was from Texas and one of her favorite foods was Frito Pie. So when we started talking about her recipes, people suggested that we make Frito Pie in her honor. I said, "Sure, I'll make it." Then I said, "What's Frito Pie?"

And I got a dozen or so answers. I looked it up on the Frito website. I asked more people. The only constants in the recipes were Fritos, chili, and cheese. Canned chili was a popular choice, with Wolf brand being a favorite among the Texans in the group, since it's a Texas product.

Some people put the chips on the chili, other people put the chili on the chips. Some people mixed it all up in a small bag of Fritos and ate it straight from the bag, and others put it in a casserole dish. Some people ate it with a fork or spoon. Some people layered it. Others mixed it. Some baked it and some didn't. And then there were toppings.

I was confused. It sounded like a cross between nachos and chilaquiles, but with chili and Fritos.

And then someone said that it doesn't matter - just make it the way you like it.

That totally sounded like what Chris would say, because she really liked to change or modify recipes to make them her own. When presented with the challenge to make a recipe from my cookbook, she turned blueberry and cream cheese sweet rolls into candied jalapeno and cream cheese rolls. I was totally impressed.

So I embarked on my Frito Pie adventure knowing that whatever I did would be okay.

My first attempt was with Fritos on the bottom, chili on top, followed by cheese. I baked it to melt the cheese, and topped it with onion, tomato, sour cream, and jalapenos. It was good, but I had leftover chili, so I decided to try something different for lunch the next day.

I didn't want to turn the oven on for a lunch portion, so I turned Frito Pie into a dip. I used a mini pie plate - hey, it's called pie, so why not - and put the chili and cheese in the microwave to warm them. And I scooped it up with crisp Fritos. Totally not like what anyone else told me to do.

Oh, and since I'm a midwesterner rather than a Texan, I used chili with beans. Apparently Chris was okay with that, too.

This one's for Chris!

Frito Pie

Wolf brand chili
Shredded cheddar cheese
Chopped onions
Chopped tomatoes
Pickled jalapenos
Sour cream
Fritos

For a single serving, put the chili (as much as you think is one serving!) in a microwave-safe bowl, and add the cheese. As much cheese as you like. If you want to take a little of the "bite" out of the onions, you can add them as well.

Microwave on high for 30 to 60 seconds, until the chili is hot and the cheese is melted.

Add onions (if you didn't add them before cooking) tomatoes, jalapenos, and sour cream.

Use Fritos to scoop up the chili. I nestled three into the dish for photos, but grabbed chips from the bag for the rest of the scooping. Remember, there's no wrong way to do it!

Have you had Frito Pie? How do you like yours?
Frito pie was never a pie - and now it's a dip!