Showing posts with label jam. Show all posts

Sunday, July 23, 2017

Got Cherries? Jam 'em, booze 'em, and eat 'em all up! #canbassador

When I was a kid, the best part of summer was walking with my mom to an empty lot a few blocks from where we lived. A guy would park a truck in the lot and sell fresh fruits and vegetables, weighing them on a hanging scale and putting them in paper sacks.

When cherries were in season, my mom would buy some for me. I'd munch on them all the way home, spitting the seeds out as I went. By the time I got home, there were no more cherries.

I'm surprised a forest of cherry trees didn't sprout along our route.

When the nice folks at Northwest Cherry Growers asked if I wanted to be a #canbassador, I jumped at the chance. Enough cherries to do some canning? Count me it!

I'll admit that I might have eaten several pounds of cherries all on my own. But I didn't spit the seeds all over the living room. That would have been weird.

The rest of the cherries were pitted and divided up for several different recipes. My two favorites were a smooth cherry jam, and some brandied cherries.

I also made a Luxardo cherry recipe that was good, but not perfect. I think it would have been better with tart cherries, or perhaps I need to tweak the sweet/tart ratio.

If you like Luxardo cherries, though, that recipe is a great starting place. Check it out!

The recipes I'm posting here were based loosely on some that I found on the Northwest Cherries site, but I cut back on the quantities so I could try more recipes.

Since I made so little of each recipe, I didn't actually can them for preserving, though. I tossed them into the refrigerator and started using them right away.

The great thing about making recipes for use "now" rather than canning is that you can adjust the sugar and acid to your taste, rather than for preservation. If you're making vast quantities of foods for long-term, non-refrigerated storage, make sure you're using a recipe from a trusted food preservation source. There's no sense spending the time and money to make a dozens of jars of jam, only to find they've molded in the jars when you open them.

Yeah, my mom made moldy jam once. It wasn't pretty.

First, I made some brandied cherries. Like this:

Brandied Cherries

Based on a recipe from Northwest Cherry Growers.

Oooooh, this was so good.

I used these as a topping for ice cream. Adults only, of course. They'd also be nice in cocktails, but for that I'd suggest not chopping the cherries.

If you don't happen to have brandy, it should work just as well with bourbon or whisky. Maybe even rum.

1 pound sweet red cherries, pitted, stemmed, and roughly chopped
1/2 cup sugar
2 tablespoons lemon juice
1/4 cup brandy

Combine the cherries, sugar, and lemon juice and bring to a simmer and let it cook for a minute or two.

Add the brandy, bring to a boil, then turn off the heat.

Transfer the cherries and liquid to jars or other storage containers (this makes about a pint, plus a little extra) and allow it to cool, then refrigerate.

Next, I made a cherry jam, also based on a recipe  from the Northwest Cherry Growers website, but I used sweet red cherries instead of yellow ones. 

Sweet Cherry Jam


2 pounds red cherries, stemmed and pitted*
1 1/2 cups sugar, or to taste
1 teaspoon vanilla extract
1/2 teaspoon almond extract
Pinch of salt
2 tablespoons lemon juice

Put all the ingredients in a blender, and blend until smooth. If you're not sure about the sugar amount, feel free to start with less - let's say about 1/2 cup - and add more sugar later, if you want more sweetness.

Transfer the blended cherries to a saucepan and heat to a boil, then lower to a happy simmer. Continue cooking, stirring often, until the jam reaches your preferred thickness.

Like the napkin? Get them here
Since it will become thicker as it cools, the best way to check it is to put a small amount of the jam on a spoon and put the spoon in the refrigerator to chill.

Taste your thickness tester and add more sugar to the pot, if desired.

If you prefer more tartness, add more lemon juice. Continue cooking until your optimal thickness is reached. Since I wanted to stir into yogurt or drizzle onto ice cream and for spreading on toast and muffins, I left it a little looser than if I only wanted it as a spread for toast.

Transfer to jars (this will make a bit more than a pint) or other storage container.

Let it cool, then refrigerate.

*Make sure your cherry pitter is actually ejecting every single pit from the cherries. Sometimes one will get stuck, and since you're blending, it could be a problem.

When I was done with this recipe, I had just a little jam left in the pan. Not enough to fill a jar, but more than I wanted to throw away. I added some pitted chopped cherries and let them cook a while to create a chunkier, not-as-sweet jam, adjusting sweet and tart on a whim. Did I write anything down? No, of course not. But that's the great thing about refrigerator jams - you can wing it, adjust flavors on the fly, and end up with a little half-pint of something fun.


Thanks to Northwest Cherry Growers for sponsoring! 
Napkins shown in photos provided by The Napkins at no cost to me for use on my blog.

Wednesday, November 23, 2016

Cranberry Jam

Cranberry sauce is fine as a side dish on Thanksgiving, but cranberry JAM is amazing on toast, English muffins, or stirred into yogurt.

Try it on that English muffin with a little smear of cream cheese. Spread it on the bread for a turkey sandwich.

Or how about on quesadilla? Yeah, that's good too! Or as a filling for jam thumbprint cookies.

Cranberry season is fleeting, but I'll bet you can find them on sale now, fresh, and maybe even a better deal frozen.

Speaking of frozen, you might want to toss some in the freezer so you can make this any time. It's so simple and soooo good. You don't even need pectin to make this!

I like mine more tart than sweet, but you can certainly add more sugar, if you like. And you can also experiment with flavors. Or add other fruits, like apples, pears, strawberries, blueberries, or raspberries. Have fun with it!

Cranberry Jam
Makes about 2  1/2 pints

Why yes, that IS a lot of cranberries!
3 pounds cranberries, fresh or frozen
1 1/2 cups sugar
1/2 teaspoon salt.

Put everything in a saucepan. Heat, stirring as needed until the cranberries pop and the mixture boils and becomes thick. It doesn't take a long time, so don't wander away from it. Give it a taste and add more sugar if it's too tart for you. Stir to combine and taste again.

Use a stick blender to blend the mix smooth. Or, transfer to a blender.

Pass the mixture through a fine-mesh sieve to remove the seeds and any unblended skins.

Transfer the mixture to containers for storage, and refrigerate. Note that this is NOT a canning recipe - I have no idea if it would be safe. I'm also not sure how long it lasts, since I somehow manage to use it all before it goes bad.

Want more flavor? I like this as-is, but you can certainly add more flavor, like vanilla extract, almond extract, lemon, ginger, cinnamon, chipotle, basil, or pretty much any flavor you think will be compatible.


Monday, April 27, 2015

8 Tips for Making Macarons

Bonne Maman Jams, a Le Creuset Teacup/pot and home made macarons.
Mother's Day is coming, and brunch is traditional for many family celebrations.

Even if the meal isn't technically a brunch, daintier foods tend to prevail. And what's more dainty for dessert than a French Macaron?

No, not macaroons, with coconut. I'm talking about the light, crisp, chewy meringue-related cookies that are French Macarons.

The nice thing about macarons is that the flavors (and colors) are endless. Since the basic cookie is nearly white, you can tint them with a tiny bit of food coloring (the Silpat kit I received came with food coloring for that purpose) or you can find recipes that take on color from their ingredients. Like, say, chocolate.

Then come the fillings. I used a chocolate ganache for this batch, but buttercream would be lovely, or make your own on-the-fly fillings. How about a nut-butter and jam? Or jam and whipped cream cheese? Or just Bonne Maman jam?

Am I saying JAM a lot?


 Well, that's because there's a giveaway here, where the winners will get a Silpat macaron kit, a gift set of Bonne Maman jam/jelly products, and an adorable Le Creuset stoneware tea for one with a cup on the bottom, and you use the top part to brew your tea, So cute.


Won't that be great for Mother's Day? A spot of tea, some English muffins or toast with jam, delicate little sandwiches, and macarons to finish the meal. Oui! 


While macaron perfection is a skill I have yet to master, I've made acceptable macarons a few times, and I've made enough mistakes that I think I can point out places where you might go wrong.

1) Almond flour, finely ground.
If your almond flour isn't super-fine (like flour) give it a buzz in the food processor, maybe with some of the powdered sugar, until it is as fine as you can get it. Some recipes even suggest passing it through a fine sieve.

I made the last batch of macarons with almond flour straight from the bag, and while they tasted fine they were a bit rough on top and the cookies had a different texture than those made with super-finely-ground almonds.

2) Mise en place is your friend.
Have all your ingredients ready and standing by. Separate those eggs, weigh your ingredients, and have everything ready to go before you start whipping and mixing.

You'll need two bowls, the usual assortment of measuring and mixing tools, and a few specialty items as well, like a piping bag.


Here's the macaron kit from Silpat, which includes a mat, piping bag, two tips, a pastry brush (not shown), food colors, a thermometer (did I mention that some macaron recipes are fussy?) and a scraper. The kit also includes a thumb drive with recipes.

3) Whip them right!
Egg whites are what give macarons their lightness and their structure, so you need to whip them to the proper consistency. If you're using a stand mixer to do your whipping, don't walk too far away from it. Underwhipped egg whites just need a little more whipping. Overwhipped whites can't be salvaged.

4) Pipe them right!
Some of my macarons rose oddly - tilted to one side or the other - while others were perfect. This was more likely to happen when I was using a recipe that resulted in a thicker batter and I piped in a circle.

I got better results when I simply put the tip in the center of the circle I was aiming to fill, and piped straight down and let the batter flow to form a circle. This also helped me form an actual circle rather than oval or odd-shaped macarons.


The Silpat Macaron Mat has circles drawn on the mat to make it easy to gauge the size of the macarons and to make perfectly round circles. Those circles would also be useful for cookies or any other food when you're trying to keep them evenly spaced.

5) Let them dry!
For the frilly rise to happen along the sides of the cookies, you need to let them sit around after piping until there's a nice crust on top. Depending on how dry it is in your house, this could be quick, or it could take much, much longer. It's possible to over-dry the cookies, but I don't know for sure what horrors would happen if that was the case - I barely have patience to let them dry enough.

This is NOT supposed to happen!
Some of my cookies had little peaks from piping, and I wanted to get rid of them. To keep my finger from sticking, I dipped it in bit of cold water. This worked really well. I thought. But the tops of those few cookies never dried right, so strange things happened when the cookies baked. These tasted just fine, but there's no way I'd serve them.

6) Bake them long enough - but not too long.


Perfectly pale, acceptably toasted, and ... oops!
Macarons aren't really supposed to brown. A tiny bit along the edges might be okay, but you don't want your white macarons getting a tan in the oven.

7) No, really, let them cool.
Before the macarons are fully cooled, they will stick to the Silpat baking mat like the suckers on a tentacle. If you try to lift them, you will tear the cookie. So you can't peek underneath. You just can't. But when the cookies are fully cooled, they'll pop right off. Be patient!

8) And if all of that doesn't work...
If it goes wrong, claim that you meant to do that. Seriously, unless you're opening a French bakery, perfection isn't required. You're making cookies for your mom. She'll be happy, even if they're a little lopsided.


As for those over-browned cookies - I did that with one batch, and to me the flavor was a little like a toasted marshmallow. I know they weren't supposed to be like that, but I liked the flavor anyway. If all of your macarons are egg-shaped or tilted or over-browned, just smile and serve them. No one needs to know you didn't plan it that way.

Just pour a cup of tea, and relax!

Le Creuset Tea for One
Thanks to the participating companies for sponsoring these group posts and for supplying product for the giveaway!

The other bloggers participating in this giveaway are:

Miss in the Kitchen, who made Macarons with Champagne Buttercream
Foodhunter's Guide who made Chocolate Raspberry Macarons
Thyme in Our Kitchen who made Pistachio Macarons

Giveaway is over!

Saturday, July 19, 2014

Stone fruit (really) small-batch jam

We're not big jam-eaters around here. At least not to the point where I need to preserve huge batches of the stuff.

But sometimes jam happens. In really small batches. Just enough for a jar to stash in the refrigerator. Because, really, that's about enough.

Not only do we not use enough jam to make large batches sensible, I like to flit from flavor to flavor, depending on what fruit is in season or what I'm in the mood for.

Recently, it was stone fruit I wanted to preserve. I had a few angelcots that were just slightly ripe. And then there were a couple mango nectarines that were bruised and wouldn't have lasted long enough for me to devour.

Mango nectarine (left) and three angelcots.
I got both of them from Frieda's Specialty Produce, a company I like to think of as the world's quirkiest CSA. They send me stuff and sometimes I write about it. Most of the things they send are unusual. Like the angelcots. They're a cross between apricots and angelfish.

No, that can't be right ...

Hmmm.
I guess what they really are is white apricots that are really sweet and delicious. I ate most of them as soon as they arrived, but I had a few left over when the mango nectarines landed. To me, the nectarines didn't taste like mangoes, but the color inside was the color of a mango. So there ya go.

After blanching, peeling, pit-removal, and chopping, I had about a cup of fruit. Not nearly enough for a traditional batch of jam, but just enough to play with.

Angelcot and Nectarine Jam

1 cup peeled, pitted and chopped nectarines and apricots
2 tablespoons sugar
1/2 teaspoon lime juice
1 teaspoon instant pectin
2 tablespoons water
Pinch of salt
1 teaspoon vanilla extract

To make peeling easier, blanch the fruit - dunk them in boiling water, then plunge into cold water. The peels will slip off easily.

Add the fruit, sugar, lime juice, pectin, water, and salt to a saucepan. Cook, stirring as needed, until the sugar dissolves, the fruit breaks up, and the mixture thickens. Very ripe fruit will turn to mush fairly quickly, while less ripe fruit will hold its shape a little better. Whether you want it all smooth or a little chunky is up to you.

Taste (let it cool a bit on the spoon before you sample) and add more sugar, if you like. I wanted a jam that was tart, so I didn't add more. Cook just long enough to let your additional sugar dissolve.

Take the jam off the heat, add the vanilla extract, and stir to combine. Transfer to a jar or other container and refrigerate.

I thought this was particularly good dabbed on toast along with a bit of cream cheese. It would also be a great filling for thumbprint cookies.
Small batch stone fruit jam

Tuesday, December 10, 2013

Five English Muffin Sandwiches

A while back, I posted a review of the Hamilton Beach Breakfast Sandwich Maker and some folks thought I was a little crazy. Yes, you can fry an egg in a pan and heat your ham in a pan or in the microwave, and toast your English Muffin.

But I sort of like the idea that I can do it all at once, in one compact device. I use this thing several times a week, making breakfast sandwiches that my husband can take to work. And sometimes I make one for myself, as well.

And then I got a bunch of coupons for Thomas' English Muffins. Oh yeah. Now we're talking. I've tried the store brand muffins, and they're not even close to Thomas's. I mean, I'm a bread snob, so I want the good stuff.

The obvious choice for a breakfast sausage is eggs and sausage, I think, but I've been venturing beyond that a bit. Here are a few of my creations.

Ham, Cheese, and Egg


Sliced ham (from a bone-in ham) is on top of the bottom half of the English muffin, topped by a slice of muenster cheese, torn to fit the muffin. That goes on the bottom of the breakfast sandwich maker. Then an egg  goes on the next layer. I break the yolk, but don't scramble it. Then the top of the muffin goes on top of the egg and it cooks for five minutes. A perfect breakfast treat.

Cream Cheese and Jam


Yeah, it sounds simple, but it's sooooo good. Spread the bottom half of the muffin with cream cheese, top with a little dollop of jam (I used this home made cran-raspberry jam) and put it into the bottom part of the sandwich maker. Put the top of the muffin in the top part of the sandwich maker.

Cook for 2 minutes, just to warm everything and lightly toast the muffin.

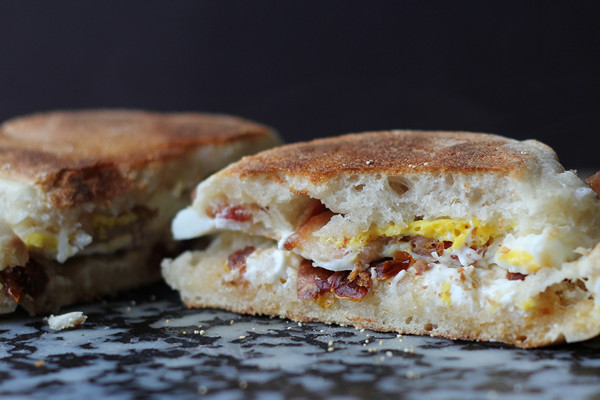
Bacon, Egg, and More


Spread a very small amount of cream cheese on the bottom half of the muffin and spread a small amount of tomato pesto on top of that. Place that on the bottom part of the sandwich maker. Crack an egg into the top half, break the yolk, then sprinkle one cooked and crumbled slice of bacon on top of the egg. Cook for 6 minutes.

The tomato tapenade I used came from Frieda's. If you can't find it, you could use chopped sun-dried tomatoes.

Omelet Muffin


Most of the recipes I've seen for the sandwich maker suggest putting an egg on the top portion of device, then putting the top piece of bread on that. But you can also cook your eggs in that top portion, without the bread. You can add more egg and more fillings if you do it that way.

So, for two breakfast sandwiches, I used 3 eggs, diced ham, diced mild cheddar, and a spoon full of salsa. The total volume was 1 cup. I blended it with a fork. I put the English muffin (both halves) in the bottom part of the sandwich maker, then put 1/2 cup of the egg mixture on top.

Five minutes later, I had a big fluffy toasty omelet with a nice brown crust. I opened the bottom part of the sandwich maker and took out the top piece of muffin, then slid the divider out to put the egg on the muffin. Put the top of the muffin on and, voila! Omelet muffin!

Fluffer-More


If a fluffernutter sandwich and a s'more had a child, it might be something like this. Yes, our final sandwich is a sweet one, with a smear of peanut butter on the bottom piece of muffin, a smear of chocolate Hershey's Spread (It's new stuff - not even on the Hershey site yet!) on the underside of the top piece of the muffin, a little dab of marshmallow fluff on top of the peanut butter, then a sprinkle of graham cracker crumbs for a little texture.

I assembled the sandwich, then put the whole shebang into the sandwich maker for about two minutes to warm.

OOooo. Melty and gooey.

Note: This is NOT a sponsored post. I bought some of the muffins with coupons, but the sandwich maker came quite a long time ago for the purpose of review. I think the statue of limitations on that freebie has already expired.

Sunday, August 18, 2013

Easy Blueberry Jam

I know, it sounds a little crazy to start with frozen blueberries when we're in the midst of blueberry season, but frozen blueberries are available all the time, and fresh ones are so fleeting. And often, they're not that great. I hate having to pick through a basket of little berries to pick out the mushy ones.

And, really, if your local blueberries are wonderful, you can freeze them yourself, and use your own frozen berries all year long. That's what I used to do when I used to go berry picking.

Meanwhile, I had purchased a bag of frozen blueberries before the fresh ones appeared at the market, and it made no sense to let those sit in the freezer and get older while I spent money on fresh ones that might not have been so great.

Feel free to use fresh berries. The recipe will be the same.

And ... I have to say that I've sort of fallen in love with instant pectin. I bought it for something other than jam - I was doing a little experimenting - and I was immediately enthralled with the idea that I could add this to a cool or cold liquid, and it would set without the need for heating.

Think about it. You can have almost-instant jam. Like, make it right before breakfast.

And, since you don't have to heat the fruit (unless you want to, which is a completely different discussion) you can have a super-fresh-tasting jam. Think about that. Mashed/chunked fresh strawberry jam. Oh yeah!

But ... in this case, I actually wanted the cooked-blueberry flavor. So I cooked the berries. And then I added the pectin while the fruit was still a little warm. And it worked. How about that? You don't have to heat the berries, but adding the pectin to a warm liquid doesn't ruin it.

And ... based on other little experiments, I can tell you that you can even cook the pectin with the fruit and it still works. The only tricky thing about this pectin is that you don't want to add it in one big lump, because then you have the possibility that you'll end up with some teeny clumps where the pectin sticks together. Sprinkle it in and whisk or stir it in as you go, and you'll be fine.

I got some spiffy citrus tools from Good Cook recently for a post about avocados (seriously, if you're working with avocados, you probably need lime, right?) and I decided to play with the citrus reamer since I needed lemon juice for this recipe.


A reamer is an old fashioned tool, for sure. I had a wooden one that disappeared into the maw of lost tools some time in the past decade. It was nice, but a wooden reamer isn't practical when it comes to cleaning. A plastic one makes more sense. Just chuck it in the dishwasher when you're done.

And it's simple to use. Just hold the cut lemon in one had, jam the pointy end of the reamer into the flesh of the fruit, and twist, mash, and gouge. Obviously, have a bowl there to catch the juice.

Then you can pick out the seeds (if there are any - aren't lemons these days showing up with fewer seeds?) or you can strain the juice if you want to make sure you aren't getting any pulp with the juice. Your choice.

There's not a ton of lemon in this jam, but I think the little bit brightens it up a bit. And blueberries and lemon are a great combo. Add more lemon, if you like. I mean, you can taste it and see if it's too sweet or if you want a tad more tartness. It's your jam. Make it exactly the way you like it.

And since this is a refrigerator jam and not one that you're canning, you don't need to worry about acid levels and things like that, which are much more important for products you're planning on storing at room temperature.

Easy Blueberry Jam

1 pound frozen blueberries
1 tablespoon fresh lemon juice
1/2 cup sugar (to taste)
2 tablespoons instant pectin

Put the berries, lemon juice, and sugar in a heavy-bottomed pan, Heat to boiling, stirring to melt the sugar. Mash some of the berries while leaving most of them whole so you have a chunky jam. Or, if you want them all mashed, have at it. It's your jam.

When the mixture comes to a boil, turn off the heat and let it cool. Add the instant pectin (sprinkle it in so it doesn't clump up) and stir until it's completely mixed in. It should begin to thicken as you stir.

If you like your jam a little looser, you can use a less pectin. That's the beauty of this instant stuff. You can add some, then add some more. But remember - it's going to thicken even more as it cools.

Transfer to a pint jar or other storage container and refrigerate.

I used this jam to fill some sweet buns, and also to fill some aebleskivers that I made. It's pretty darned good stuff.

This post was not sponsored in any way by Good Cook. I just happened to get the reamer from them recently and decided to have some fun with it.

Thursday, March 14, 2013

Pi Day CatBoy Plum Jam Crostata

Pi Day is here and Virtual Potluck is celebrating with ... well, pie. All kinds of different pies.

I decided to make a crostata - a rustic sort of pie, baked free-form. Sort of flat. In this case, it's very flat, since i didn't use solid fruit - I just used a very flavorful jam.

When my husband was in the hospital, I called upon cooking friends and fellow bloggers to do guest posts here. One was my friend Charles who goes by the name "Catboy" on some of the sites we frequent. Although he's not a blogger, he offered to post one of his recipes - and he chose plum jam.

And then, as a very awesome surprise, he sent me some of his homemade jam. And that's what I used in this recipe. Let me tell you, that jam is pretty darned awesome. Give it a try when plums are in season. You won't regret it!

Meanwhile, we have pie. Any thick jam, or even a lemon or lime curd would work in this. Something as thin as a jelly might be a problem though.

CatBoy Plum Jam Crostata
Recipe © by www.cookistry.com. Do not republish without permission.
1 cup all purpose flour
1/2 cup white wheat flour
1/2 teaspoon salt
2 tablespoons sugar (plus more for sprinkling)
1 teaspoon vanilla bean paste
10 tablespoons cold unsalted butter
1/2 cup water
1/2 to 1 cup plum jam (recipe here)
Eggwash (1 egg beaten with 1 tablespoon water)

Put the flours, salt, sugar, and vanilla bean paste in your food processor. Pulse a few times to combine.

Cut the butter into chunks and add it to the food processor. Pulse until you have pieces no larger than a pea. It's fine if there are one or two pieces that are slightly larger, but the majority should be pea-sized.

With the food processor running (and work quickly here) add the water as fast as the flour can absorb it, and continue processing until the dough forma a ball.

Stop the food processor and remove the dough. Quickly form it into a ball, and then flatten to a disk. Wrap it in plastic wrap an refrigerate at least an hour. It's fine if you continue the next day.

Preheat to 375 degrees and have a baking sheet and parchment paper (to fit the baking sheet) ready.

Flour your work surface and turn out the dough With a rolling pin, roll it into a rough circle about 14 inches in diameter. You don't have to be precise. Transfer the dough to the parchment paper. It's fine if it's hanging over the edges a bit.

Spread the jam over the surface of the dough, leaving a few inches around the edges uncovered. Again, you don't need to be precise.

Fold the edges of the dough - about 3-4 inches worth - over toward the center of the dough, working all around the dough until you have all the edges folded over and a few inches uncovered jam in the center. It really doesn't matter how much you fold over, how you pleat the dough, or how much is showing in the center. It's your creation.

Slide the parchment paper - with the crostata on it - onto the baking sheet.

Brush the exposed dough with the eggwash, and sprinkle with as much sugar as you like.

Bake the crostata at 375 degrees for 35 minutes, or until the pastry is nicely browned.

Let the crostata cool a few minutes on the pan, the slide the parchment paper onto a rack to cool. As soon as it's cool enough to handle, slide the crostata off the parchment and allow it to cool completely on the rack.

Slice into wedges to serve.

Want more PIE???

Check out these other great recipes!

Farmgirl Gourmet made Goat Cheese Quiche with Sweet Potato Crust
Cooking with Books made Carrot, Jalapeno and Cheese Pie
Thyme in our Kitchen made Chicken Pot Pie with Bacon and Butternut Squash
Miss in the Kitchen made Mini Lemon Pies
Diabetic Foodie made Crustless Crab and Asparagus Quiche
30a Eats made Tomato Pie
Foodhunter's Guide made Lemon Cheese Danish Pie

Sunday, December 2, 2012

Gadgets: Jam and Jelly Maker

For some reason, I'm fascinated by the number of appliances these days that cook and stir for you automatically.

I guess it makes sense, since the one thing people object to most about cooking is "standing at the stove and stirring." People don't object to a simmering pot of soup on the stove or a roast in the oven, but stirring something constantly for 20 minutes is a lot less appealing.

The Ball FreshTECH Automatic Jam & Jelly Maker ($90) is one of those devices. It heats and stirs jam or jelly for you.

On the pro side, it heats to a precise temperature and stays there, which can be tricky on the stove, and it does all the stirring for you, taking the guesswork out of making jam or jelly. The machine came with a limited number of recipes, but I also tried a recipe from a package of pectin, and it worked just fine.

On the con side, this makes very small batches of jam or jelly - about 4 cups at a time - so if you're planning on canning the overabundance of fruit from your garden, you're going to be at it for a long time with this machine. It also needs time to cool down between batches, so you couldn't make continuous cycles of jam or jelly.

Since it does the cooking and stirring, the only thing you need to do is add ingredients, and the machine beeps at intervals to tell you when to add things. I'll admit that I mis-read the instructions on one batch, and it still came out fine.

Dedicated jam-and-jelly makers will scoff at this machine because of the small batches, but folks who want to make a few foolproof jars at a time will love the simplicity. People who don't want to stand and stir will love it too, and I can imagine that moms who want to get their kids involved in cooking might be more comfortable letting them watch this machine do the work, rather than having them stirring a bubbling hot pot on the stove.

Although I haven't tried it, you could probably use this for cooking and stirring other things, like tomato sauce or applesauce, with a little fiddling to figure out which setting to use.


Tuesday, September 25, 2012

Cat Boy Plum Jam

Guest Post - Charles Turnipseed


Charles is a prolific and amazing cook but his current passion is his cat rescue work. Please take some time to read his blog, Purrfect Cat Rescue.

I like most jams and preserves but when I was growing up I especially liked apricot jam, and plum jam—my grandmother’s and King Kelly’s. I have fond memories of both: King Kelly was jelly-thick, pale burgundy, and had the light, fresh taste of the fruit; Grandma’s was somehow both dense and soft, the color of garnets, with a flavor somewhere between plums and prunes, all the result of her cooking process.

I say process, but it was less scientific than that sounds. She’d toss plums and sugar in a pot, place it on the burner of her Wedgewood stove that had a “flame tamer” and go out in the garden. She’d prune, she’d rake, she’d transplant—she’d forget she had something on the stove. Sometimes she burnt it, but more often than not it turned out great despite her not being a particularly skilled or confident cook. She didn’t “put things up,” so the jam was spooned into Cracker Barrel spreadable cheese containers and stored in the freezer.

Decades after Grandma made her last batch, I finally got around to making my own. I didn’t opt for her method since I knew I would never get it right anyway. I found a recipe in a cookbook inherited from another family member, a great aunt who was a skilled and confident cook. (Strictly speaking, despite her talents, she used a cornbread mix but I never told anyone until after she died since I knew it would ruin her reputation.)


The recipe is fairly simple, but it’s easier if you have a food mill since the fruit is first cooked—pits and all—then pureed, and cooked once more, this time with the sugar, to your desired thickness. Since I don’t have a food mill I push the stuff through a sieve and it takes forever; if you also lack a food mill, you can cut out the stones and save yourself some time. You can use any plums you like (I actually use about 6 varieties, buying some of each as they come into season then store in freezer bags until I have a couple gallons worth), but be sure to use some with black or deep-red skin so you’ll have a nicely colored jam.

Cat Boy Plum Jam
Adapted from “American Woman’s Cook Book” circa 1951

Makes approximately 4 half-pints of jam

1 quart plums, washed and cut in half, stones removed if you prefer
½ cup water
2 cups of sugar, approximately
Juice of a fresh lemon or two

Place the plums and water in a saucepan; bring to boil and lower to a simmer. Cook, covered, until the fruit—including the skin—is very tender. If you removed the stones, you can puree the mixture using a blender or food processor; otherwise press through a fine sieve or a food mill to form a thick pulpy liquid. You can stop here and refrigerate the mixture if you’d like to space your work out over a couple of days.


Measure the puree and return to the pot with about ½ cup sugar per cup of plums for a moderately sweet-tart jam, about 1/3 cup for a quite-tart jam. Cook over medium heat, stirring most of the time until the jam is glossy and shimmering and falls from a wooden spatula in thick drips. (You can use a candy thermometer and cook it to the jelly point if you want to, but I’m more of an eye-baller.) Add lemon juice and taste for a balance of sweet to acid, adding as much as you think it requires. (One year I incorrectly measured the sugar and ended up adding a full cup of lemon juice to fix things; oddly enough, the jam was especially good that year.)


Pour the jam into hot sterilized jars, seal, and process in a boiling water bath for 10 minutes for 8- or 12-ounce jars. Alternately, cool and store in the refrigerator.