Showing posts with label olives. Show all posts

Monday, August 22, 2016

Whole Wheat Focaccia with Olives, Cheese, and Rosemary

This bread actually started out as an idea for a sandwich. Well, it started with salad, but then it quickly turned into a Salad Nicoise sandwich with tuna and kalamata olives.

I decided that foccacia would be the perfect vehicle for my sandwich, and I decided to embed the olives in the bread. I mean, why not?

The bread was also a great way to use a new flavored olive oil I got from a company called Pasolivo. They have a lot of flavored oils, but the one they sent me was a rosemary oil. I adore rosemary, but it can be kind of strong, so I was fairly conservative with it here - I just used it for drizzling on top of the bread. The rosemary flavor isn't super-strong, but that's exactly what I wanted - a hint of rosemary that would compliment the olives and the final sandwich, without overpowering.

If you're using this bread as a stand-alone and you want more rosemary flavor, you could drizzle more oil on right after baking, or substitute rosemary olive oil for the regular olive oil in the dough. Or, even more fun, you could use the rosemary olive oil as a dipping oil for the bread.

Because I'm still in love with my new grain mill, I ground my own whole wheat flour for this. If you don't have a grain mill, of course you can buy flour. It's what most folks do, right? But ... if you want a grain mill ... well, check out this post.

Whole Wheat Focaccia with Olives, Cheese, and Rosemary

4 1/2 ounces (1 cup) bread flour
4 1/2 ounces (1 cup) whole wheat flour (I used freshly ground flour)
1/2 cup (about 3 ounces) semolina flour
2 1/4 teaspoons Red Star* active dry yeast
1/2 cup shredded cheddar cheese
1 tablespoon sugar
1 teaspoon salt
1 cup water (or more, as needed)
2 tablespoons olive oil (divided)
1 tablespoon Pasolivo rosemary-flavored olive oil
1/2 cup pitted and halved Kalamata olives
1/4 to 1/2 shredded mozzarella cheese

Combine the bread flour, whole wheat flour, semolina flour, yeast, cheddar cheese, sugar, salt, water, and 1 tablespoon of olive oil in the bowl of your stand mixer. Mix slowly with the dough hook until it comes together. The dough should be soft and sticky at this point. If it's not soft, and is dense instead, add more water as needed.

I've found that freshly-ground flour tends to require less water, so if you're using store-bought whole wheat flour, you're likely to need another 1/4 cup of water, or possibly a little more.

Increase the speed to medium and continue kneading until the dough is elastic.

Cover the bowl and set aside until doubled in size, about an hour.

When the dough has risen drizzle the remaining tablespoon of olive oil into a quarter-sheet baking pan. Turn the dough out onto the pan and stretch, poke, and cajole the dough to fit the pan. Heat the oven to 375 degrees.

Cover the pan (another quarter-sheet pan turned upside-down makes a great lid) and set aside for 30 minutes.

Drizzle the rosemary olive oil onto the dough. Use your fingertips to dimple the top of the dough randomly. Top the dough with the kalamata olives, spreading them evenly over the dough. Push the olives into the dough. Scatter the mozzarella cheese over the top of the dough. If you want more cheese, I wouldn't say no. But remember - it's not pizza.

Bake at 375 degrees for 30 minutes, turning the pan around halfway through the baking time if your oven tends to bake unevenly.

Let the focaccia cool in the pan for a few minutes before turning out onto a rack to cool completely.

Remember that sandwich?


I cut a piece of the focaccia in half and added mayonnaise, tomato, and tuna. It was really good.

*If you use a brand other than Red Star, let it soften in the water before adding the other ingredients.

I received the Pasolivo Rosemary Olive Oil as a sample for review. I decided to use it in a recipe, instead.

Tuesday, September 29, 2015

Olive and Feta Swirl Rolls

I don't know what it is about swirl rolls, but I love making them. And I fill them with all sorts of things.

I'll bet a lot of people would think of cinnamon rolls first when someone mentions swirl rolls, Or maybe they think of sticky buns.

Those are great, but swirl rolls don't have to be sweet.

Nope, savory swirl rolls are pretty amazing, too.

These rolls are filled with olives (I used kalamatas) and feta cheese, and the dough is flavored with oregano. They're tasty all by themselves, but they're also perfect with dinner, particularly when you're serving something with Greek or Mediterranean flavors.

This recipe is sponsored by my friends at Red Star Yeast, which makes a whole lot of sense for this blog. It's the brand that I buy exclusively, because I like it.

I use the active dry yeast most often, but I'm also a big fan of the Platinum yeast, particularly for finicky breads. The Quick Rise is great when you're in a hurry, and it's also a great yeast for bread machines.

But enough about yeast. Let's get back to the rolls!

These rolls are best when they're refrigerated overnight for the final rise, so you can bake them when you need them - right before lunch or dinner.

But, if you want to, you can let them rise at room temperature and bake the same day. Just let them rise for 30-45 minutes after shaping - if you poke one with a finger, the indent should remain. Then they're ready for baking. Personally, I think the flavor is better with the long, slow, overnight rise, so if you have the time, give that a try.

Olive and Feta Swirl Rolls

1 cup plus 2 tablespoons water
2 1/2 cups (11 1/4 ounces) bread flour
1 tablespoon sugar
1 1/4 teaspoons Red Star active dry yeast
1 teaspoon salt
2 tablespoons olive oil
1/2 cup instant mashed potato flakes
1 tablespoon oregano
1/2 cup pitted kalamata olives (or your favorite pitted olives)
4 ounces crumbled feta cheese

Combine the water, bread flour, sugar, yeast, salt, olive oil, mashed potato flakes and oregano in the bowl of your stand mixer fitted with the dough hook.

If you prefer, you can mix the ingredients in a bowl and knead by hand. I like using the stand mixer for kneading, but I know that not everyone has one.

Knead until the dough is elastic.

Cover the bowl and set aside in a warm place until the dough has doubled in size, about an hour.

Flour your work surface and spray a 9 x 13-inch baking pan with baking spray (or, if you're confident, you don't need to spray. I usually do, for extra insurance.)

Roll the dough to a rectangle about 9x13 inches. It doesn't need to be precise. You can just eyeball it to see that it's about the same size as your pan.

With one of the long sides of the dough facing you, sprinkle the cheese and the olives over the surface of the dough, leaving about 1 inch uncovered on the far end. Use the rolling pin to gently press the filling into the dough.

Starting with the end closest to you, gently roll the dough, jellyroll-style. Don't roll super-tight. When you reach the opposite end, pinch the seam to seal the roll.

Cut the dough into 12 even pieces and place them, with the cut side up, in the prepared pan. If you've managed to cut them unevenly, it's not a big deal - I actually like having some rolls bigger than others, so people can choose a larger or smaller roll. If there are some that are taller than others in the pan, press them down gently so they're all about the same size.

Cover the pan (it's handy to have a pan that has its own cover, or you can cover with plastic wrap.)

Refrigerate the dough overnight or up to 24 hours. It will rise during that time.

When you're ready to bake, take the pan out of the refrigerator while you let the oven heat. Preheat to 350 degrees.

When the oven has heated, remove the cover from the pan and bake the buns at 350 degrees until they're nicely browned and cooked through - about 50 minutes.

Remove the buns from the pan (you can flip them out onto a rack, then from them over onto another rack so they're right-side-up) and let them cool before serving.

Want to see lots of pretty bread photos? Follow Red Star Yeast on Pinterest.

Thanks to Red Star Yeast for sponsoring this post!
Feta and Olive Swirl Rolls

Friday, May 15, 2015

Greek Salad

I don't usually write about "healthy" cookbooks, because I'm a big fan of moderation in all things instead of eliminating or cutting back severely on specific foods or food groups.

The book Eat Right for Your Sight is a "healthy" book, but it takes a different path. Instead of eliminating foods, it focuses on getting more of the foods that are good for your eyes and that are supposed to help reduce the risk of macular degeneration.

Each recipe lists the nutritional profile, with particular mention given to the nutrients that are good for your sight. Calories, protein, fat, and fiber are also listed, so if you have additional health concerns, you have more information.

I've made quite a number of Greek salads in my life - and I've posted a few of them here - but this one is a little different. For one thing, there's no lettuce. And for another, there's no lemon.

This was quite tasty as a salad, and it makes a nice side dish, too.

Greek Salad
Adapted from Eat Right for Your Sight
by Jennifer Trainer Thompson and Johanna M. Seddon, MD, ScM


20 cherry tomatoes, halved
2 cucumbers, peeled, halved, and sliced 1/2 inch thick (I used one English cucumber)
1/2 small red onion, peeled and thinly sliced
3 ounces feta cheese, diced
15 pitted kalamata olives, quartered
1/4 cup extra virgin olive oil
2 tablespoons red wine vinegar
2 teaspoons chopped fresh oregano
Freshly ground black pepper

Combine all ingredients in a bowl and toss gently. Let this sit for 10 minutes before serving so the flavors have a little time to get friendly.

Note: leftovers are pretty good after 24 hours - the vegetables marinate in the vinegar and flavors mingle and the onion gets milder, but you might want to drain the liquid and perhaps add a touch more vinegar if you need to hold it any longer, or it can be a bit watery.

I received this book from the publisher at no cost to me.

Tuesday, May 5, 2015

Hunter's Chicken (Pollo alla Cacciatora)

So this is how my life works. As I was going to bed, I realized that I hadn't dragged anything out of the freezer to thaw for dinner, and I pondered what I might make for dinner the next day.

I knew I had chicken thighs in the freezer, and I remembered seeing a chicken recipe in one of the piles of cookbooks I'd recently bookmarked.

So, first thing I did (well, after coffee, actually) I pulled the chicken out. Later, I went hunting for the cookbook. The recipe obviously wasn't in the cookie book or the pie book or the bakery book or the mug meal cookbook or ... hmmm ... which one? I knew I saw it somewhere.

Finally, I picked up Extra Virgin by Gabriele Corcos and Debi Mazar. I paged through the bookmarks. Not the potato and pepper stew, not pork loin, not the pasta ... and then I saw the Hunter's Chicken. That was it!

As I perused the ingredients, I realized that I had (sort of) everything I needed. The recipe called for 12 pieces of chicken including white and dark meat. I had six chicken thighs. The recipe called for anchovy filets, and I had anchovy paste. The recipe called for garlic cloves and I had Dorot frozen crushed garlic cubes. The recipe called for red onion, carrot, and celery. Okay, I had those.

But then it called for Sangiovese red wine. I had red wine, but not that one in particular. I used a red blend from Chateau La Paws. The recipe called for chopped fresh Roma or plum tomatoes. I had canned tomato products. The recipe called for black pitted olives. I had Lindsay Naturals green olives (they taste like black olives, but they're green). The recipe called for fresh bay leaves, but I had dry bay leaves sent to me by my friend Charles Turnipseed.

And while we're naming brands, I just happened to notice that I was using Hunt's canned tomato products for a recipe called Hunter's Chicken. On a side note, one of my favorite canned tomato products is the Petite Diced. I can't explain exactly what it is, but they taste fresher and they also tend to hold their shape better when they're used in cooked recipes, so you keep the texture.

So, after reading the recipe and checking my available ingredients I realized that I might as well make my own version of the recipe. Not a big deal, because I'd made Chicken Cacciatore many times, so I knew what it was supposed to be like, and I decided to keep the "bones" of the Extra Virgin recipe. My changes weren't all about substituting ingredients, though. Once I decided to wander off on my own, I also changed the amount of most of the ingredients. Some were small changes and some were much more substantial.

In the end, it worked. Possibly better than other versions of Chicken Cacciatore I'd made before. I served with rotini pasta to take advantage of the sauce - and I cooked it in a new way. Yup, a new way for cooking dried pasta. Whoda thunkit?

And, by the way, when my brain isn't fully engaged, I'm quite likely to call this recipe Kitchen Cacciatore. Which makes no sense at all.

Hunter's Chicken (Chicken Cacciatore)
Inspired by Extra Virgin by Gabriele Corcos and Debi Mazar

1 tablespoon olive oil
6 chicken thighs
Salt and pepper (to taste)
1 teaspoon anchovy paste
2 cubes Dorot garlic (or 2 garlic cloves, minced or crushed)
1 red onion, peeled and diced
1 carrot, peeled and diced
1 celery stalk, diced
1 cup red wine (I used Chateau La Paws red blend)
1 14.5-ounce can petite diced tomatoes
1 8-ounce can tomato sauce
1 6-ounce net weight can Lindsay Naturals pitted green olives (you can use black olives), drained
2 dry bay leaves

In a large skillet or Dutch oven, heat the olive oil on medium heat. Salt and pepper the chicken on all sides. Add the chicken to the pan, skin-side down, and cook until golden brown. Flip and cook on the other side. Remove the chicken from the pan while you continue cooking.

Add the anchovy paste and garlic cubes and cook, stirring, until the garlic cubes have thawed in the pan and the mixture is fragrant. You don't want the garlic to get more than very lightly browned, because a few seconds more could result in burned garlic.

Add the onion, carrot and celery and cook until the onions look translucent and the vegetables are all beginning to soften.

Add the wine and cook at a vigorous simmer until the alcohol scent is gone. You want it to smell winey, but not like alcohol. It will reduce while you're doing this.

Add the tomatoes, tomato sauce, and olives. Stir to combine.

Nestle the chicken into the sauce and add any liquid that came out of the chicken while it was resting. Nestle the bay leaves into the sauce - you'll be removing them before serving, so adding them last makes them easy to fish out.

Cover the pot, turn the heat to low, and cook until the chicken is tender - about 50 minutes. Since you're working with dark meat, it can stand to be cooked longer with no ill effects, so if you need to leave it longer, that's perfectly fine.

Serve hot.

There's a lot of sauce, so it's a good idea to serve this with something to take advantage of that sauce. I suggest pasta, but crusty bread is great, too.

Thursday, April 23, 2015

Pasta Puttanesca

Long, long ago, I worked for a family company that had the bad habit of building its empire by buying similar family companies. Inevitably, we'd acquire one or two family members who were contractually obligated to get a paycheck, but who weren't terribly motivated to work for that paycheck.

Those new pseudo-employees were shuffled around to different departments, in the hope that they'd find something they liked enough that they would do the job, and (fingers crossed) that they'd be capable of doing the job. Or at least they'd cause no great harm.

I worked in outside sales, and one such wunderkind was shoveled into our department, probably because he liked to go out to lunch a lot, and the powers-that-were thought he could at least take customers along for the meal.

I had the un-pleasure of dining with him on several occasions, and whenever he had the chance, he'd order Pasta Puttanesca. Not because he particularly liked it better than other offerings, but because it would allow him to grin creepily and ask everyone at the table, "Do you know what that means?"

He was not Italian, nor did he speak Italian, but he had once asked a waiter what puttanesca meant, and was absolutely delighted that a pasta dish was named after ... well, ladies of the night. And he gleefully shared that knowledge with whoever was dining with him.

The story is that the ladies in question would make this dish because they could make it fast, which allowed them to get back to work quickly. But of course, he didn't care about the story. He just loved translating the name (usually in cruder terms) and gauging the reactions of people at the table, hoping for shock or horror.

Yup, that's the guy you want representing the brand.

Back then, I just rolled my eyes and said yes, I know. These days, I'd probably conspire with a waiter to invent a dish named after men with small noses.

No matter what the name, the dish still holds up as a quick and tasty meal. This version comes from Patsy's Italian Family Cookbook by Sal Scognamillo. Patsy's is an Italian restaurant in New York, and the recipes are what you'd expect from a restaurant serving the classics.

The recipe is actually for Linguine Puttanesca, but I've also had it with spaghetti. Use what you like.

I didn't have the anchovies in oil, but I did have anchovies in a tube. I just eyeballed the amount.

Linguine Puttanesca
Adapted from Patsy's Italian Family Cookbook by Sal Scognamillo

1/4 cup olive oil
2 garlic cloves, peeled and minced
1 28-ounce can whole plum tomatoes in juice
1/2 cup pitted and coarsely chopped kalamata olives
3 tablespoons drained capers, rinsed
6 anchovies* in oil, drained and finely chopped
1 teaspoon dried oregano
Salt and freshly ground pepper, to taste
1 pound linguine, cooked al dente in boiling salted water
Grated parmesan (or the good stuff), for serving

Get the water boiling and cook the pasta while you're working on the sauce.

Heat the oil and garlic together in a large, deep skilled over medium heat. Stir very often until the garlic is just turning golden. It can burn in an instant. If it does, toss the garlic and oil and start over.

Pour the juices from the tomatoes into the pan, then crush the tomatoes with your hands as you add them. Bring the mixture to a boil, then add the olives, capers, anchovies, and oregano. Reduce the heat to medium-low and let it simmer until it has thickened, about 20 minutes. If the linguine hasn't cooked to al dente by this time, set the sauce aside.

The book suggests draining the pasta, reserving 1/2 cup of pasta water, and adding the sauce to the pasta along with the reserved pasta water. Instead I transferred the pasta to the sauce, then added pasta water. Do whichever you think is easier.

Bring the pasta and sauce to a boil over high heat. Taste and add salt and pepper to taste - you might not need a whole lot of salt since you have olives, capers, and salty pasta water already.

Serve hot with cheese on the side to add as desired.

*I used anchovy paste from a tube and eyeballed the amount.

I received this book from the publisher at no cost to me.

Thursday, April 16, 2015

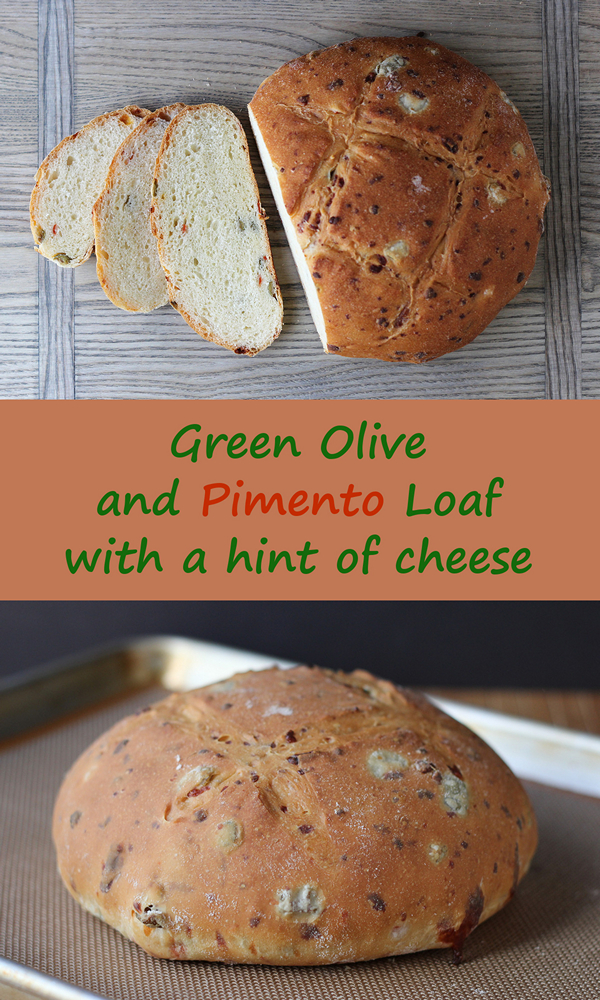
Green Olive and Pimento Bread with a Hint of Cheese

Cutting board courtesy of J.K. Adams: 1761 Large Rectangle
I've been on a little bit of an olive binge lately, so it was inevitable that some would fall into a loaf of bread. I had my choice of a few different types, but decided to use green olive stuffed with pimentos, mostly for the color.

Then I decided to add just a little bit of cheese. For the fun of it.

The resulting loaf is rich, with little bursts of salty-savory olives and sweet-savory bits of pimento. I used a white cheese, so it mostly disappeared into the loaf, but you can see brown flecks in the crust where the cheese was near the surface. If you use an orange-colored cheese, it will be more visible in the bread itself.

The one funny thing about this loaf is the green olives that are close to the surface, but barely covered by a film of dough ... they look a little odd because they're a greenish-white color. So make sure everyone knows that they're looking at green olives and not something evil growing on the loaf.

To make this bread, I used a crisping mat made by Mrs. Anderson's and supplied by Harold Import Company via 37 Cooks. Hmmm. Is that unclear? I belong to a group blog called 37 Cooks, and we're doing a challenge using the Mrs. Anderson's crisping mats (and standard silicon mats) that Harold Import Company sent to all of us.

I've tested the crisping mat quite a bit, and I have to say that I'm really pleased with the results. The surface is nonstick, so there's no need for cornmeal under the dough. The mat is actually a very fine mesh, so there are holes that allow air circulation under the baking bread. It's really a great idea.

Even if the bread is a little sticky - like a sweet bread that might ooze sugary stuff - or a cheesy bread like this one - the bread doesn't stick and the mat is easy to clean. It's dishwasher safe, but things like this are awkward in my dishwasher, so I've only washed it by hand.

If you bake a lot of bread, pastries, cookies, or other baked goods where a crisp, non-soggy bottom is preferred, I suggest you give one of these mats a try. And although I haven't tried it, it should be pretty awesome for reheating things like pizza, where you really do want a non-soggy bottom.

Green Olive and Pimento Bread with a Hint of Cheese

1 cup lukewarm water
2 1/4 teaspoons active dry yeast
1 tablespoon sugar
2 1/2 cups (11 1/4 ounces) bread flour
1 teaspoon salt
2 tablespoons olive oil
2 ounces shredded cheese (your choice)
16 pimento-stuffed well-drained green olives, sliced or roughly chopped

Combine the water, yeast, sugar, bread flour, salt, and olive oil in the bowl of your stand mixer fitted with the dough hook. Knead until the dough is smooth and elastic.

Add the cheese and olives and mix until well combined.

Cover the mixer bowl and set aside until the dough has doubled in size, about an hour.

When the dough has risen, flour your work surface, place the crisping mat on a baking sheet, and heat the oven to 350 degrees.

Knead the dough briefly, then form it into a tight ball. Place it on the prepared baking sheet and cover with plastic wrap. Or, what I did was use the empty mixing bowl as a cover. Set aside until the dough has doubled in size and if you gently poke the dough with a finger, it leaves an indent or slowly fills in rather than bouncing back quickly.

Slash the dough as desired and bake at 350 degrees until nicely browned, about 45 minutes.

Let the bread cool completely on a rack before slicing.

I received two baking mats at no cost to me from Harold Import Company via 37 Cooks.
Green olive and pimento loaf with a hint of cheese

Sunday, April 21, 2013

Black Olive Truffles. Yes, you read that right!

This may be the recipe that makes you think, "Donna's gone over the edge." But bear with me a few seconds. This makes sense. Really it does.

A while back, I read in some food publication that if Food A pairs well with Food B and Food B pairs well with Food C, then you can guarantee that Food C will pair with Food A.

At the time, I tried to think of combinations that would break this rule. But I couldn't. Sometimes the combination of Food C and Food A was a little un-obvious or unusual, but it always worked.

So when Kitchen Play launched a menu using Lindsay Olives and asked people to add one more course to the menu, it got me thinking. About crazy things. Because, you see, they already covered the amuse bouche, bread, salad, appetizer, and entree.

You see what's obviously missing?

Yes, dessert. With olives. Oh my.

And my mind went immediately to chocolate. Well, it goes there a lot. Usually not with olives. But I wondered if this could be the combo that would break the A-B-C food rule. Olives pair well with nuts (there are almond-stuffed olives, right?) and nuts pair well with chocolate. Therefor, olives have to pair with chocolate.

Right? Right!

I let my official taste tester sample one, and he was quite impressed. He actually asked how many of them I made. So, yeah, it works.

It's not as weird as it seems. Olives are fruit, after all, and the mild saltiness of the olives goes well with the chocolate.

And I kept the nuts, too. Because why not?

I'm thinking that pistachios would also be a good nut for stuffing into the olives. Maybe I'll give that a try next time. Because, oh yes, there will be a next time.

Black Olive Truffles

Lindsay Naturals pitted black olives
Marcona almonds
Chocolate, melted

Drain and dry the olives. You don't want a wet surface. Let 'em sit on a paper towel for a while. Stuff a nut into the center of each olive.

If the nuts are too big, cut them in half or whatever needs to be done to make them fit. It's fine if you have a bit poking out, but olives aren't elastic. If you try use a nut that's too big, you're just going to tear the olive.

Dip the olives into the melted chocolate. I used a semi-sweet. Use whatever you like.

Note: I'm really terrible at doing this and making the resulting candy look uniform. But whatever. They all have their own unique charm. Or that's what I tell myself.

Place the dipped olives on a plate and shove them in the refrigerator to harden the chocolate.

Serve soon. I have no idea how well these keep. So make as many as you're going to serve in a day or two.

Monday, November 29, 2010

Olive Pimento Cheese

Okay, so I'm addicted to cooking contests. They inspire me to make things I might not otherwise think of. The Kitchen Play contest this month is sponsored by Lindsey Olives, and I certainly had olives on hand after the Thanksgiving holiday.

I decided to take one more look at the menu on Kitchen Play before the month was over, and see what else I could find and (of course) modify. This time I decided to work on the Amuse Bouche course which was a baked brie.

Cheese and olives are a great pair, but my post-Thanksgiving plans didn't require something as fancy as baked brie. But I had plenty of other cheeses. And ideas. So I went with something a little less geared for entertaining, and went with something a little more geared towards hanging around and snacking.

The cheese is still there and the olives are still plentiful. And there's baking. I served this cheese two ways - atop home made Fire Crackers, and inside pastry as mini turnovers. The pastry was left over from making pie crust for Turkey Pot Pie, but if you're entertaining a crowd and want a lot of turnovers, you might want to make a whole batch of pastry just for this recipe. Or buy pastry crust.

This cheese would also be great in puff pastry shells. Hey, we're getting back around to the original idea!

Instead of brie, I went with more ... common cheeses, and the idea itself is a riff on pimento cheese, is a staple in the southern US. The addition of olives makes it different than the usual, though.

Besides using this on crackers, it would make a savory filling for celery sticks. Or you could loosen it up with a bit of mayonnaise or sour cream, and use at as a dip.

For something with this much flavor, it's simple. Just four ingredients, and if you make it in a food processor, there's not much effort. If you don't have a food processor, you can still make it, with just a tiny bit more effort - but still easy enough that you can whip it up at the last minute for unexpected guests or a sudden snack attack.

If you don't want to roast your own red bell pepper for this recipe, you can use jarred roasted red peppers.  Use 4-5 average-sized pieces, or more, to taste.

Other items are customizable as well, so you can make this from pantry ingredients if you need a quick appetizer and don't have time to shop. Use any combination of cheeses you like, for example. As for the olives, you can use any pitted olive you like. No pitted olives? It's very easy to pit your own with an olive pitter.

Olive Pimento Cheese

4 ounces cheddar cheese, cubed
4 ounces cream cheese
1 cup pitted olives (I used a combo of Lindsay green and kalamata olives), chopped
1 red bell pepper, roasted, peeled and seeded.

Put the cheddar cheese in the food processor fitted with the chopping blade and process until it is finely chopped. Add the cream cheese and process until you have a smooth mixture. Add the olives and red pepper and pulse until the mixture is as smooth as you like - smooth, chunky, or in-between, it's up to you.

If you don't have a food processor, finely shred the cheddar cheese, and finely chop both the olives and peppers before combining with the cream cheese. Mix thoroughly.

You can serve immediately, or make it ahead and refrigerate until you need it.

Thursday, November 25, 2010

Eggplant Putanesca

After trying out one of the recipes for the Kitchen Play contest sponsored by Lindsey Olives, I decided to see what else I could find and (of course) modify. This time I decided to riff on a recipe for Squash Putanesca Cruda which itself is a play on Pasta Putanesca.

This contest recipe was written as a salad course, and used spaghetti squash as the base. Which makes sense, since spaghetti squash is sort of like spaghetti. But I didn't have any spaghetti squash on hand. I did, however, have some eggplant that needed to be used.

I used most of the same ingredients that were in the topping in the original recipe, but I didn't make the dressing that included ricotta cheese. Instead, I used just a bit of shredded parmesan cheese.

There's not a lot of work required to make these, and you could assemble them ahead and heat them up later, if that works better.

Eggplant Putanesca

2 medium/small eggplants
2 tablespoons olive oil
1 can petite diced tomatoes
1 2 1/3 ounce can Lindsay sliced black olives, drained
2 tablespoons capers
Seasonings (to taste): Salt, oregano, basil, fennel, red pepper flakes
Shredded parmesan cheese, for garnish

Preheat oven to 350 degrees.

Peel and slice the eggplant into 1/4 inch thick rounds.

Salt the eggplant and let it sit for 10 minutes or so, until it exudes moisture.

Squeeze the eggplant to release more liquid, and rinse briefly to wash off extra salt.

Pat eggplant dry.

Heat the olive oil in a skillet and brown the eggplant slices on both sides, then transfer the eggplant to a baking sheet or shallow casserole.

Top the eggplant with fork-fulls of tomatoes, leaving the liquid behind in the can. Top the tomatoes with the drained olives.

Add the capers and spices to the liquid left in the can, then spoon that liquid over the top of the olives.

Top with a bit of parmesan cheese.

Bake at 350 degrees for about 20 minutes to warm everything through and begin to melt the cheese.

Top with a little more cheese, if desired, before serving.

Monday, November 22, 2010

Olive Rosemary Bread

One again, I decided to throw my hat into the ring for another Kitchen Play contest. This time the sponsor was Lindsey Olives. I looked over the menu items and saw that the dessert course was French toast made with bread that included olives.

I decided to forgo making the French toast and just made the bread. Once that's made, of course you can do anything you want with it.

I'm thinking it would be great for turkey sandwiches, if it lasts that long. Or it would be pretty in the Thanksgiving bread basket. Or toasted and used as the base for an olive tapenade.

Of course, I added my own little twists to the original bread recipe. I decreased the recipe to make just one loaf, and I fiddled with a few of the other original ingredients, adding semolina flour and using bread flour instead of the all purpose and whole wheat flours.

For the olives, I used regular black olives instead of the kalamatas, and I used the sliced rather than chopped. The stand mixer beat them up a little bit more, but it left large, dramatic chunks. It's a pretty loaf of bread, with a light golden crust.

Olive Rosemary Bread

1 cup lukewarm water
2 1/4 teaspoons (1 package) instant yeast
1/2 cup semolina
2 cups (9 ounces) bread flour
1 teaspoon cracked dried rosemary
1 /2 cup sliced Lindsay black olives, drained
1 teaspoon salt
1 tablespoon olive oil

In the bowl of your stand mixer, combine water, yeast, and semolina and set aside until it's bubbly, about 10 minutes.

Add the bread flour and rosemary and knead with the dough hook until the dough is smooth and elastic. The dough might seem a little bit dry, but the olives will add more moisture, so there's no need to worry.

Add the salt, olive oil, and olive, and knead until the olive oil is incorporated and the olives are well distributed in the dough.

Form the dough into a ball drizzle with a bit of olive oil, and return it to the bowl. Cover with plastic wrap and set aside until doubled, about 60 minutes.

Preheat the oven to 350 degrees and sprinkle some cornmeal on a baking sheet.

When the dough has doubled, flour your work surface lightly and turn out the dough. Knead briefly, then form the dough into your preferred shape. Place it on the prepared baking sheet, seam-side down. Cover with plastic wrap and allow to rise until doubled, about 30 minutes.

Slash the loaf as desired and bake until golden, about 45 minutes. Cool completely on a rack before slicing.

This has been submitted to Yeastspotting.