Showing posts with label avocado. Show all posts

Monday, November 23, 2015

Fajitas! And a really sharp #Giveaway

A while back, I read a quote from a chef who commented that cooking is fun because you get to play with knives and fire.

I can't disagree. There's something incredibly satisfying about cutting meats and vegetables and fruits with good knives. It's a pleasure rather than a chore. So when my buddies at Virtual Potluck teamed up with WÜSTHOF, I was pretty excited about the new kitchen weapons.

We each received the CLASSIC 5-inch Serrated Slicing Knife and the CLASSIC 2-Piece Extra Wide Chef Set that includes a 4-inch paring knife and a 6-inch cook’s knife. AND I have the same knives that I'll be giving to one of my readers.

The first time I used the serrated knife to slice a tomato, I nearly swooned. I like using serrated knives to cut tomatoes, but this one is so much better than other knives I have. So much. Much like the serrated bread knife that I received as a gift to celebrate my book contract, this was a knife I didn't know I needed until I used it. Now I'm in love with it.

Wowza.

And the other two knives are pretty darned nice, too. The wide cook's knife is great for slicing, and the width makes it wonderful for smashing garlic or scooping up what's been cut.

The paring knife is sweet, too. It make peeling things much more fun, and it's also great for cutting small things, like when I'm slicing limes for cocktails.

The first thing I thought of cooking that would show of the knives was fajitas. First, I love Mexican food. And Mexican-inspired food.  And second, fajitas require a lot of slicing. And different kinds of slicing.

I opted for steak fajitas. But what kind of steak? The usual suspects for fajitas are skirt steak, flank steak, or flap meat. But the secret is that you can pretty much use any kind of steak you like, as long as you slice the meat into small, thin pieces. I decided to use a boneless ribeye.

I also decided to use a LOT of vegetables. Because I like them.

The one thing I didn't do (that I usually do) is that I didn't go crazy with toppings. I usually end up with way too many toppings whenever I serve something in a tortilla. This time, I limited it to an avocado crema, fresh tomatoes, and cilantro.

Steak Fajitas
with Avocado Crema

For the fajita filling:
1 steak (your choice)
Salsa (home made or store-bought) for marinating
Olive oil
1 zucchini
1 red bell pepper
1 poblano (or similar) pepper
1 onion
Salt and freshly ground black pepper, to taste

For the crema:
2 avocados
1/2 cup sour cream
2 tablespoons lime juice
1/2 teaspoon salt

For assembly:
Corn tortillas
Tomatoes
Cilantro

Marinate the meat:
A few hours before cooking, place the steak in a plastic zip-top bag and add just enough salsa to coat the meat. Seal the bag and let the steak rest at room temperature while you prep everything else. You can also marinate the steak overnight and remove it from the refrigerator an hour before cooking.

Prepare the vegetables:
Slice the zucchini into matchsticks about 2 or 3 inches long. Core and seed the red pepper and poblano pepper and slice into similar-sized pieces. Peel the onion, cut it in half from root to stem, and slice into half-moons so the strips are about the same size as the zucchini and peppers. Set aside.


Make the crema:
Put the avocado flesh, sour cream, lime juice, and salt into a blender or food processor and blend until smooth.


Prep the garnishes:
Slice the tomatoes into thin wedges and chop the cilantro roughly.


Cook the steak:
Heat a skillet on high heat. Remove the steak from the marinade and pat dry. Rub the steak with the olive oil and place in the hot pan. Cook until nicely browned on one side, flip, and cook on the second side. Continue cooking until the steak is done to your liking. Remove it from the pan and let it rest while you cook the vegetables.

Cook the vegetables and tortillas:
Add the vegetables to the pan where you cooked the steak. You can wipe out the pan, if you like, or just let the meat flavor season the vegetables. Add a little olive oil, if necessary and season with salt and pepper, to taste. Cook the vegetables to you liking - crisp-tender is fine, and fully cooked and caramelized is just as good. It's your dinner, so make it the way you like it.

Meanwhile, warm the tortillas in a dry pan, flipping them over as the heat up, until they're soft and have a few brown spots.


Slice the steak and assemble:
By the time the vegetables are cooked, the steak should be rested well enough to slice into small, thin pieces. If you're using skirt or flank steak or flap meat, make sure you're cutting against the grain of the meat.

Assemble the fajitas with vegetables, steak, and garnishes as desired - or serve the individual components in bowls and let people make their own.

Serve hot.

If you're looking for a knife for a holiday present, check these out! And they're easy to wrap, since they come in boxes. Or, enter below and see if you might win!


Thanks to WÜSTHOF for sponsoring this post and providing knives for the giveaway (US residents only). If you want to know more, check out their website, like them on Facebook, or follow them on Twitter.

Tuesday, August 18, 2015

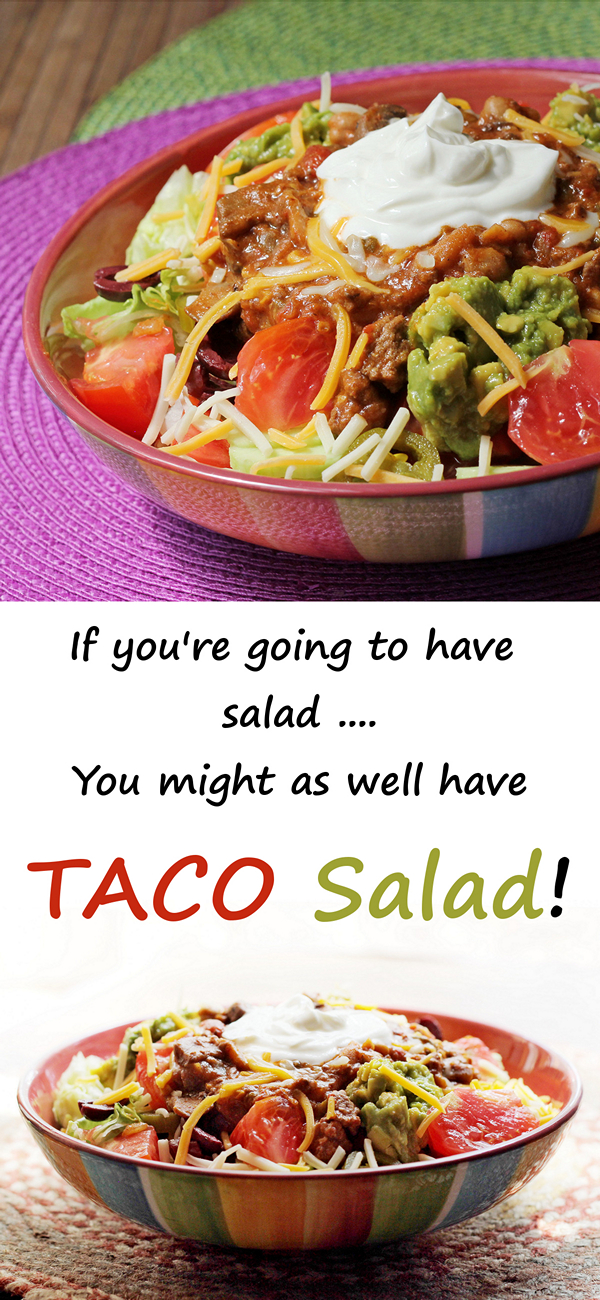
Taco Salad

A long, long time ago, I had a job that required that I spend countless hours driving all over the Chicagoland area.

On some days, I went out to lunch with customers. Most days, I ate lunch alone.

If I was in a hurry to get from one side of town to the other, I sometimes grabbed fast food. But if I was close to my next appointment and it was lunchtime, I had plenty of time to have a decent meal.

I had some criteria for where I dined. For example, I didn't like getting seated at a tiny table, even though I was alone. Sometimes I brought work with me to read over, and sometimes I brought a book. I didn't need a huge table, but I wanted a little bit of elbow room, if the restaurant wasn't crowded. It irked me to be seated at a tiny table if the restaurant was only 1/4 full, so I tended to avoid those sorts of places.

As far as food, I wanted something filling enough to get me through the rest of the day, but not so heavy that I'd want a nap in a couple hours. I also didn't want a super-expensive lunch. This wasn't a special treat, it was just an everyday lunch.

And I didn't want something messy. After all, I was going to be visiting with customers after lunch.

Over time, I found favorite places in many of the areas where I had customers, and I had favorite dishes at many of those restaurants. One of my favorite lunches was served at a Mexican restaurant, but it certainly wasn't a traditional Mexican dish. It was taco salad.

The salad was served in an oversized flour tortilla that was deep-fried in the shape of a bowl. While a giant deep-fried tortilla wasn't exactly the most healthy thing to eat, the rest of the salad was reasonably healthy.

I haven't had one of those salads in years, and I'm not sure why not - it's pretty easy to assemble as long as I have chili on hand.

I don't bother with the giant deep-fried flour-tortilla bowl - I just use a normal shallow bowl.

The appeal of this salad is the contrast between the warm chili and the chilled salad ingredients, as well as the spiciness of chili and jalapenos contrasting with the creaminess of the sour cream.

If you look at it, a taco salad is very similar to nachos, with crisp lettuce instead of crunchy chips. And probably with less cheese - depending on how your make yours.

Just like any salad, you can modify it to suit your tastes. You could even add a handful of tortilla chips, if you like.

Taco Salad

Romaine or iceberg lettuce
Sliced zucchini or cucumbers
Pitted olives (sliced, if you like)
Tomatoes, cut in wedges or bite-sized chunks
Pickled jalapeno peppers, sliced
Sliced or cubed avocado or guacamole
Shredded cheese
Chili (home made preferred, but a good canned brand is fine)
Sour cream or Greek yogurt

Scatter the lettuce in a shallow bowl. I aim for a salad that's at least half lettuce compared to the rest of the toppings, but make it the way you like.

Add the zucchini and/or cucumbers, olives, tomato, and jalapeno over the top of the lettuce. add a few small dollops of guacamole or slices of avocado around the edges.

Add the chili in the center. Sprinkle with cheese, and top with a dollop of sour cream or yogurt.

Serve immediately.

Note: this salad would also work well as a built-it-yourself meal with all of the ingredients available for everyone to add as much or as little of each item as they like.
If you're going to have salad, you might as well make it a taco salad, right? Want some chips with that?Want some taco salad? I know you do!

Tuesday, May 19, 2015

Half-Moon Taco Burgers

Ground meat isn't unusual in a taco, but I decided to change things up by making half-moon shaped burgers that would fit neatly inside a tortilla.

I flavored them with peppers and chili powder, melted cheese on top, and served them in warm tortillas with guacamole and pepper.

The result was a really really really tasty burger that looked unique, nestled it its tortilla home.

The meat I used was a combination of beef and chicken from a company called Cluck 'n Moo that provided product for the blog group 37 Cooks that I belong to.

Because the meat includes chicken, it needs to be cooked to a safe temperature - no rare burgers with this stuff.

You can make these less spicy by using mild pepper and mild chile powder, or make it more spicy by using hotter peppers and chile powder. And of course, you can add extra spice with your choice of condiments, like peppers or salsa.

Half-Moon Taco Burgers

1 pound Cluck 'n Moo ground chicken and beef
1 4-ounce can diced Hatch chiles (hot or mild, your choice)
2 teaspoons chili powder (hot or mild, your choice)
1/2 teaspoon salt (or to taste)
1 cup shredded cheese (I used a mix of cheeses, but any good-melting cheese will work)

In a medium bowl, combine the ground meat, chiles, and chili powder.

Divide the meat into four portions. Shape each portion into a half-mood shape that will fit into your tortilla. I used 6-inch tortillas and made the burgers slightly smaller that the tortillas - keep in mind that the tortillas need to wrap the meat.

Heat your grill. Sprinkle the burgers with salt as desired, and cook, flipping as needed, until just about done. Divide the cheese onto the tops of the four burgers, close the grill, and let them cook until the cheese is almost melted.

When the cheese is almost melted, place the tortillas on the grill (on a cooler part of the grill, if possible). Place the burgers on the tortillas and close the grill again. Cook until the cheese is melted and the tortillas are warmed.


Serve with your favorite taco toppings. I used guacamole and pickled jalapenos. Other options are shredded lettuce, salsa, cilantro, crema, or chopped fresh tomatoes.

Tuesday, April 28, 2015

Shishito Guacamole

There was an avocado sitting on the kitchen counter, glaring at me accusingly. I had plans for it the day before, but plans fell through. I knew that if I didn't use it soon ... like now, it would be ugly inside, and I'd be mad.

For a fleeting moment, I thought about adding the avocado to the mashed potatoes I was planning, but shifted gears when I remembered the shishito peppers I recently received from Frieda's Specialty Produce.

Avocado with shishito peppers sounded like a really good idea. And, it was. They added a nice roasted pepper flavor and just a little bit of heat.

Shishito Guacamole

6-8 shishito peppers
Splash of olive oil
1 avocodo
1 teaspoon finly chopped fresh chives
1 teaspoon lime juice
Salt, to taste

Remove the pepper stem and slice the peppers in half, lengthwise. Heat the oil in a skillet and add the peppers. Cook, stirring occasionally, until the peppers are browned in spots and beginning to smell fragrant.

Remove the peppers from the pan and chop finely.

Remove the flesh from the avocado and put it in a small bowl along with the peppers, chives, lime juice, and salt. Stir to combine, while chopping and mashing the avocado to your desired smoothness. Taste for seasoning and add more salt or lime juice, if desired.

Serve.

Frieda's Specialty Produce occasionally sends me food items for use on my blog. I'm not required to post.

Thursday, December 19, 2013

Three lunch sandwiches made in a breakfast sandwich maker

After my last breakfast sandwich binge, I wanted to make some more ... lunchy sandwiches. So here they are!

English Muffin Pizza


This is a great use for leftover Italian sausage. Start with a generous smear of tomato caponata or some thick marinara or your favorite pizza sauce on the bottom half of an English muffin, then add some slices of cooked Italian sausage. Top with a nice melty cheese like mozzarella, or even jack. Heat in the sandwich maker until the cheese is melted.

Yes, I left this one topless. So you can make another sandwich from the other half of the muffin. Sneaky, yes?

Tuna Melt


I'm guessing that Tuna Melts are a love-hate thing, right? People either love them or say, "ewwwww, warm tuna salad!" But if they're done right, the tuna salad stays mostly cool while the cheese gets a little melty.

Instead of an English muffin, this time I used a bagel. To be honest, the bagels I bought were a tiny bit too large for the breakfast sandwich maker, but that was an easy fix. I just cut a wedge from the bagel, and pushed the cut ends together making a smaller circle and it fit perfectly. Sometimes you just have to improvise.

I started with a few slices of tomato on the bottom (which also helped keep the tuna salad from falling through the hole in the bagel!) then a generous portion of tuna salad, then some cheese. It was too tall to fit into the sandwich maker with the egg-cooking plate in place, so I just moved that aside and let it cook for about 3 minutes until the cheese was melty. Then I put the top part of the bagel on.

If I wanted that top part of the bagel toasted, I could have let that sit in the sandwich maker for a minute after I took the main part of the sandwich out, but I was fine with it untoasted.

Ta daaaa!

Veggie Delight


This little sandwich combines some of my all-time favorite foods. And the colors are really pretty together. The olives add a nice briny flavor to cut the richness of the avocado and cheese and the red pepper adds a bit of lightness.

For something meat-free, this is pretty filling and VERY satisfying.

On the bottom half of the English muffin, I spread some avocado. Okay, maybe it was a LOT of avocado. Then I added some pitted kalamata olives, sliced in half lengthwise. That went into the bottom half of the sandwich maker. I but a big slice of roasted red pepper on the egg-cooker part, then topped that with some mild cheddar cheese. I let that cook until the cheese was almost melted, then topped with the top half of the English muffin to let it get a little toasty. Another minute and I called it LUNCH.

Monday, August 26, 2013

Keep your Guacamole Green!

I love avocados. And I post about them a lot. As of right now, there are 61 posts on this blog that mention avocados, and 31 posts that mention guacamole.

Yes, I do love guacamole. Plain, fancy, spicy, fruity, limey. Traditional or non-traditional.

But there's a limit to how much I want to eat. I mean I could eat a whole avocado's worth of guacamole all by myself. And maybe that has even happened. Maybe. But most of the time, guacamole is an appetizer, or it's intended as a garnish on tacos.

And that means there's a good chance there will be leftover guacamole. Which never survives well.

I've tried putting plastic wrap directly on the surface of the guacamole, and that helps. But it's not a perfect solution. The guac still gets brown.

In part, it depends on the avocados. I've had some that I swear begin to turn dark while I'm working on them. Make the guacamole more than two seconds before the chips begin dive-bombing, and it's already getting ugly. Other avocados stay green much longer, even with no magic spells or protective charms.

The amount of lime you add to the guacamole also makes a difference. More lime = longer storage. Although I like lime, I want my guacamole to taste more like avocado than lime.

So, when I read a tip on The Kitchn about putting a layer of water on top of the guacamole prior to storage, I had to give it a try. And, the fact that they used a container that's exactly like one I have might have caught my eye, too.

I tried it. Water on top of the guacamole, seal the container, and stick it in the fridge.

After 24 hours, it was still a vibrant green. So far, so good. I let it rest a little longer. After two days, the water had started turning dark, and there was a very small layer of brown on top of the guacamole. It was a much thinner layer than I would have seen if I had stored it normally, but it was still headed to a bad place.

Then, inspiration struck. I poured out the water, scraped off that tiny layer of brown, and added some clean water. THEN I added a splash of lime juice. I didn't measure, but it was just a splash compared to the amount of water.

Back into the fridge it went. 24 hours passed. No change. Another 24 hours. Still good. Three days, and it looked just like it did on the first day. Well, okay, some of the bits of avocado had loosened themselves from the guacamole and were floating in the water, but the guacamole was still green. The water wasn't brown. SUCCESS!


And keep in mind, this was guacamole that had been in the fridge for two days with just the water. It was now five days old and still perfectly edible. Absolutely no signs of going brown.


Woah. It's like a kitchen miracle!

After six days in the refrigerator, that same guacamole is just now starting to show the tiniest bit of brown. And, really, that's eight days, since the first two were with just water and no lime juice. I'm really impressed at how well this works. It's pretty doubtful I'll ever need to store guacamole for six days, but it's nice to know I can make a larger batch (like, two avocados instead of one) and it won't be wasted.

If you're going to do this for a large quantity of guacamole, I'd suggest using a container that's tall rather than wide so you limit the amount of water/guac interaction. Over time, you're probably going to get some water infused into the guacamole. Not a lot, but you might as well limit it by using a tall container. A wide-mouth canning jar, perhaps?

Smooth the top of the guacamole before you add the water, and try to get rid of air bubbles below the surface.

When you add the water, pour it in slowly. You can pour down the side of the container or pour onto a spoon and let it dribble off of that. There's no sense in making a crater in the guacamole by pouring water in too fast and getting the guac mixed with water.

Don't forget to add your splash of lime juice. Since you're going to be pouring off the water, anyway, you could also use lemon juice or fruit fresh - whatever you have on hand.

And then just cover the container and refrigerate.

Easy, right? And no more brown guacamole!

Monday, August 19, 2013

Almond Avocado Alligators

I love avocados ... so many great things to do with them. Like guacamole. Or guacamole. Or guacamole.

But seriously, I've used avocado in baked goods, like cookies. It was inevitable that I'd use them in bread, right?

This bread is similar to a sweet brioche, with the avocado taking the place of the egg and butter. My dough was a lovely green color before it was baked. Afterward, there was a green tinge on the outside in areas that weren't browned, and the inside was a greenish yellow.

Your results might be different. Avocados vary a bit in color, and mine was quite green. If you have avocados that are more yellow than green, your bread will be less green.

I thought the almonds were a great complement to the bread - to me, avocados taste a little bit like pistachios, so other nuts made sense. And, since the bread was green and brown, I thought that the sliced almonds resembled the rough back of an alligator.

Speaking of alligators, did you know that avocados are sometimes called "alligator pears"? It makes sense, right? The shape is like a pear, and the rough exterior is pebbly, like an alligator. So, there's more than one reason for these buns to be alligators, right?

When you're making this bread, mash the avocado right before you add it to the bread so it doesn't have a chance to start turning brown.

Although I didn't need sliced avocado for this recipe, I had some fun playing with the avocado tool (and citrus tools) that Good Cook sent me.

The avocado tool has a hook (for lack of a better description) on one end that you can use to pry out the pit. The other end scoops and slices the avocado in one motion. Kind of neat, if you need to plow through a whole lot of avocados. It makes even slices, which is a nice for presentation, too.

The tool is dishwasher safe, which is always a plus. I have enough stuff that doesn't fit in the dishwasher or that has to be hand washed. Anything I can chuck into the dishwasher is great.

And (bonus points) since this isn't a sharp implement (because avocados are fairly soft when properly ripe) this is a tool you can hand to your kids and let them help in the kitchen.

The other tools are a citrus reamer and a zester.

I used to have a wooden citrus reamer that disappeared some time ago, but it wasn't my favorite tool since it wasn't all that easy to clean. This one is dishwasher safe and hand-washing isn't much of a problem, either. It pretty much rinses clean.

The zester will make smaller shreds as well as larger ones that you'd use for cocktails.

Almond Avocado Alligator Buns

1 cup lukewarm water
4 tablespoons sugar (divided)
2 1/4 teaspoons instant yeast
3 cups (13 1/2 ounces) bread flour
1/2 cup mashed avocado
1 teaspoon salt
1/2 cup instant mashed potatoes
1/2 cup sliced almonds
Eggwash (1 egg beaten with 1 tablespoon water)
Jam (optional)

Combine the water, 1 tablespoon of sugar, and yeast in the bowl of your stand mixer. Let it rest for a few minutes while you gather the rest of the ingredients.

Add the bread flour and knead with the bread hook until the dough forms a ball, cleans the sides of the bowl, and becomes smooth.

Add the mashed avocado, salt, and instant mashed potatoes. Continue kneading until the dough is smooth and elastic.

Cover the bowl with plastic wrap and set aside until the dough has doubled in size - about an hour.

Meanwhile, line a baking sheet with parchment paper and preheat the oven to 350 degrees.

When the dough has risen, flour your work surface and turn out the dough. Divide it into 12 pieces. Form each piece into a smooth ball and arrange them on the baking sheet.

Just for fun of it, I filled three of the buns with blueberry jam, but the rest were left un-filled. I thought the purple looked good against the light green of the bread, and the flavor worked really well, too.

If you want to fill some buns, form the dough balls into flat disks, put a small amount of jam in the center, then bring the edges up and pinch them together to seal the dough over the jam. Place the buns seam-side down on the baking pan.

Cover the buns with plastic wrap and set aside until doubled in size, about 30 minutes.

When the buns have doubled, remove the plastic wrap and brusd the buns with the eggwash. Sprinkle the buns with the sliced almonds. (I didn't put the almond on the jam-filled buns, so I could tell them apart better after baking. If was making all of the same type of buns, I'd put the almonds on all of them,)

Bake the buns at 350 degrees until nicely browned, about 25 minutes. Let the buns cool completely on a rack before serving.

Want more avocado? Check out these other blogs!


Disclaimer: I receive products and giveaway items from Good Cook as part of their Kitchen Experts program.

Good Cook is offering a 25% online discount on the ProFreshonals Produce Tools. Use the code LoveAvocado to get your discount.

Tuesday, July 9, 2013

Guacamole with Finger Limes! Squeeeeeeee!

I've been lusting after finger limes ever since I saw them online, so I was really excited when Frieda's Specialty Produce sent me some this month.

I had one cut open before I put anything else away.


Since I'd only seen photos of them, I didn't realize how small they were. Not the size of a standard lime. Or a finger. The ones I got were about 1 to 1 1/2 inches long.

The really cool thing, besides the fact that there are teeny balls of limey goodness inside the fruit, is that the insides were different colors. The first one I cut open was a pale peachy color, another was a pretty pink, and a third was a darker pink, and some are a pale green - almost like a common lime.


The little balls are fairly sturdy, so they have a bit of snap to the them. The flavor is definitely lime, but maybe not as tart, and there's a whiffy of an herby-piney scent on the skin.

I could snack on these like candy.


I decided to toss some into guacamole and then I used another lime's worth for a garnish.

Guacamole with Finger Lime


1 avocado
1/2 teaspoon salt
1 teaspoon lime juice
2 tablespoons diced onion
Innards of 3 finger limes

Combine the avocado flesh, salt, lime juice, onion, and two of the finger lime flesh in a small bowl. Stir well, mashing the avocado to your desired texture.

Put the guacamole in a serving bowl and garnish with the flesh from the third finger lime.

Serve.

I received the organic finger limes (and other items) From Frieda's Specialty Produce. I was not required to write a post.

Saturday, June 22, 2013

Whole Foods Feasting: Peachy Guacamole

In this guacamole, peaches play role similar to tomatoes - a little sweet and a little tart, and the texture is very similar to that of tomatoes. Give it a try - I think you'll like it.

This pairs well with the salsa from yesterday, with the salsa providing the heat, and the guacamole taming it.

Once again, I prefer to peel the peaches, but you can leave them unpeeled, if you prefer.

Peach Guacamole
Makes 1 cup

1/2 peach
1 avocado
1 tablespoon chives, thinly sliced
2 teaspoons lime juice
Pinch of salt

Peel, pit, and dice the peach and add it to a small bowl.

Remove the flesh from the avocado and add it to the bowl. Add the chives, lime juice, and salt.

Stir to combine, breaking up the avocado as desired. Serve immediately.

Garnish with some extra chives, if desired.

Friday, May 17, 2013

Whole Foods Feasting: A Tale of Two Salads

When I was growing up, salad meant greens -usually iceberg lettuce - and salad dressing. Salad was something that was eaten before dinner. It sure wasn't something that was eaten as a meal.

Okay, maybe there was the occasional tuna salad. But even though "salad" was in the name, it wasn't something eaten like salad. It was a sandwich filling.

Now, salad in my life has broken out of its mold, It can still be a starter, but it's just as likely to be a side dish or a meal. In summer, a nice light chilled salad is particularly welcome for lunch. And a hearty - but chilled - chicken salad makes a great salad nestled in a lettuce cup, or it makes a great sandwich filling.

The chicken salad is a great way to make use of leftovers, too.

The Chicken and the Egg Salad

1 chicken breast, cooked and chilled
1 chicken thigh, cooked and chilled
2 celery stalks, diced
2 radishes, diced
2 mini sweet peppers, cored and diced
2 eggs, hard boiled, peeled and diced
1 tablespoon capers
1/4 teaspoon salt
1/4 teaspoon white pepper
1/4 teaspoon dry mustard
1/4 cup Greek style yogurt
1/4 cup mayonnaise
1/2 teaspoon paprika
A few grates of nutmeg

Remove the skin and bones from the chicken, and cut into a medium dice and add it to a medium bowl.

Add the celery, radishes, peppers, eggs, capers. salt, pepper, mustard, , yogurt, mayonnaise, paprika, and nutmeg.

Stir gently to combine. Taste for seasoning and add more salt as needed.

 Serve in lettuce cups (garnish with extra paprika, if desired) or use as a sandwich filling.

Shrimp Salad 

This salad makes a nice appetizer with just a few shrimp, or it can be a full meal with more shrimp - it's your choice. The greens are dressed with a fruity dressing, with an additional avocado sauce for the shrimp. Any extra avocado sauce is a great dip for chips, or you can thin it with milk or buttermilk and use it as a salad dressing.

You could use regular bell peppers for this salad, but the mini peppers make nice, small rings that look pretty in the salad.

Shrimp Salad with Avocado Sauce

For the salad:
1 head romaine heart
1 small zucchini
1 radish
3 mini sweet peppers
1 tablespoon raspberry or mango vinegar
2 tablespoons olive oil
Pinch of salt
1/2 teaspoon sugar
1/2 pound shrimp, cooked, cleaned, and chilled

For the avocado sauce:
1 cup mashed avocado
1 cup Greek-style yogurt
2 tablespoons lime juice
1/2 teaspoon salt
Pinch of chipotle powder

Tear the romaine into bite-sized pieces and add it to a medium bowl. Cut the zucchini in half horizonally, then slice into thin rounds and add them to the bowl. Slice the radishes into thin rounds and add them to the bowl. Core and seed the peppers, slice them into thin rings, and add them to the bowl.

Combine the vinegar, olive oil, salt, and sugar in a small jar with a lid. Shake the jar to combine and emulsify the dressing. Pour the dressing over the salad and toss to combine.

In a small bowl, combine the avocado, yogurt, lime juice, salt, and chipotle powder. Stir well.

Arrange the greens on a plate, dollop the as much of the avocado as you like in the center, then arrange the shrimp on top. Serve chilled.

Refrigerate the remaining avocado sauce. Unlike guacamole, this doesn't turn brown quickly, so it will last at least several days in the refrigerator.

For information about Whole Foods, see the tab at the top.

Tuesday, May 14, 2013

Avocado Dip and #TheRealKettleChips

Let me admit this right upfront. I used to be a potato chip purist.

Yup, I was never fond of flavored chips. Oh, I'd nosh on the occasional flavored chip if someone else was serving. But I pretty much only bought plain chip. Boring, right?

But recently, I've become acquainted with flavored chips that I like, so when I got the opportunity to sample Kettle Chips and write about them, I got my dip ready (recipe below) and eagerly awaited the testing.

Kettle Chips aren't exactly new - they've been made in Oregon for over 30 years. That's a lot of spuds. Many, many, many spuds.

Here's what they said about themselves, "Thirty years ago, we pioneered the kettle cooking style that’s become the gold standard for all-natural hand-cooked potato chips. We cook real, unpeeled potatoes in small batches for a superior taste and a signature crunch. And we continue to pioneer bold, unique flavors that people really seem to love. Did we mention we got our start selling our chips out of a van? It doesn't get much realer than that."

So no wonder I didn't know about them years ago. That potato-chip-selling van probably never cruised my neighborhood.

It must be a popular product, because apparently there are a lot of copycats on the market, playing off the "Kettle" concept. But the folks at #TheRealKettleChips say, "We’ve been making great-tasting, all-natural chips since 1982. When you open a bag of Kettle Brand Potato Chips, you know you’re getting real chips made with real ingredients by real people."

@KettleChips is encouraging everyone to answer the question, "Why is real food important to you?" over here. Everyone who answered will be entered to win $250 on that site.

And if you're concerned about such things, they had the first potato chip verified by the non-GMO project and will have 16 of them verified soon. They're working on having all of their products verified as soon as possible.

Also, there are no trans-fats, no preservative, no MSG, and no artificial flavors or colors. You can also find lower-fat and baked chips, as well as organic chips and even an unsalted chip. Something for everyone.

But what about the flavor? I didn't try every flavor they make - there are 24 different flavors - but I did some serious sampling with help from my chip-munching husband, and so far we've liked the flavors we tried. It's not just the flavor, though. I like the texture. Solid enough to hold some serious dip, but not tooth-breakingly hard. Just enough crunch.

And a nice amount of flavor without making you feel like you're dipping straight into a spice jar with a spoon. I mean, yeah, I want a lot of flavor, but I also want to know I'm eating a potato chip.

Want to know what the 24 flavors are?
The regular chips are:
  • Sea Salt & Vinegar
  • Sea Salt
  • Jalapeño
  • Backyard Barbeque
  • Spicy Thai
  • New York Cheddar
  • Honey Dijon
  • Sour Cream and Onion
  • Sweet Onion
  • Fully Loaded Baked Potato
  • Unsalted
  • Cheddar Beer
  • Jalapeño Jack
  • Red Chili Salsa with Mesquite
Krinkle Cut chips are:
  • Zesty Ranch
  • Buffalo Bleu
  • Salt & Fresh Ground Pepper
  • Cheddar & Sour Cream
  • Classic Barbeque
  • Sea Salt
Reduced Fat chips are:
  • Reduced Fat Sea Salt
  • Reduced Fat Krinkle Cut Sea Salt & Vinegar
  • Reduced Fat Salt & Fresh Ground Pepper
Baked chips are:
  • Bakes Sea Salt & Vinegar
  • Bakes Honey Hickory Barbeque
  • Bakes Sea Salt
  • Bakes Cheddar & Roasted Tomato
  • Bakes Sour Cream & Onion
Organic chips are:
  • Organic Country Style Barbeque
  • Organic Sea Salt
  • Organic Salt & Fresh Ground Pepper
  • Organic Sweet Chili Garlic
My favorite (so far) is the Buffalo Bleu, but I certainly haven't tried them all. If you're looking for a different sort of dip, this avocado dip is pretty danged good, and it was perfect with those Buffalo Bleu chips. Unlike guacamole, this dip doesn't go brown quickly, so you can make a larger batch and keep it refrigerated for use over several days.

Avocado Dip

1/2 cup Greek-style yogurt
1/2 avocado
1 teaspoon dry chopped chives or 1 tablespoon fresh chives
1/2 teaspoon dill weed
Pinch of salt
1 teaspoon lime juice

Combine all of the ingredients and blend well, mashing the avocado until the mixture is smooth. It's fine if you have a few "bumps" of avocado, but this isn't meant to be chunky.

Serve cold or at room temperature and keep unused portions refrigerated.

This is a sponsored conversation written by me on behalf of Kettle Brand. The opinions and text are all mine.

Saturday, April 27, 2013

Avocado Salad

This is a Sponsored post written by me on behalf of Avocado App. All opinions are 100% mine.

If you’ve read my blog at all, you probably know that I have a serious love affair with avocados. Me, guacamole, and a spoon. *swoon*

Oh yeah, and I share with my husband. 

And we use chips, too. Or put guacamole on sandwiches or nachos. Or slice the avocado and layer it with tomato and mozzarella and drizzle with a little lemon olive oil. *swoon* again.

And now Cinco de Mayo is around the corner, so it’s the perfect time to go crazy with avocados.

There's an app...

But avocados aren’t just avocados. There’s an Avocado app for iPhone, Android, and web users that’s sort of like a personal messaging system. 

We didn't have cell phones back then. 
Two people sign up for a joint account, and you message between the two of you. No one else can see the messages, so there’s no risk you’ll message a Facebook friend to pick up a quart of milk and then wonder when hubby shows up empty-handed.

Or, you know, whatever messages you want to send to your sweetheart. These days our messages are more practical than they might have been a few (many) years ago. But this is a cool way to keep in touch.

But I'm all about the recipes

This one is a cross between guacamole and salad. Appropriate eaten with chips, or as a side dish.

Avocado Salad

1 tomato
1/2 green pepper
1/4 cup lime-pickled red onion (see instructions below*)
1/4 cup cilantro
12 pitted black olives
2 ounces chevre
1/2 teaspoon salt
1 avocado
2 teaspoons lime juice

Dice the tomato and green pepper and add to a medium bowl. Cut the pickled red onion into similarly-sized pieces and add to the bowl.

Chop the cilantro roughly and add it to the bowl. Cut the olives in half or slices (your choice) and add to the bowl. Break the cheese into pieces and add to the bowl. Sprinkle the salt on top and add the lime juice. Mix well.

Scoop the avocado flesh out of the avocado and add it the bowl. Mix gently. The goal is to mix the ingredients without breaking up the avocado too much.

Serve chilled.

*To make the pickled red onions, peel, quarter, and slice one red onion. Stuff it into a pint jar. Add a pinch of salt and enough fresh lime juice to cover all the onions. Refrigerate the onions until they are evenly pink. You can eat them sooner, but they’ll still have the onion “bite” to them.

 photo b58c3aa5-dc72-4281-a6ab-8816b01b7ab5_zpse92c1fc2.jpg

Want more? 

Check out the Cinco De Mayo recipes on the Avocados from Mexico website.

Visit Sponsor's Site