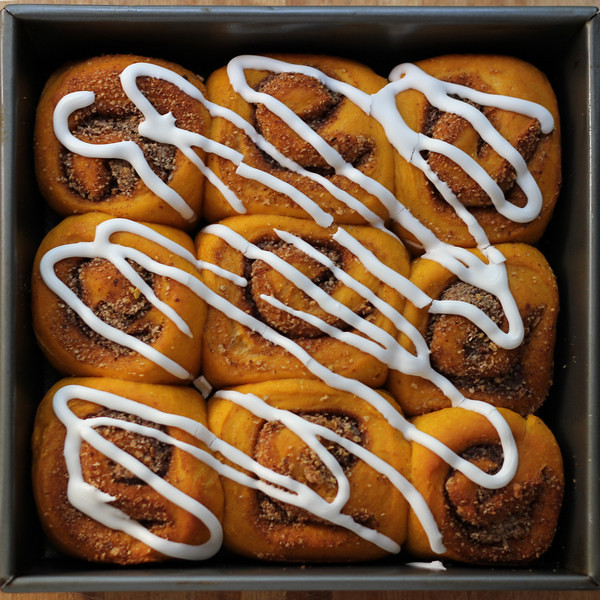
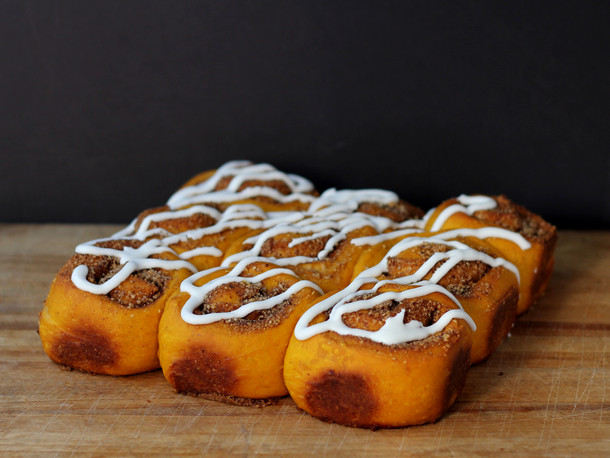
 Who says pumpkin's just for dessert? These sweet buns are perfect breakfast treat. The sugary drizzle is optional, but pretty.
The great thing about this recipe is that you do most of the work the night before, then refrigerate the formed rolls and bake them the next day.
The dough continues to rise in the refrigerator and the buns are ready to bake the next morning ... or afternoon ... or evening. After a while, the cold temperature slows the rise, so the buns can happily spend more time in the refrigerator with no ill effect.
Of course, there's a limit. Sooner or later, the dough will over-rise or the gluten will degrade and you'll have a pan full of sludge instead of a pan full of buns. So keep that in mind.
Pumpkin Sweet Swirl Buns
Makes 9 rolls
1/2 cup lukewarm water
2 1/4 teaspoons active dry yeast
1/4 cup sugar
13 1/2 ounces (3 cups) bread flour
4 tablespoons unsalted butter at room temperature
1 teaspoon salt
1/4 cup hazelnut meal
1/4 cup sugar
1/4 cup graham cracker crumbs
2 teaspoons cinnamon
In the bowl of your stand mixer, combine the pumpkin puree, water, yeast, sugar, and bread flour. Knead with the bread hook until the dough becomes smooth and elastic - this will take some time - figure 7-10 minutes.
Add the salt and butter and continue kneading until the butter is completely incorporated into the dough.
Cover the bowl with plastic wrap and set aside for 1 hour. The dough should have visibly risen, but it doesn't have to double in size.
Flour your work surface and spray a 9-inch square pan with baking spray.
 Turn out the dough and form it into a rough square - this makes it easier to keep it square as you roll it. With a rolling pin, roll it to about 10 x 18 inches.
In a small bowl, combine the hazelnut meal, sugar, graham cracker crumbs, and cinnamon. Spread this mixture evenly over the top of the dough, leaving about 1/2 inch uncovered on one of the long sides.
Starting from the other long side, roll the dough up loosely, and when you reach the uncovered edge, seal the seam by pinching it together.
If there are any sections of the dough that are fatter, roll it gently so the whole roll is approximately the same diameter.
Cut the roll into nine even pieces. Place the pieces, cut side down, in the pan. The filling is quite loose and will want to come out as you lift the pieces the easiest way to move them without losing a lot of filling is to flip the pieces onto a large dough scraper and move the to the pan and slide them off. When you've moved all nine pieces to the pan, scoop up any of the filling that's left on the counter and sprinkle it over the buns.
Cover the pan with plastic wrap or put it in a large plastic bag and close the bag. Refrigerate overnight or up to 24 hours.
When you're ready to bake, remove the pan from the refrigerator and let it rest on the counter while you preheat the oven to 350 degrees. Remove the plastic wrap (or remove the pan from the plastic bag) and bake at 350 degrees until the buns are nicely browned, about 40 minutes. If you're not sure if the buns are done, you can take the dough's temperature - it should be about 200 degrees, but make sure you're checking the temperature of the dough and not the sugar filling.
Let the pan cool on a rack. Drizzle the buns with a sugar icing, if desired (powdered sugar and just a bit of water to reach a drizzling consistency).
