Showing posts with label spicy. Show all posts

Monday, March 19, 2018

Some Green Sauce #AbramsDinnerParty

So, I was browsing through my most recent acquisition from #AbramsDinnerParty (where I get free cookbooks) and I ran across a recipe for a green sauce that's supposed to be much like That Green Sauce sold by the HEB food stores.

Wait, let me back up a bit.

The cookbook is The Austin Cookbook by Paula Forbes. It's all about recipes "from deep in the heart of Texas," so of course I expected a lot of beef, and some Tex-Mex. But when I saw that sauce recipe ... I kind of swooned.

You see, a while back, someone sent me a jar of That Green Sauce, and I put it on everything until the jar was empty. And then I kind of whimpered because that sauce isn't available here. Waaaah!

So I was pretty excited to see that recipe. And I was stunned to see how easy it is. Apparently this type of sauce is pretty popular around Austin, and the one sold by HEB is just one of many versions of that type of green sauce. But ... the HEB version was the first one of its kind that I tried, so it's the one that I wanted to find a recipe for.

Now that I've made it, I have a feeling I'll be making it again.

With variations. Many variations. Because now that I know how it's made, I can adjust the heat, add spices or herbs, and just generally mess around with the recipe. I might even order some of That Green Sauce so I can do some taste tests and see how close I can get to the original.

And now you can make it, too!

The Green Sauce

Adapted from The Austin Cookbook by Paula Forbes

Store-bought green salsa or Salsa Macha Verde (recipe follows)
Vegetable oil
Yeah, that's it. Just two ingredients.

Puree the salsa in a food processor or blender until it's almost completely smooth, then start slowly drizzling vegetable oil into the salsa while the processor is running.

You'll add about one cup of oil for the Salsa Macha Verde, which made just about a pint of salsa.

Continue adding the oil until you have a creamy but runny sauce - it should not be as thick as mayonnaise. And it will thicken just a little when you refrigerate it. Not a lot, but a little.

And there ya go. The oil makes the sauce creamy, which is why a lot of people think it has avocado in it.

Needless to say, the sauce will taste like your salsa, except creamier and perhaps a little milder.

Salsa Macha Verde
Adapted from The Austin Cookbook by Paula Forbes

6 large jalapenos
2 garlic cloves
Salt
Juice of 1 large lime

Grill, roast, or toast the jalapenos until you have grill marks or they've acquired some black spots (I used a roti grill). Remove the stems and put the jalapenos in a food processor or blender.

Add the garlic, a couple pinches of salt, 1 tablespoon of water, and the lime juice. Process or blend until it's as smooth as you like.

Now just carry on to make THE GREEN SAUCE.

Note: Since I used my Vitamix blender, the jalapeno seeds were blended to smithereens ... and this also helped to make the sauce rather spicy. If you prefer a less spicy version, remove the seeds - some or all - along with the inside ribs. This will help to make the sauce less spicy.

Another recipe that I thought was interesting - and that wasn't at all Tex-Mex - was the mustard and brown sugar crusted steak that was first cooked, then rubbed with a butter and mustard mixture, and then sprinkled with brown sugar, and then broiled to get the sugar caramelized. I've never had a steak quite like it. And then I made another one just like it the next day.

I'll just leave this here for you.


In case my statement at the top wasn't totally clear, I got this cookbook for free from the publisher.
Yum

Monday, September 5, 2016

Cocoa Puff Waffles with Zesty Cocoa Puff Honey #Sponsored

Sponsored by Big G General Mills Cereals.

I used to think that honey was just honey. Then I found out about varietal honeys that come from bees that feed on specific flowers. Then I found out about hot honey. No, the bees don't feast on pepper flowers - the spice is added to honey.

And that's part of how this recipe came about.

My buddies the Big G Cereals team at General Mills challenged me to come up a with a recipe using Cocoa Puffs for a sponsored post, and the first thing I thought of was adding something spicy, because chocolate and spice are such good friends. And then spice immediately led to hot honey.

I had a few different ideas before I settled upon waffles studded with Cocoa Puffs along with a spicy chocolate honey. If you're not fond of spicy foods for breakfast, you can certainly leave out the cayenne. Chocolate honey is still pretty darned good.

These waffles aren't super-sweet on their own. And if you haven't had Cocoa Puffs in a while, you might want to know that they aren't super-sweet, either. They've got a nice chocolate flavor, but they're not like candy. I really love that.

The reason General Mills is sponsoring this post right now is that September is National Whole Grain Month and whole grain is the first ingredient in all General Mills Big G Cereals - including the Cocoa Puffs I used, which are made with whole grain corn. In all Big G cereals, there is more whole grain than any other single ingredient, including sugar from all combined sources. That's pretty impressive.

No wonder those Cocoa Puffs weren't super-sweet.

A whopping 95 percent of Americans don't get enough whole grain in their diet. Pretty amazing, considering how many folks are so interested in healthy foods these days. And fiber - which is one of the nutrients you'll find in whole grain - is something people are concerned about.

I've been trying to improve my diet, and swapping whole grains for more refined grains is part of the plan. I'm not going to completely give up refined flours - moderation is my mantra - but I've been swapping in whole grains when they make sense.

And by make sense, I mean that the food has to taste good. I've tried some whole grain products that made me feel like I was eating mulch. Sorry, but no.

So, to make these waffles even more better for me, I added a good dose of whole wheat flour. Sometimes whole wheat is tricky to work with - you can't always substitute it 1:1 for white flour in a recipe. Or you can, but sometimes you end up with a product that's a little too dense. So most of the time, I use some whole wheat and some white flour. See? Moderation.

I tweaked this recipe a few times, messing with the liquids and the flours, trying to get exactly the right flavor and the right texture. My last tweak was actually a mistake - I grabbed the bread flour instead of the all-purpose flour, and I really liked the result. The waffles were soft and fluffy on the inside with a nice crisp brown on the outside.

Meanwhile, the Cocoa Puffs added a little bit of chocolate in every bite.

As far as the honey - if you have any left after you've stuffed yourself with waffles, try it drizzled on fried chicken. Trust me.

Zesty Cocoa Puff Honey
Makes a little more than 1 cup of honey

1 cup Cocoa Puffs
1 cup honey
Pinch of cayenne pepper (or to taste)
Pinch of salt (optional)

Put the Cocoa Puffs in a blender and blend until the pieces are as small as you can get them. Add the honey, a small pinch of cayenne pepper, and the salt, if using. Blend until the Cocoa Puffs are incorporated into the honey. Scrape down the sides of the blender, if necessary.

When this is first blended, there will be small crunchy bits in the honey, but they soften and dissolve as the mixture rests.

Taste for seasoning and add more cayenne, if desired. Wait about 10 minutes, then blend again, to incorporate the softened bits of Cocoa Puffs. Transfer to a container for storage and serving.

Cocoa Puff Waffles with Zesty Cocoa Puff Honey
Makes 6-8 waffles (depending on your waffle maker)

2 eggs
1 cup bread flour (use all-purpose flour if you don't have bread flour)
1 cup whole wheat flour
1 tablespoon baking powder
1 tablespoon sugar
1/2 teaspoon salt
3/4 cup buttermilk
1 1/4 cups whole milk
1/2 cup vegetable oil
1 teaspoon vanilla extract
1 cup Cocoa Puffs (a little bit more won't hurt)

Heat your waffle maker while you make the waffle batter.

Put the eggs in a medium bowl and beat with a whisk until they are well blended and a little lighter in color.

Add the rest of the ingredients (except the Cocoa Puffs) and mix until the batter is smooth. Stir in the Cocoa Puffs.

Pour the waffle batter into the waffle maker, using the amount appropriate for your particular waffle maker. Cook until nicely browned.

Serve with butter (if desired) and the Cocoa Puff honey.

If a stack of waffles is too much for you to tackle, cut the waffles in quarters and serve them with the Cocoa Puff honey as a dip. Perfect for smaller appetites!

Thanks to General Mills Big G Cereals for sponsoring this post!
Yum

Friday, December 18, 2015

Enchiladas Suisas and a #giveaway

I love enchiladas, so the fact that there's an entire book about them makes me just a little giddy. I was invited to participate in a book tour for the book and I got the chance to make some amazing enchiladas.

Enchiladas suizas were one of my favorites, dating way back to when Bob and I were dating. Suizas, I was told, meant that the enchiladas were Swiss-style, which refers to the dairy products used. These enchiladas have a creamy green sauce and are topped with cheese.

Mmmm. Cheese.

The instructions are long, but that's because they're detailed. These are actually very easy to make, and you can make some of it ahead of time, like the sauce that can be made and refrigerated until you need it, and the chicken that can be cooked, shredded, and refrigerated until you're ready to assemble.

I had more sauce than I thought I needed, but when I reheated, I added more sauce, because it's really good. I've also used some on tacos. Next time I make these, I might mix some sauce into the shredded chicken. It's a really good sauce. I can see using it for a LOT of things.

Here's what you can WIN in the Giveaway (see the entry at the end of the post):


Enchiladas Suizas
Reprinted from Enchiladas: Aztec to Tex-Mex Copyright © 2015 by Cappy Lawton and Chris Waters Dunn. published by Trinity University Press.
Makes 12 enchiladas

Ingredients:
For the sauce:
1 pound (454 grams) tomatillos, husks removed, cored
1–2 serrano chiles, destemmed
1⁄2 medium white onion, peeled, coarsely chopped, and root end removed
3 cloves garlic, peeled
3⁄4 bunch cilantro
Chicken broth as needed for thinning sauce
1 tablespoon (15 ml) vegetable oil
1 cup (237 ml) crema Mexicana
Kosher salt to taste

For the filling:
2 cups (260 grams) poached and shredded chicken

For the assembly:
12 white corn tortillas
Vegetable oil as needed for softening tortillas
2 cups (240 grams) queso asadero, queso Chihuahua, or Emmentaler Swiss, grated

For the garnish:
1 cup (237 ml) crema Mexicana, or to taste
1 medium white onion, peeled and thinly sliced
Cilantro leaves to taste

Directions:
Start with the sauce:
Place the tomatillos, chiles, onion, and garlic in a saucepan, cover with water, and
bring to a boil.

Reduce heat to a simmer and gently cook until the tomatillos change color but
do not burst.

Using a slotted spoon, transfer vegetables to a blender.

Blend the vegetables until smooth, adding chicken broth as needed to achieve a
medium sauce consistency.

Add cilantro and process for a few seconds more.

In a saucepan over medium heat, place 1 tablespoon (15 ml) oil.

When it is hot, add the sauce and cook for a few minutes until warmed through
and slightly thickened.

Reduce to a bare simmer and stir in crema Mexicana. Heat the sauce through,
but do not let it boil.

Remove from heat and season with salt to taste. Cover, set aside, and keep warm.

Assemble the enchiladas:
The authors.
Preheat the oven to 350°F (177°C).

Pour oil to a depth of 1⁄2 inch (12 mm) in a heavy skillet over medium-high heat.
Heat to low frying temperature, about 300°F (150°C).

Place each tortilla in the oil and fry for a few seconds, just long enough to soften.
Drain on paper towels.

Fill the lower third of a tortilla with 2 tablespoons shredded chicken, roll, and
place seam side down in an ovenproof baking dish large enough to accommodate
the enchiladas in a single layer.

Repeat with the remaining tortillas.

Generously cover with the sauce, making sure the edges of the enchiladas are
well covered.

Sprinkle queso asadero or queso Chihuahua on top.

Bake in a preheated oven until the enchiladas are heated through and the cheese
is melted and brown in spots, about 15 minutes.

Garnish with crema Mexicana, onion slices, and cilantro leaves.

Note: These enchiladas are intended to be flavorful but not spicy hot, so use chiles accordingly.

I used purchased tortillas (we have some good ones out here) but there's a recipe for homemade tortillas in the book, and the authors created an awesome video as well. Check it out!


For more information, check out the book's website, Pinterest, and Facebook.

Giveaway has ended.
Yum

Monday, September 21, 2015

Idaho Home Fry Potato Salad with Poblano Mayonnaise

Potato salad is a welcome guest at pretty much every party, and for sure it plays well at tailgating parties along with all the typical grilled foods. Keep it chilled in your cooler until serving, then just bust out the bowl and serve - no muss, no fuss.

But of course, you don't want to make the same old potato salad that everyone's mom and grandmother has hauled to every picnic and potluck since the dawn of time. This one includes zucchini for a little extra crunch and a fire-roasted poblano pepper for a mild heat.

The last twist is that the potatoes are cooked twice - first boiled and then lightly pan-fried to add a rich, savory, roasted flavor to the potato salad.

Idaho® Home Fry Potato Salad with Poblano Mayonnaise

For the potato salad:
2 pounds Idaho® potatoes (smaller ones; not bakers), boiled in their skins until done, then cooled
2 tablespoons olive oil
2 scallions
2 celery stalks
1 small zucchini
6 eggs, hard boiled and peeled
1/4 cup parsley
For the poblano mayonnaise:
1 poblano* pepper, roasted, peeled, and cored
1/2 cup mayonnaise
1/2 cup Greek yogurt, sour cream, or a mix
1 tablespoon lemon juice
1/2 teaspoon salt (or to taste)

The potatoes can be cooked a day ahead and refrigerated, if it's more convenient. They slice best when they're fully chilled, but it's fine if they're still a little warm after cooking.

Peel the potatoes, then slice into 1/4 inch rounds.

Heat the olive oil in a large pan and brown the potato slices on both sides. You can cook in batches, if necessary, or just add all the slices to the pan and flip occasionally. If you need a more oil to get the potatoes browned, add it as needed. If a few potatoes don't brown during the flipping, it's not a big deal.

While the potatoes are cooking, you can make the mayonnaise. Add the poblano pepper, mayonnaise, Greek yogurt, lemon juice, and salt to a blender or food processor and blend until it's as smooth as you can get it.

Meanwhile, slice the scallions into thin rings and add to a large bowl. Slice the celery stalks lengthwise, then slice thinly and add them to the bowl. Slice the zucchini into thin rounds and add them to the bowl. Chop the parsley and add it to the bowl - save some for garnish, if you like. Peel and chop the eggs roughly and add them to the bowl.

Add about half of the mayonnaise to the vegetables in the bowl and stir. When the potatoes are done, add them to the the bowl, add the remaining mayonnaise, and stir gently, trying not to break up the potatoes.

Refrigerate the potato salad until chilled. Garish with the reserved parsley before serving, if desired.

*Poblano peppers aren't super-spicy, so this isn't going to set your hair on fire - it just adds a mild hint of heat.

This post was sponsored by Idaho® Potatoes.
Idaho potato salad with poblano mayo
Yum

Friday, September 4, 2015

Quick and Easy Chicken with Hatch Chiles

Don't get me wrong. This isn't fancy food. This isn't something you'd serve the Queen when she showed up. What this is, very frankly, it the meal you make when you want an hour before dinner to just sit and chill.

Or maybe an hour to help problem child with homework.

This uses (gasp) a can of soup. Yes, there I said it. I was inspired (and possibly frightened) by a recent cookbook that passed this way. It was written by Coolio.

Yes, that Coolio.

He's not a cook, but he wrote a cookbook called Cooking with Coolio, and it's a little weird. He has an odd love for balsamic vinegar, and canned soup made its way into a whole lot of recipes.

So I tried one of the canned-soup concoctions. And you know what? I liked it. It was comfort food. He was also pretty heavy-handed on the salt. Just so you know.

Anyway, this is not one of his recipes; not even adapted. The book is now long gone, so I couldn't peek if I wanted to.

I made this in my slow cooker, which is my usual set-it-and-forget-it cooking tool, but you could also make this in a heavy-bottomed pot, like a Dutch oven, either on the stove or in the oven.

Chicken with Hatch Chile

1 tablespoon olive oil
3-4 bone-in, skin-on chicken thighs*
1 red bell pepper
2 fire-roasted and cleaned Hatch** chiles (hot or mild, your choice)
2 tablespoons balsamic vinegar
1/4 cup water
1 can cream-of-something** soup
1/2 teaspoon salt
Chives or the green part of a scallion, for garnish (optional)

Heat the oil in your slow cooker (if it's got a stovetop/browning function) or in a pan on the stove. Or in your Dutch oven, if that's what you're using. Add the chicken, skin-side down, and cook until nicely browned. Flip the chicken over and cook the same way on the other side.

You can prep the vegetables while the chicken is browning.

Core the bell pepper and cut into a large dice. It doesn't need to be pretty. This is rustic food. Add to the pot when the chicken is browning on that second side.

Combine the peppers, balsamic vinegar, and water in a blender. Or you can use a stick blender or food processor. No tools like that? Just chop the peppers as finely as you can. Otherwise, blend the pepper mixture until it's as smooth as it can get.

Add the soup, pepper mixture, and salt to the chicken in the slow cooker and give it a stir. Cook on high for 60-90 minutes, depending on how much down time you need before dinner.

I served this with rice - made in my rice cooker. The rice was great for sopping up the extra sauce. Easy peasy.

Garnish the chicken with a few snips of chives or scallion, if desired.

* Of course, you can use other parts. Whatever you like. Cooking time might be different, though. I like thighs for the slow cooker because they're so forgiving as far as overcooking is concerned.

** If you don't happen to have freshly fire-roasted Hatch chiles waiting to be used, you can substitute with whatever you happen to have, or that you like.

*** I used cream of chicken, but you could use cream of mushroom, cream of celery, or even cheddar cheese soup.
Quick and Easy Chicken with Hatch Chiles
Yum

Tuesday, August 18, 2015

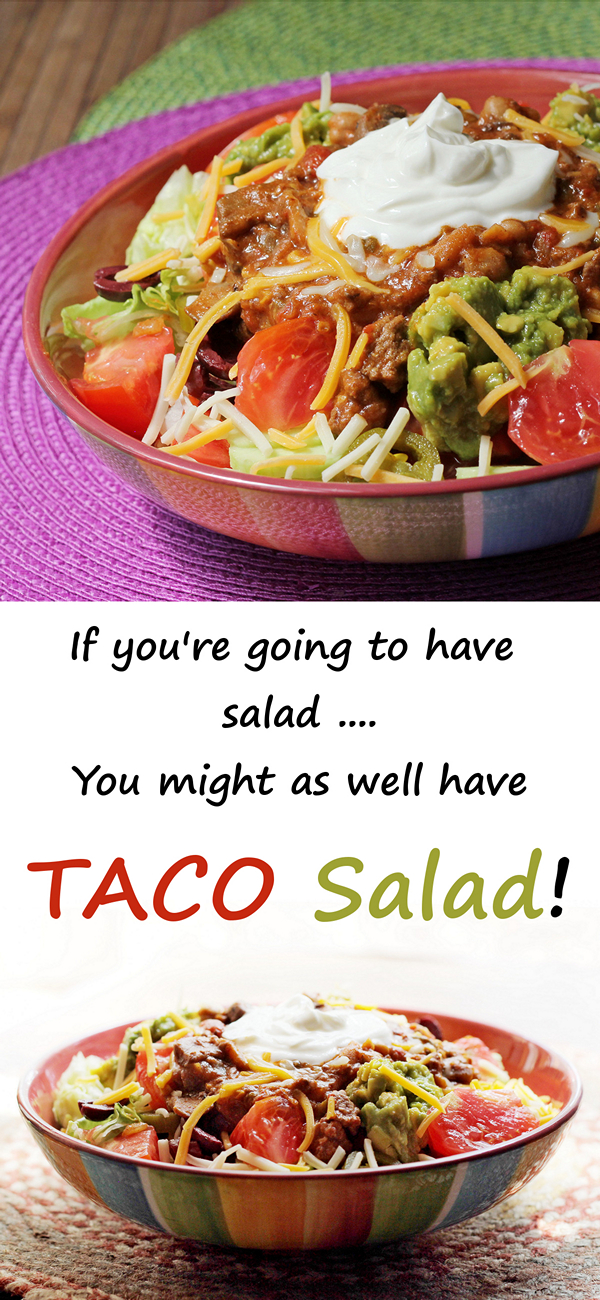
Taco Salad

A long, long time ago, I had a job that required that I spend countless hours driving all over the Chicagoland area.

On some days, I went out to lunch with customers. Most days, I ate lunch alone.

If I was in a hurry to get from one side of town to the other, I sometimes grabbed fast food. But if I was close to my next appointment and it was lunchtime, I had plenty of time to have a decent meal.

I had some criteria for where I dined. For example, I didn't like getting seated at a tiny table, even though I was alone. Sometimes I brought work with me to read over, and sometimes I brought a book. I didn't need a huge table, but I wanted a little bit of elbow room, if the restaurant wasn't crowded. It irked me to be seated at a tiny table if the restaurant was only 1/4 full, so I tended to avoid those sorts of places.

As far as food, I wanted something filling enough to get me through the rest of the day, but not so heavy that I'd want a nap in a couple hours. I also didn't want a super-expensive lunch. This wasn't a special treat, it was just an everyday lunch.

And I didn't want something messy. After all, I was going to be visiting with customers after lunch.

Over time, I found favorite places in many of the areas where I had customers, and I had favorite dishes at many of those restaurants. One of my favorite lunches was served at a Mexican restaurant, but it certainly wasn't a traditional Mexican dish. It was taco salad.

The salad was served in an oversized flour tortilla that was deep-fried in the shape of a bowl. While a giant deep-fried tortilla wasn't exactly the most healthy thing to eat, the rest of the salad was reasonably healthy.

I haven't had one of those salads in years, and I'm not sure why not - it's pretty easy to assemble as long as I have chili on hand.

I don't bother with the giant deep-fried flour-tortilla bowl - I just use a normal shallow bowl.

The appeal of this salad is the contrast between the warm chili and the chilled salad ingredients, as well as the spiciness of chili and jalapenos contrasting with the creaminess of the sour cream.

If you look at it, a taco salad is very similar to nachos, with crisp lettuce instead of crunchy chips. And probably with less cheese - depending on how your make yours.

Just like any salad, you can modify it to suit your tastes. You could even add a handful of tortilla chips, if you like.

Taco Salad

Romaine or iceberg lettuce
Sliced zucchini or cucumbers
Pitted olives (sliced, if you like)
Tomatoes, cut in wedges or bite-sized chunks
Pickled jalapeno peppers, sliced
Sliced or cubed avocado or guacamole
Shredded cheese
Chili (home made preferred, but a good canned brand is fine)
Sour cream or Greek yogurt

Scatter the lettuce in a shallow bowl. I aim for a salad that's at least half lettuce compared to the rest of the toppings, but make it the way you like.

Add the zucchini and/or cucumbers, olives, tomato, and jalapeno over the top of the lettuce. add a few small dollops of guacamole or slices of avocado around the edges.

Add the chili in the center. Sprinkle with cheese, and top with a dollop of sour cream or yogurt.

Serve immediately.

Note: this salad would also work well as a built-it-yourself meal with all of the ingredients available for everyone to add as much or as little of each item as they like.
If you're going to have salad, you might as well make it a taco salad, right? Want some chips with that?Want some taco salad? I know you do!
Yum

Saturday, August 15, 2015

Watermelon and Peach Salsa

Oh my gosh, this salsa is good. You need to try it!

This started as a what-if, and I have to admit that I was a little bit skeptical of my own idea. I've made fruit salsas before, usually with mango or peach. But ... watermelon?

It totally worked.

Not only did it work but it was oh-my-gosh amazing.

The interesting thing was that as the mixture sat, it exuded a bit of liquid and the watermelon seemed to get a little denser, in a very good way.

I just can't say enough about how ridiculously good this is.

I made a pretty small batch because there are only two of us, but this could easily be doubled or tripled or quadrupled for a party.

And of course, adjust the heat to your liking. If you want to add more heat right off the bat, leave the seeds and ribs in the jalapeno. Or just add the other half of the pepper.

Watermelon Peach Salsa

1 tablespoon finely diced onion
1/2 jalapeno cored, seeded, and finely diced
2 teaspoons lime juice
1/2 teaspoon salt
1 cup cubed watermelon (about 1/4-inch pieces)
1 peach, peeled, pitted, and cut in bits about the same size as the watermelon
1/4 of a red bell pepper, cored, seeded, and cut a little smaller than the watermelon

Put the onion, jalapeno, lime juice, and salt in a small bowl while you prep the rest. The lime helps mute the sharpness of the onion and at the same time it picks up some of the heat of the jalapeno so it can mingle better with the fruits.

Add the watermelon, peach and bell pepper (I used red, but yellow or orange would look nice as well).

Stir to combine.

You can certainly serve this right away, but I think it improves with a little time to rest and let the flavors mingle - at least an hour, if possible.

The fruit exudes quite a bit of juice, so you can drain some of it before serving - but don't get rid of all of it, since there's a lot of flavor in that juice.
Watermelon and Peach Salsa
Yum

Monday, August 3, 2015

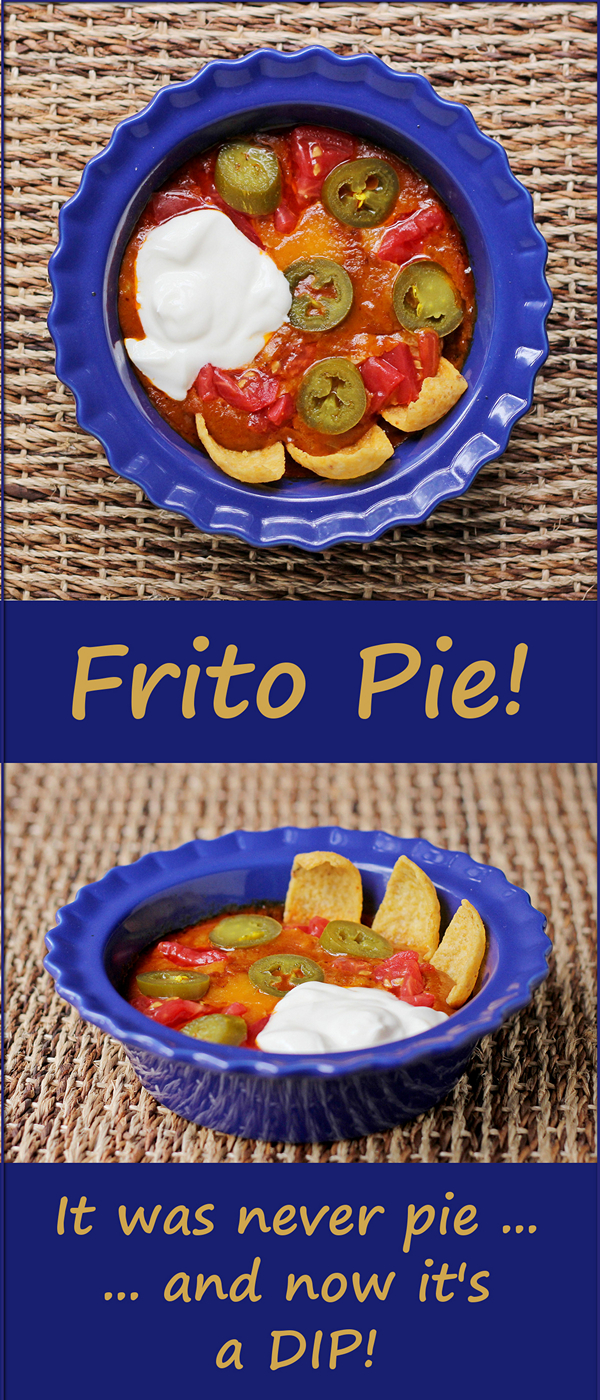
Frito Pie - It was never pie, and now it's a dip!

Last night I was watching a re-run of Hawaii 5-0 and the plot revolved around a surfer who was murdered. At the end of the show, a bunch of surfers paddled out into the ocean and formed a circle and spread the ashes of their deceased friend.

For me, it was a completely foreign ritual, and also very moving.

Particularly because a friend of mine had died suddenly, and I've been a bit weepy.

I started thinking about the rituals we have in our different cultures. Our religions and our ethnic groups and even our geographical locations dictate what sort of things we do when a friend or loved one dies, ranging from the mournful playing of a bagpipe, to a 21-gun salute at a military funeral, to the joyous celebration of life as it's done in New Orleans.

In those instances, mourners gather together to comfort each other in a way that is familiar to them. Different cultures have developed different rituals, but the purpose is the same. They help people move beyond the grieving to the point where they can think of their loved one with a smile and a fond memory.

Besides the usual geographic and familial cultural groups I'm a part of, I also belong to relatively new and unique culture. It spans many religions and nationalities and pays no attention to geography. We're a loosely connected and firmly knotted group of people who go online and bond over food and fun. We talk every day. We laugh, celebrate, kvetch, and sometimes cry. We are close friends, even though many of us have never met in person.

But when one of us dies, the rest of us can't hug or hold hands or perform rituals together. We can't eat funeral potatoes or hot dish or go to that one restaurant where everyone goes after a funeral. We're a new sort of tribe, we don't have those generations-old traditions, and we're not geographically close enough to get together for happy or sad events.

The funny thing is that new rituals have emerged, all by themselves. I guess people need a way to bond and celebrate the lives of those who have touched us. With our group, we talk about our friend's favorite food or their signature recipe. We choose a time to raise a glass in a tearful toast. We make their recipes. We post photos. And we are comforted because we know that despite the distance between us, we have a bond.

Don't those Fritos look happy in their chili and cheese spa?
My friend Chris Hughes, who recently died, was from Texas and one of her favorite foods was Frito Pie. So when we started talking about her recipes, people suggested that we make Frito Pie in her honor. I said, "Sure, I'll make it." Then I said, "What's Frito Pie?"

And I got a dozen or so answers. I looked it up on the Frito website. I asked more people. The only constants in the recipes were Fritos, chili, and cheese. Canned chili was a popular choice, with Wolf brand being a favorite among the Texans in the group, since it's a Texas product.

Some people put the chips on the chili, other people put the chili on the chips. Some people mixed it all up in a small bag of Fritos and ate it straight from the bag, and others put it in a casserole dish. Some people ate it with a fork or spoon. Some people layered it. Others mixed it. Some baked it and some didn't. And then there were toppings.

I was confused. It sounded like a cross between nachos and chilaquiles, but with chili and Fritos.

And then someone said that it doesn't matter - just make it the way you like it.

That totally sounded like what Chris would say, because she really liked to change or modify recipes to make them her own. When presented with the challenge to make a recipe from my cookbook, she turned blueberry and cream cheese sweet rolls into candied jalapeno and cream cheese rolls. I was totally impressed.

So I embarked on my Frito Pie adventure knowing that whatever I did would be okay.

My first attempt was with Fritos on the bottom, chili on top, followed by cheese. I baked it to melt the cheese, and topped it with onion, tomato, sour cream, and jalapenos. It was good, but I had leftover chili, so I decided to try something different for lunch the next day.

I didn't want to turn the oven on for a lunch portion, so I turned Frito Pie into a dip. I used a mini pie plate - hey, it's called pie, so why not - and put the chili and cheese in the microwave to warm them. And I scooped it up with crisp Fritos. Totally not like what anyone else told me to do.

Oh, and since I'm a midwesterner rather than a Texan, I used chili with beans. Apparently Chris was okay with that, too.

This one's for Chris!

Frito Pie

Wolf brand chili
Shredded cheddar cheese
Chopped onions
Chopped tomatoes
Pickled jalapenos
Sour cream
Fritos

For a single serving, put the chili (as much as you think is one serving!) in a microwave-safe bowl, and add the cheese. As much cheese as you like. If you want to take a little of the "bite" out of the onions, you can add them as well.

Microwave on high for 30 to 60 seconds, until the chili is hot and the cheese is melted.

Add onions (if you didn't add them before cooking) tomatoes, jalapenos, and sour cream.

Use Fritos to scoop up the chili. I nestled three into the dish for photos, but grabbed chips from the bag for the rest of the scooping. Remember, there's no wrong way to do it!

Have you had Frito Pie? How do you like yours?
Frito pie was never a pie - and now it's a dip!
Yum

Wednesday, July 22, 2015

Cheesy, Spicy, Sweet and Nutty Snack Mix

I've always liked Chex Mix, but I've never really found that ultimate recipe that I wanted to make over and over again.

Until now.

The inspiration for this creation was traditional Chex Mix, of course, but also a popcorn mix that's sold at my local farmer's market. That mix includes a spicy cheese popcorn mixed with caramel corn. I don't buy it often, because I devour it way too fast.

Chex Mix can be spicy, but I thought that the addition of cheese and sweetness would make it unbeatable. Turns out I was right.

The mix of sweet toffee-coated nuts, spicy buffalo flavored nuts, crunchy buttery toasty cereal, all coated in salty savory cheese powder makes perfect snack mix.

Cheese powder can be found online from spice shops, or from companies that sell popcorn supplies. There is also a cheese-flavored popcorn topping that you can find at grocery stores, but I don't recommend it - it can be way too salty, well before you taste enough cheese.

Even so, taste the cheese powder before you start. If it seems salty, you can skip the salt in the recipe and keep the saltiness in mind as you add the cheese powder.

The nuts I used were from Truly Good Foods supplied to me via 37 Cooks for a blogging challenge.


Cheesy, Spicy, Sweet and Nutty Snack Mix

3 tablespoons unsalted butter
2 teaspoons worcestershire sauce
1/2 teaspoon salt
1/4 teaspoon onion powder
Pinch of garlic salt
5 cups Chex cereal (mixed or all one type)
1 cup Cheerios cereal
1 cup Buffalo Nuts
1 cup Butter Toffee Peanuts
1/4 to 1/2 cup cheese powder

Put the butter on a large sheet pan and place it in the oven while you heat it to 250 degrees. When the butter is melted, add the worcestershire sauce. Sprinkle on the salt, onion powder, and garlic powder so it's fairly well evenly distributed.

Add the cereals and stir and toss to coat the cereal with the butter and seasonings.

Place the pan in the oven and cook for 45 minutes, stirring every 15 minutes.

After 45 minutes of baking, add 1/4 cup of cheese powder and stir. The cheese will stick to the cereal. Add more cheese powder, if desired. I added another 2 tablespoons and I was happy with that, but more would not be terrible, either.

Add the nuts and stir to combine.

Cook an additional 15 minutes, then remove the pan from the oven and let the mix cool before storing.

This makes about two quarts worth of snacks, which is fine for family use, and it's simple enough to make again and again and again and again whenever you want more.

Ahem.

But if you're making this for a party, I suggest doubling or quadrupling the recipe. It will disappear pretty quickly in a setting where people are nibbling.
Cheesy, Spicy, Sweet and Salty Snack Mix
Yum

Tuesday, June 30, 2015

Chicken with Sunflower Butter, Lime, and Sriracha - a slow cooker recipe

A while back, I posted an ice cream recipe made from a chocolate and sunflower seed butter that I got from a local company called Good Luck Chuck.

While I was pretty fond of that recipe, I have to say that the very first recipe I thought of was a savory one. When I heard there was a sriracha-flavored sunflower seed butter, my first thought was about the peanut dipping sauce for chicken sate.

But I envisioned it as a spicy chicken gravy, sort of. Well, first I was thinking that I didn't want to thread chicken onto skewers, and a spicy nutty sauce would be good as a sauce for chicken thighs.

With those thoughts in mind, I went into the kitchen and started fiddling around with flavors.

The first thing I knew I wanted to do was to make this recipe in my slow cooker. It's warm out (and inside) and the slow cooker doesn't heat up the kitchen. And I don't have to watch it all that carefully.

Chicken with Sunflower Butter, Lime, and Sriracha

2 tablespoons olive oil
4 bone-in, skin-on chicken thighs
1/2 cup Good Luck Chuck Sriracha Sunflower Butter
1/4 cup lime juice
1/2 cup water
2 tablespoons chopped fresh cilantro
2 scallions, thinly sliced, white and tender green
1/2 teaspoon salt
Generous grinds of black pepper

If your slow cooker has a browning setting, heat the olive oil in the slow cooker, then brown the chicken, skin-side down, then flip it over and brown it on the other side.

If your slow cooker doesn't have a browning setting, you can brown the chicken in a skillet, then add it to the slow cooker. You can also skip the browning, but it adds extra flavor to the chicken and helps the texture of the chicken skin.

Add all of the other ingredients, and stir to combine.

Cover the slow cooker and cook on low for 4 hours, or until the chicken is tender.

Check the chicken a few times to make sure there's enough liquid in the cooker - you want a sauce consistency, so add water, if needed, during the cooking process. Depending on your cooker, you might not need to add more.

Taste for seasoning and add more salt, pepper, or lime juice, if desired.

Serve hot, with the sauce.

To take advantage of all of the tasty sauce, consider serving this with rice.

Good Luck Chuck is currently for sale in a limited geographic area, but if you're not in the neighborhood, you can also buy it on Amazon.

Thanks to Good Luck Chuck for sponsoring these posts!
Slow Cooker Chicken with Sriracha, Sunflower Butter, and Lime
Yum